In our previous guide, we covered the essential steps to installing macOS Ventura on a PC or laptop using Virtual Machine and OpenCore. Now, we'll dive into the details of downloading, editing, and upgrading the Custom EFI Bootloader.
Custom EFI consists of files that we have modified to be compatible with different CPUs. Custom EFI includes ACPI files and a Config.plist file that has been appropriately adjusted. The ACPI and Config.plist files typically remain unchanged during usage and are also the most crucial components. ACPI contains the DSDT (Differentiated System Description Table) and SSDT (Secondary System Description Tables) files, which describe the hardware of a PC or Laptop and enable the installation of macOS.
Since Custom EFI only contains ACPI and Config.plist, you will need to download the latest version of OpenCore to supplement other folders such as Kext and Opencore.efi to create a complete EFI set. Therefore, combining Custom EFI with the latest version of OpenCore will make it easier for you to install the latest macOS on your PC or Laptop effortlessly.
How to Download, Edit and Upgrade the Custom EFI Bootloader
Step 1: Identify Your Machine's Hardware Specs
Before diving into the exciting world of macOS installation on your PC or laptop, it's crucial to know your device's hardware specifications. Two key players to keep an eye on are the CPU and Graphics Card. If your machine boasts dual Graphics Cards, make sure to take note of the internal Graphics Card or iGPU.

To access this information, simply search for Device Manager in Windows Search and voila! Take note of the all-important CPU and iGPU details, found in the Processors and Display Adapters sections. Armed with this knowledge, you'll be well on your way to a smooth and successful installation.
Step 2: Download OpenCore Base File
OpenCore always provides the latest updates to fix issues related to the Hackintosh installation process, so it's advisable to choose the most recent versions. First, download the latest OpenCore-RELEASE from the following link.
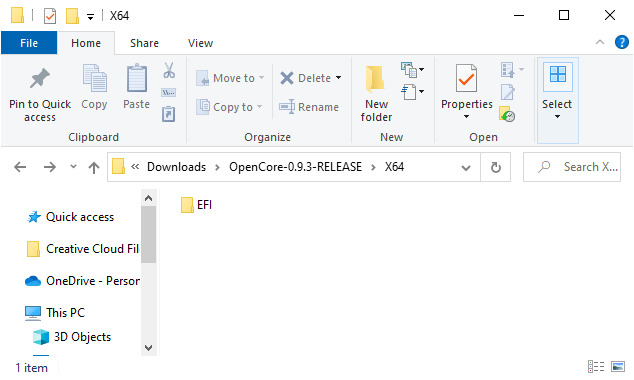
Next, extract the OpenCore files and navigate to OpenCore > X64 > EFI. This directory contains the essential EFI files required for the macOS installation process. However, it still lacks the config.plist file and ACPI files, which we will add in the next step.

Step 2: Download and Copy Custom EFI to OpenCore
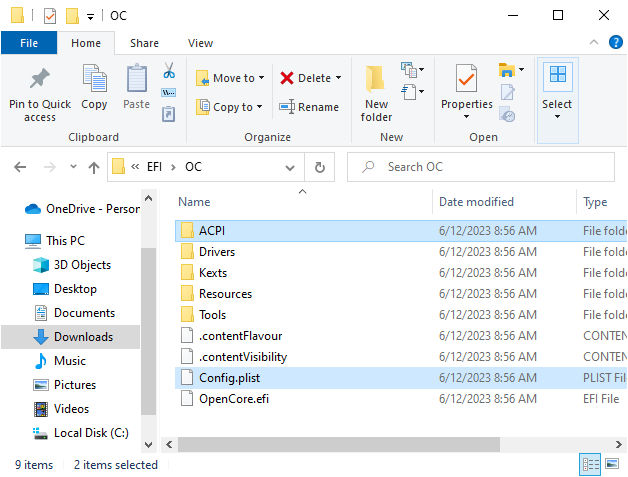
Once you have identified your CPU's name, proceed to download your APCI and Config.plist files. You can find the Custom EFI download link here. After downloading, simply copy these files into the OpenCore EFI > OC directory.

With these files in place, you now have a comprehensive EFI set containing the latest Opencore Kexts and the pre-configured APCI settings. You can proceed to copy this EFI set into the EFI Partition of your USB Installer. For assistance with creating and mounting the EFI Partition on Windows, you can refer to this guide.
Step 3: Update Config.plist file
Once you have a comprehensive EFI set, the next essential step is to update the config.plist file to incorporate any changes, such as new Kexts or ACPI updates. To accomplish this, you will require either a Mac computer or a Virtual Mac, along with the Propetree software, to perform the config.plist update.
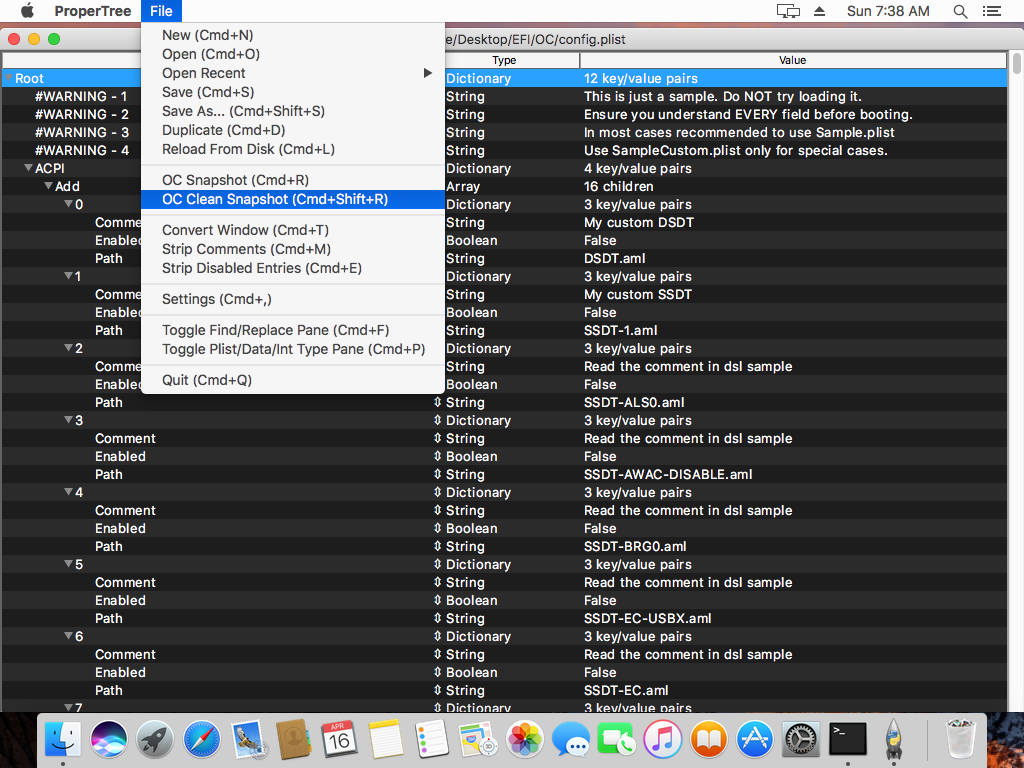
Simply launch the Terminal within your Virtual Machine and drag the Propetree.app software into it. Then, open the Config.plist file located in the EFI partition. It's important to remember that whenever you add Kext or edit any files within the EFI, you'll need to run the Clean OC Snapshot once.
This can be done by selecting File and then choosing OC Clean Snapshot then open OC folder, next press Command+S to save this file. With these simple steps, you'll be well on your way to a fully optimized macOS experience!

In conclusion, installing macOS on a PC or Laptop can seem daunting at first, but with the right tools and knowledge, it can be a fun and rewarding experience. Taking the time to identify your device's hardware specifications is crucial before beginning the installation process. Once you've done that, downloading and installing Custom EFI and mounting the EFI partition is a breeze. And with the help of Propetree, configuring and upgrading your OpenCore EFI is easier than ever.
It's important to note that each hardware setup is unique, so there will be different configurations to consider. However, with the right software tools and attention to detail, you can customize your experience with upgrades and additional settings for WiFi, Audio, External Graphics, and more.


Leave a Comment