macOS 10.13 Ventura Final promises major improvements on speed and performance for your Mac. But if you're still using an older model like a MacBook Air or Pro, don't worry--we have tips to make sure that this release runs smoothly with little-to-no lag time during use.
Mac users have two options for updating their operating system. The first is to install macOS using the standard installer, which will automatically update your existing version of macOS without any additional action on your part. When installing a new version of macOS, will your old applications work with Ventura?
The second option would be a clean install macOS, which will delete all data saved in order for you do have access again after updating! Clean Install is a great way to get started with your new operating system, but it's not without its problems. You might run into issues like Spotlight Indexing or Screen brightness after installing on top of an existing OS that needs attention first!
In our article today we will be focusing primarily upon common mistakes people may unintentionally commit when upgrading their machines so as not affect how fast they can now go about tasks throughout daily life.
How to Speed Up macOS 13 Ventura
1. Compatibility issues can slow down your macOS
We all know that the speed of any computer including Mac depends on its processor and RAM, but did you also realize what can happen when an app takes up too much CPU or memory? It will slow down entire system and make your macOS Ventura Slow. So during use always keep a eye out for how many apps are running in background; if two seem excessive then close them before your Computer becomes stuck!
To find out which apps are using up all your memory and processor time, you can use Activity Monitor. This tool will show information on RAM usage as well as CPU levels for every application running in system tray at once or selected lists according to what type of activity they represent.
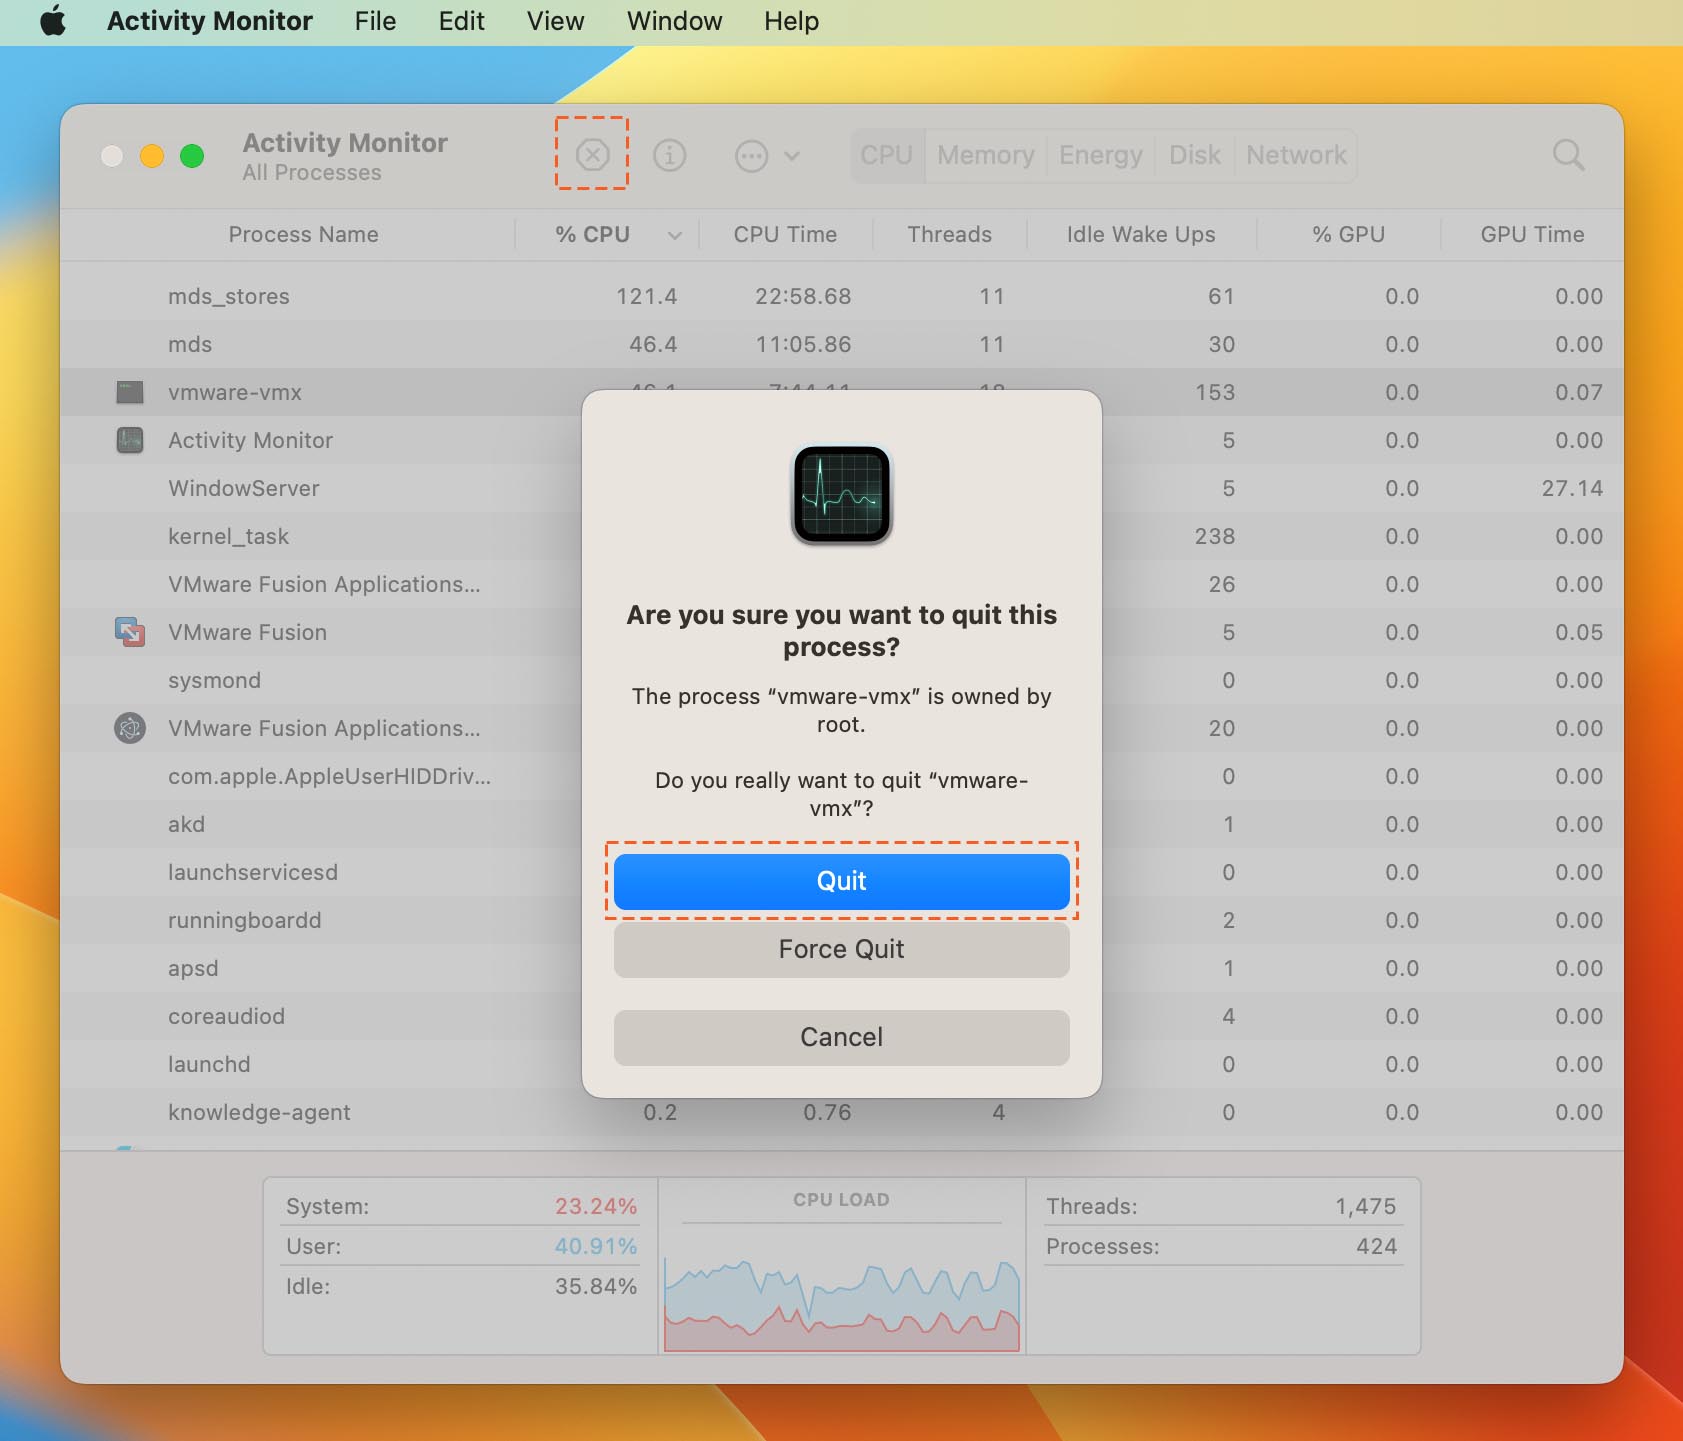
Step 1. Open Spotlight Search and type ‘Activity Monitor.’ Open the ‘Activity Monitor’ when it appears in the results.
Step 2. On Activity Monitor, click on the CPU tab. You’ll see how much CPU every app is using.
Step 3. One way to fix high CPU usage is ending Idle Tasks, which means applications or programs you are using. Right-click on any process you would like to end, then click on the Quit button to end the process completely.
Disabling the App in Activity Monitor is a temporary solution, we can follow step 2 to Reset or Complete Uninstallation of this application. If it's because there are problems with mds or mds-stores then you need go to step 3.
2. Reset App or Completely Uninstall Applications
If you need to take a break from your favorite app or want it back in its original state, there's no better way than Resetting. With CleanMyMac App users can easily reset any stubborn apps that are giving them trouble by tapping on "Reset" with one click of their mouse!
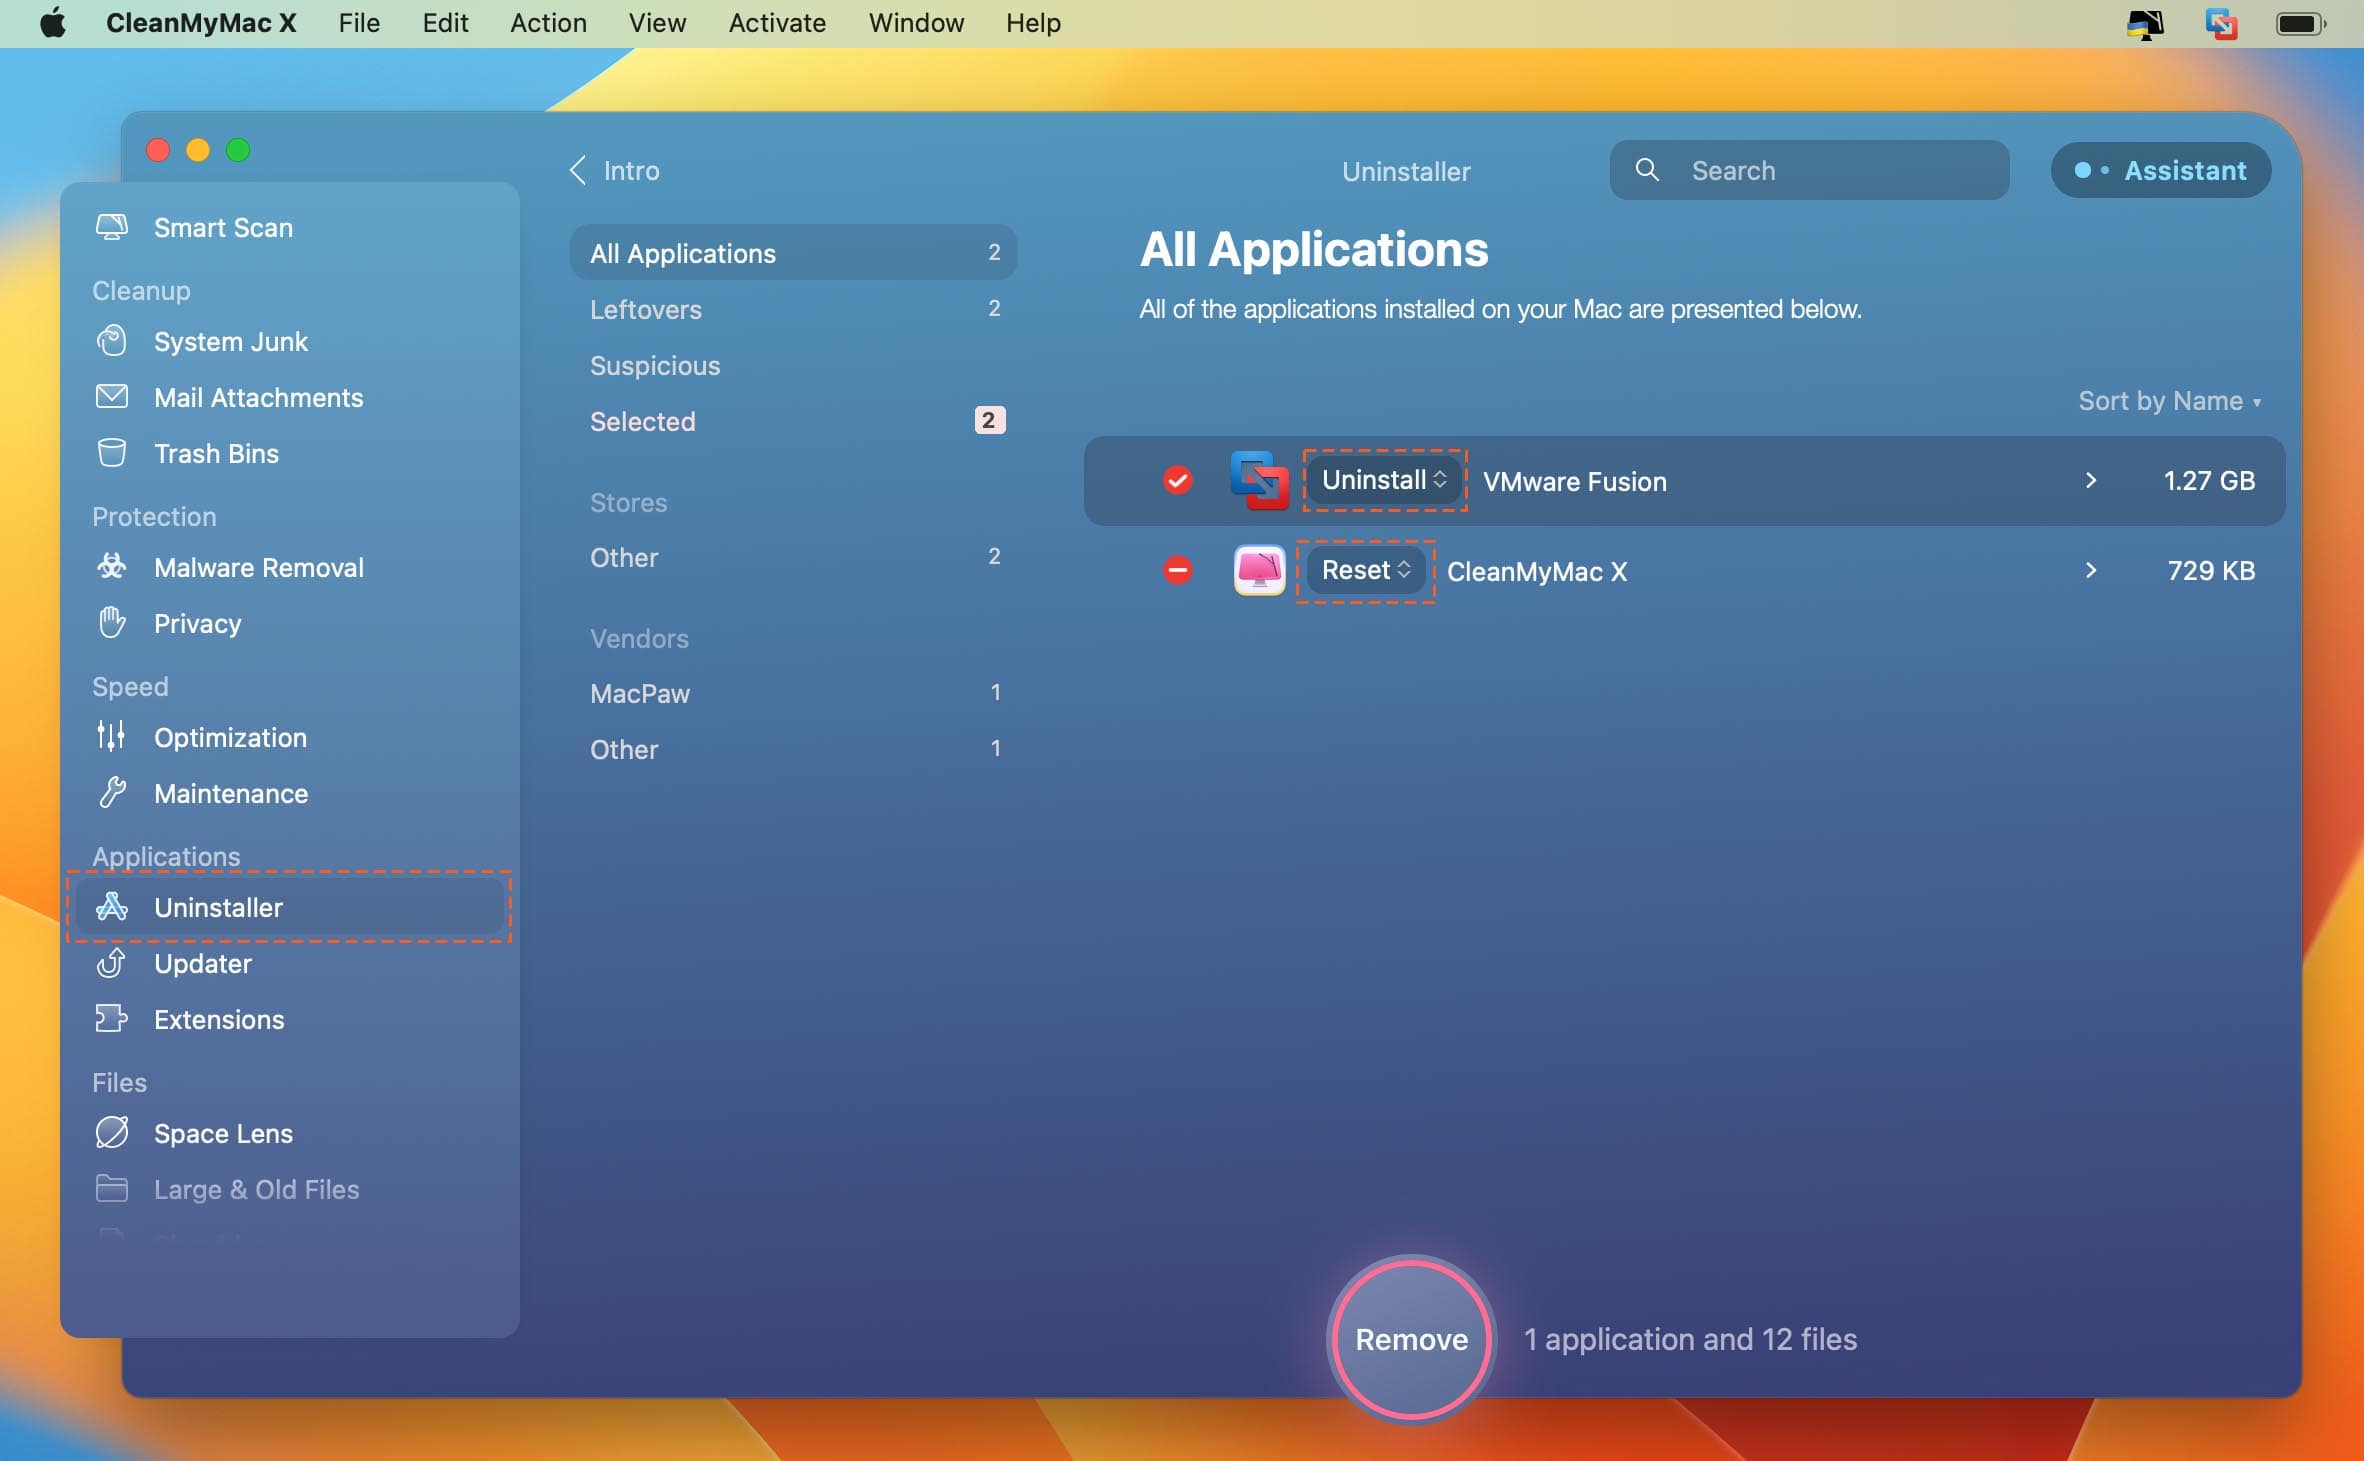
When the Reset App doesn't clear up your problem, you can Uninstall it using Clean My Mac. This app will help get rid of any junk left behind by applications and cleanse everything on your Mac so it runs faster than ever before!
3. System Monitoring and Clean Up your Mac
We all know how important it is to have a speedy computer, but did you also consider what happens when your Mac slowing down? When the temperature is too high, you may notice your Mac's FAN or Hard Disk sometimes has problems during Write/Read. And remember to make sure that Batteries in your Mac are stable before using them again; otherwise they might run out of power quickly and cause permanent damage!
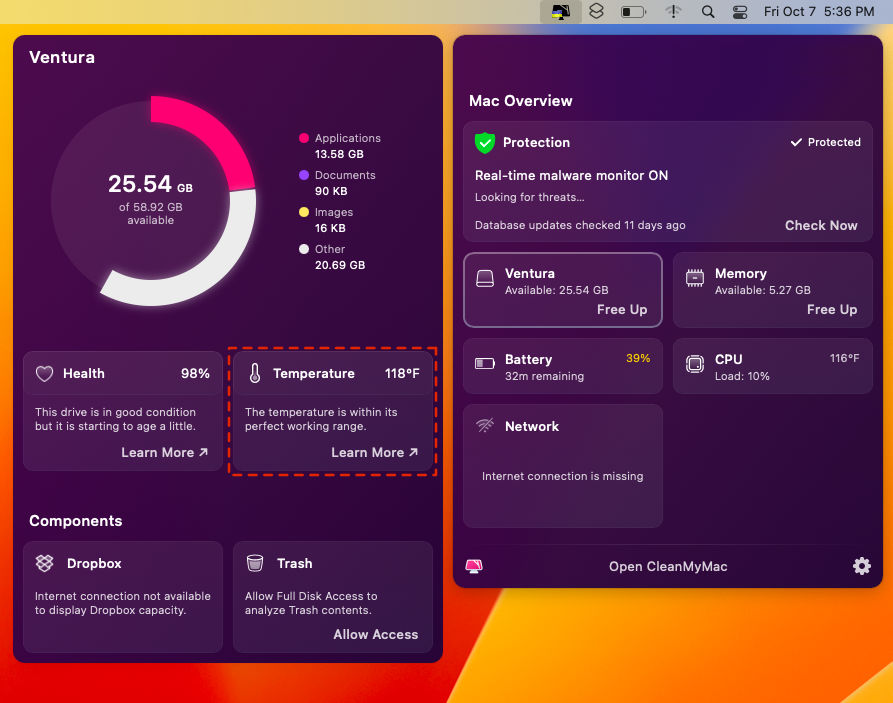
There are a lot of different things that can affect your Mac and make it slow down, like an overheated Mac. A temperature monitoring application will show you when this happens so we recommend checking for any apps taking up too much space or having trouble loading properly before moving on to other tasks while waiting patiently until everything cools down!
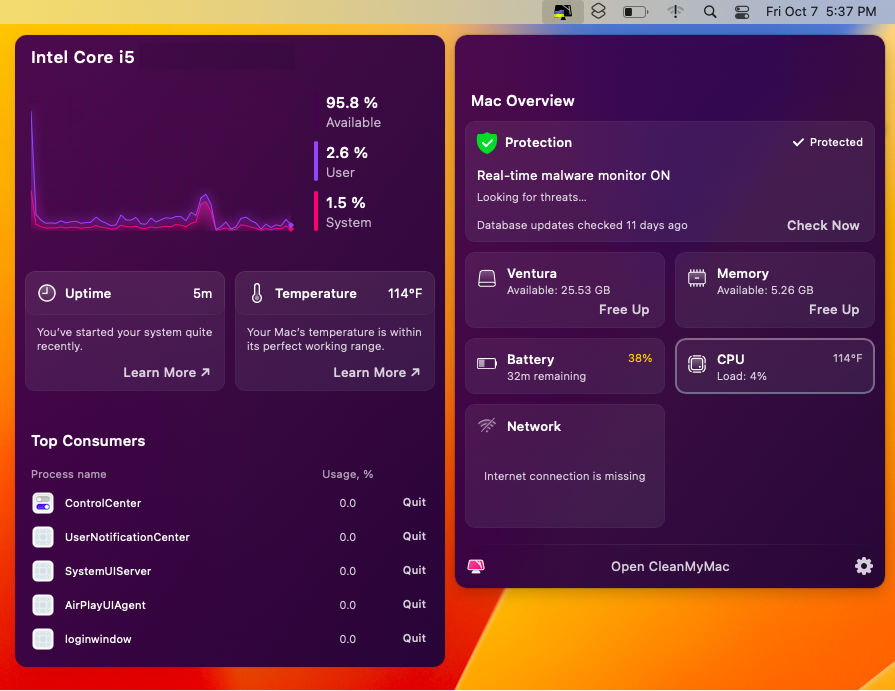
The applications that are running in the CPU can be an indicator for any problems on macOS. By monitoring this, you'll know when something's wrong and have a chance at preventing it from getting worse!
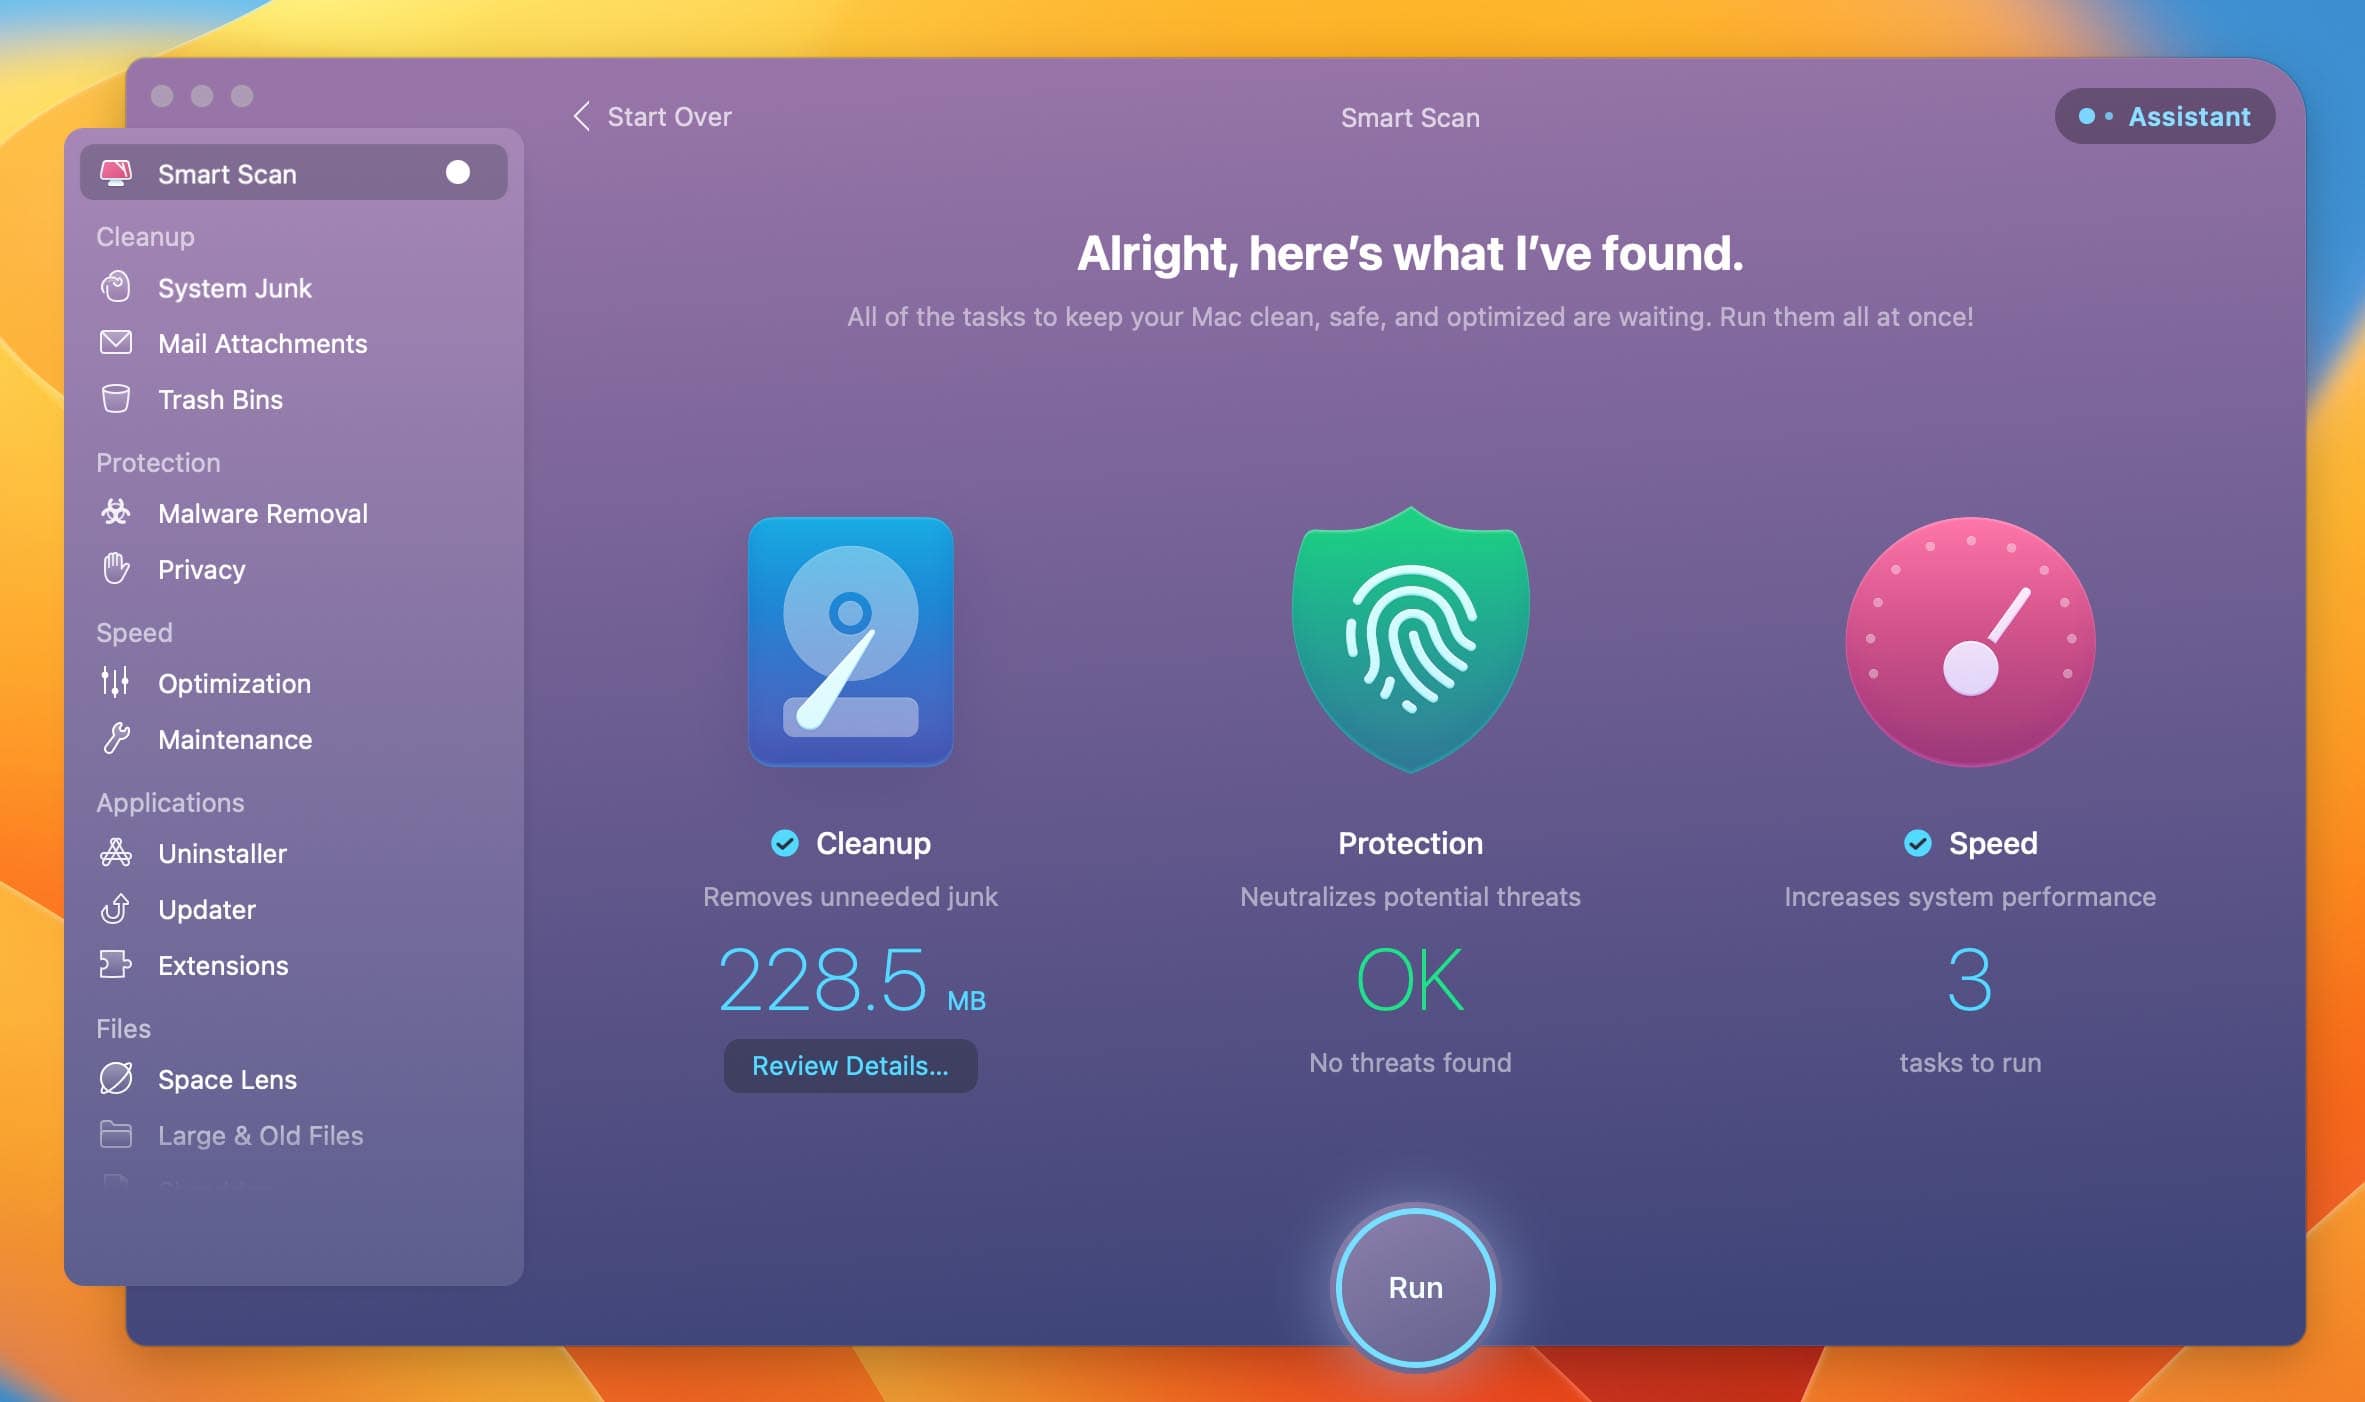
One of the best ways to keep your computer safe and running smoothly is with a reliable software like Cleanmymac. With this program, you can monitor what's going on in depth as well have complete control over how much memory space they're using or even delete any unnecessary files that could be slowing down their performance!
4. Improve Spotlight's Performance
The built-in search engine in macOS Ventura, Spotlight, is another cause of a slow Mac. You may not be aware that the high CPU consumption of macOS is due to the continual indexing of your new files. When you log into your Mac for the first time following a significant macOS update or copy a large number of files from other drives, Spotlight rebuilds the index.

The mds and mds-stores processes are two crucial parts of Spotlight that aid in indexing the data on the whole macOS system. Due to the large number of system and user files in macOS, the indexing process creates numerous small jobs that the CPU must handle. As a result, the operating system as a whole becomes slower.
You may disable Spotlight in the Activity Monitor or through the Terminal to resolve this issue. Another possible solution is to decrease the amount of data that Spotlight requires to index in the System settings.
Go to System Settings > Siri & Spotlight and choose categories will appear in Spotlight search.

5. Clean Install macOS Ventura
There are a few things you can do if your Mac is having problems with Ventura Slow. You could try Clean installing macOS, which will involve deleting the partition containing old versions of Apple's operating system and then erasing all data on it; this might be necessary in cases where there has been major corruption or if an update doesn't install properly for some reason (though we recommend contacting Tech Support).
The clean install process for macOS is pretty straightforward, but there are a few things you should keep in mind before starting. First off all; make sure to back up any important data because otherwise your data will be lost! You can save that backup file either on an external disk or by creating another partition using partition tool found within Disk Utility app (which comes pre-installed).
6. Disable Hidden Startup Program
If you’re still dealing with the macOS slow login issue, then perhaps disabling hidden startup programs will fix it.
These programs open up on their own when you start your Mac which uses a lot of RAM and it slows down your system. As convenient as these startup apps are, you don’t really need them to launch all at once because they eat up tons of memory.
If you know which apps launch at startup, you can simply right click on them and uncheck “Open at Login” in the “Options” menu. If you have too many apps that launch at login and you don’t even know what most of them are, then it can be difficult and time-consuming to hunt all of them down and disable them one by one.
Instead, you can disable them in the System Settings as it’s called in macOS 13 Ventura. Simply search for “Users and Groups,” and in the Login Items tab, you’ll see a list of all the apps that launch when you login. Remove the apps by clicking on the “-” symbol in the bottom.

Step 1. Click the ‘System Settings’ . Head to the ‘General’ tab and click on ‘Login Items’ tab.
Step 2. Then, click on the ‘Checkbox’ besides each application for which you want to disable auto-startup.
Step 3: Enter your Mac administrator password to proceed ahead.
7. Erase All Content and Settings
One of the reasons behind macOS slow speed could be the wrong settings and content present in your Mac. In that case, we suggest factory resetting your entire Mac. One of the best ways to speed up macOS is to erase all content and settings. After the factory resetting, all your content will be erased, and settings will be back to their default state. You can easily do this by following the mentioned steps.

Step 1. Click the ‘System Settings’ and select ‘General’ tab.
Step 2: Click on 'Transfer or Reset' tab.
Step 3. After that, click on the ‘Erase All Content and Settings’ option.
Step 3. You need to enter your Username and Password to run ‘Erase Assistant.’
Step 4. Now, select the account to erase all content and settings, and set them back to default.
Step 5. You will now see a warning pop-up with a few buttons on it. Click on the ‘Erase All Content and Settings’ option.
After performing the above steps, your Mac will now restart Furthermore, all your data will be deleted now along with the saved settings.
8. Reset SMC and PRAM/NVRAM
Still haven’t figured out how to fix slow macOS Ventura after update? Don’t worry, this method will help you.
SMC or System Management Controller is a chip that controls things such as thermal management, battery levels, hibernation, and LED indicators. PRAM or Parameter Random Access Memory is a type of memory that’s used for storing essential details about your Mac.
Any problem with these two components can cause your Mac to become glitchy and slow. When you reset SMC or PRAM, it can fix a lot of issues with the power or hardware that you otherwise can’t fix using other methods.
The M1 MacBook, one of the latest models, doesn’t have an SMC. Instead, it has an NVRAM (which is similar to PRAM). This means that there’s no way to reset SMC on the M1 MacBook.
Reset SMC On Intel iMacs, iMac Pro or Mac mini
Step 1. First, shut down your desktop.
Step 2. Then, unplug the power cord.
Step 3. Wait for at least 15 seconds, then reattach the power cord.
Step 4. After reattaching the cord, wait for five seconds, and turn on the computer.
Reset SMC on MacBook Air, Macbook Pro (2018 to later)
Step 1. First, shut down your desktop.
Step 2. Unplug the power cord to stop the power supply.
Step 3. Press and hold the right Shift, left Ctrl and Option (Alt) keys simultaneously. (Note: Keep holding it for 7 seconds.)
Step 4. Keep all the keys while you press the power button for 10 seconds.
Step 5. Release all key, press the power on button to turn on the computer.
Reset NVRAM/PRAM
Step 1. Shut down your Mac, and wait until the screen becomes dark and all the fans stop.
Step 2. Turn on your Mac again.
Step 3. Press and hold the ‘Command + Option + P + R’ keys until you see the startup screen and sound. (Note: Keep them holding and release when you see the Apple logo and hear the startup sound.)
You can’t reset NVRAM on M1. Apple claims that the M1 chip is powerful enough to deal with every issue that PRAM/NVRAM were designed to handle. M1 automatically resets PRAM/NVRAM when it detects any issue. If your M1 or M2 Mac is slow, you can turn it off, wait for a couple of seconds, and then turn it back on.
9. Use macOS Optimization Feature
One of the possible culprits for slow macOS speed could be insufficient storage space which is not letting your Mac run smoothly. macOS 13 has a built-in storage optimization feature that lets you optimize your Mac storage for efficient working. Follow the steps to optimize your macOS storage space.

Step 1. Click on the ‘System Settings’. Head to the ‘General’ section, and then click on the 'Storage' tab.
Step 2. After that, click on the ‘Optimize’ button, macOS will start calculating the space occupied by the documents, videos, audios, and others on your Mac.
Step 3. After that, click on the ‘Documents’ or ‘Applications’ tab to see the way to optimize your Mac storage space.
You can now follow the suggestions given on your screen. For instance, you can turn on the ‘Empty Trash Automatically’ feature, etc. Recommendations may vary based on your storage settings
10. Check Battery's Health
The CMOS-Battery on Mac Minis is always there to store any NVRAM information you need, but it's not supported by Macbook Air and Pro models. When your MacBook has a battery problem, it won't start up even when connected to power. If you notice any slowdowns or freezing of the operating system on yours then there could be an issue with its batteries and we recommend getting them replaced as soon as possible!
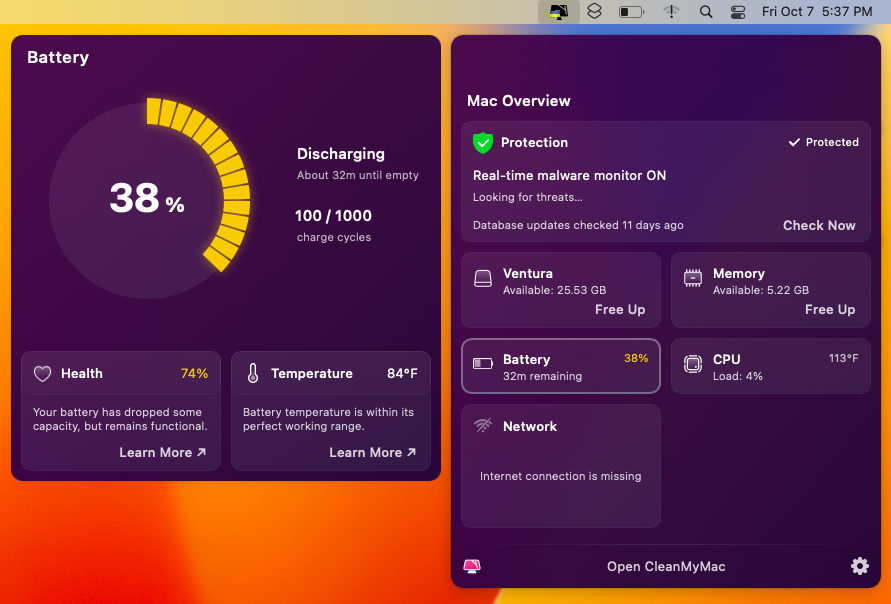
The battery in your MacBook Air or Pro will eventually lose its charge. You should check it at least once every six months and if necessary, replace the old one with a new one to make sure you have enough power when using computers all day long
All in all, macOS 13 Ventura is one of the most hyped upgrades in the history of Mac, with tons of new features being introduced. In its developer version, however, there are bugs and issues which need to be solved. One of the most prominent being macOS Ventura slow. Using the methods mentioned above, you’ll be able to improve the performance of your MacBook and enjoy all the benefits of macOS.



It’s noticeably slower in my opinion over Monterey on my 2018 Mac mini. I wouldn’t say it’s terrible, just noticeable. Stands to reason given that it probably barely makes the compatibility list with a core i3 and 8Gb RAM. I also figure Apple isn’t probably optimizing Ventura so much for Intel as much as Apple silicon. It is very much usable, but also gives hints that maybe it’s the end of the road for this Intel Mac mini.