One of the newest features introduced with macOS Monterey and Ventura is the Shortcuts app. The app allowed lots of customization options that made it easier for users to automate many of their repetitive tasks. If you’re someone who loves saving time and don’t like to constantly switch between apps to complete a task, you can set up a shortcut for your task and perform it in one or two clicks. It is immensely powerful and lets you not worry about iterative tasks and focus on creative work.
What is a GIF and Why are they Popular?
A GIF (Graphics Interchange Format) is an image file similar to JPEG and PNG files. But unlike other image file formats, the GIF format has a special feature — it can be used to create animated images. Since GIF files can hold multiple images together, these images can be made to load in sequence to create animations.
The growing popularity of GIFs is associated with their ability to convey information, ideas, and emotions. Animated memes are used to communicate jokes and share messages. GIFs have been integrated into social media and phone keyboards to make it easier to communicate and connect with others.
GIFs have been around for a long time and their popularity is attributed to being compatible with all browsers and easier to create. While there are many ways to create GIFs, you can create them with ease on macOS Monterey with the Shortcuts app.
How to Make a GIF on Mac
Let us see how simple it is to make a GIF on Mac with the Shortcuts app. It involves two distinct processes, set up shortcuts to create GIFs from images and use shortcuts to create GIFs.
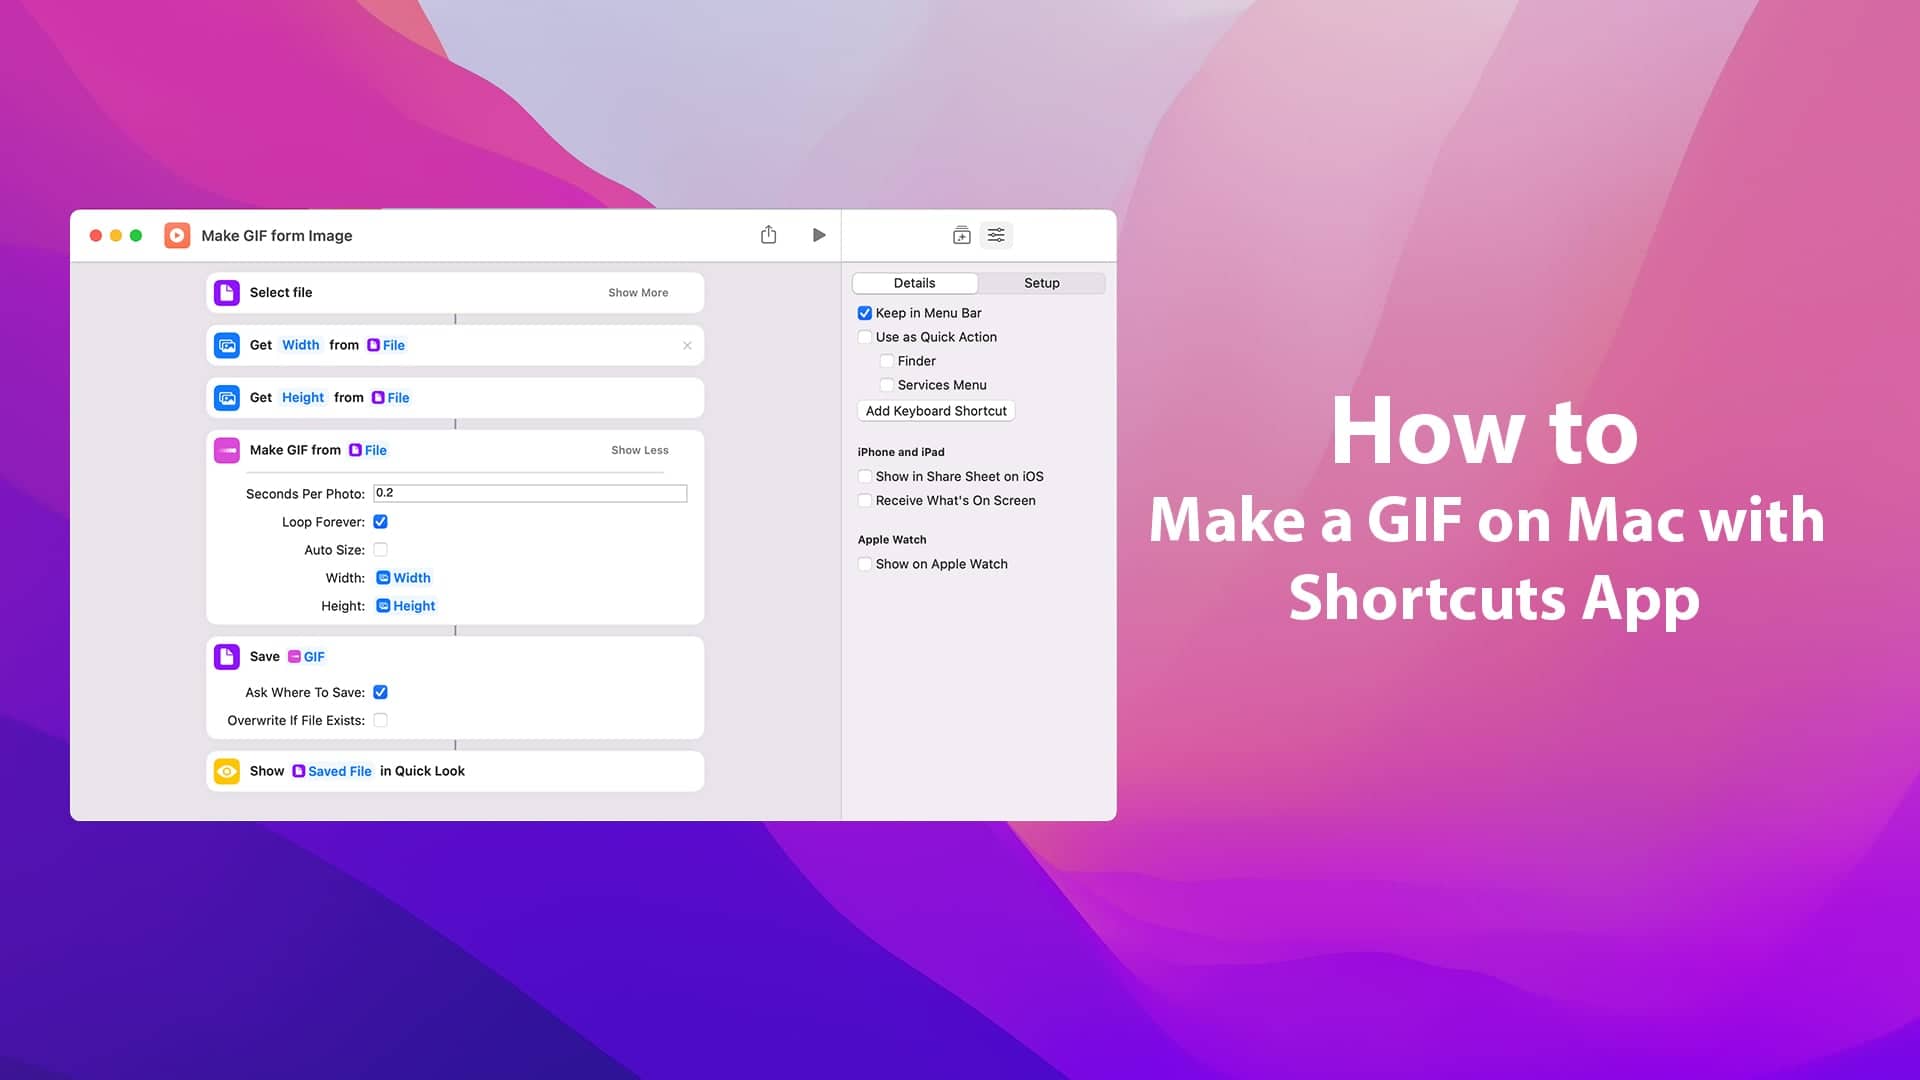
Set up Shortcuts to Create GIFs from Image
Step 1: You can open Shortcuts app from Spotlight search.
Step 2: Click on the ‘+’ button on the top-right corner of the application screen to create a new shortcut.
Step 3: Search for actions using the search bar. Type ‘Select File’ and drag the shortcut option to the left-side window to build your shortcut. Enable the ‘Select Multiple’ setting.

Step 4: Search “Get Detail of Images” then drag it below the ‘Select File’ action. Replace “Album” with “Width”.

Step 5: Drag “Get Detail of Images” to the Shortcut and replace “Album” with “Height”.

Click on “Image” and choose “Select Magic Variable” then click on “File”

Step 6: Search ‘Make GIF’ and drag the shortcut. Disable auto-size, Set “Width” and “Height”, and change seconds per photo to 0.2-0.9.

Step 5: Now, search ‘Save File’ and drag the shortcut option below the ‘Make GIF’ action. Enable the ‘Overwrite If File Exists’ setting.

Step 6: Search “Quick Look” and drag it to your Shortcuts, name your shortcut as ‘Make GIF from Image’ and add an icon and color to identify it. Click on the ‘Shortcut Details’ option in the right sidebar and enable ‘Keep in Menu Bar’. This will add shortcuts to the menu bar and make it easier for you to create GIFs instantly.

Step 7: Close the Shortcuts app. You will see it in the menu bar where it can be conveniently accessed.
Use Shortcuts to Create GIFs
Step 9: Click on the Shortcuts app in the menu bar and select ‘Make GIF from Image’.

Step 10: Select the image files you want to use for creating a GIF. Click on open and wait for Mac to create the GIF. This process should be fast. Click on open again to save your GIF file. You should see an ‘image.gif’ file. This is the GIF image of the individual images you selected.
Creating a GIF on Mac is as simple as that. All you have to do is create a shortcut to select the images to create your GIF. When you’re constantly in touch with other individuals online, you can stand out from the crowd by being able to express yourself more freely with the power of GIFs. Get the ability to create GIFs with ease on macOS Monterey with the Shortcuts app.


Thanks for sharing this, great tip!! The only thing that doesn’t work for me is the get width/height from file variables, it just outputs every gif at 500px width. I’m on Ventura – any hints how to solve this? Cheers!