macOS Sonoma is Apple's newest version of the operating system. Like its previous iterations, macOS Sonoma does not support a significant number of older Mac machines released before 2017. However, users with Mac Pro or MacBook Pro models from before 2017, featuring Core i7 or Core i5 processors, have adequate power to run macOS Sonoma. These users are keen to explore the new features offered by macOS Sonoma. In this guide, we will delve into the process of installing macOS Sonoma on unsupported Macs using OpenCore, providing detailed assistance at each step.
What is OpenCore Legacy Patch?
Introducing OpenCore Legacy Patch, a remarkable open-source application tailored specifically for Mac users. It comes to the aid of older Mac machines by seamlessly installing or supplementing missing components, such as Kext drivers, that are crucial for hardware compatibility on macOS Sonoma. With OpenCore Legacy, even previously unsupported peripherals like mice, keyboards, Bluetooth devices, backlight controls, and Wi-Fi adapters can now join the Sonoma party. But that's not all—OpenCore Legacy goes the extra mile by addressing common issues related to APCI and Power Manager on older machines, ensuring a smooth and optimized Sonoma experience. It also acts as a guardian, disabling unnecessary features that might otherwise disrupt the installation process of the latest macOS.
OpenCore Legacy as a reliable Boot Manager, gracefully taking its place in the EFI partition of your Mac or residing within an external USB installer. Instead of relying on the standard "boot.efi" file, your Mac boot with "Opencore.efi" from the EFI partition.
Supported Model
While OpenCore is a powerful tool, it's important to note that not all Mac machines can benefit from its support. Macs running on x64 bit chips, such as Intel Core processors, seamlessly harmonize with OpenCore Legacy. However, it's worth mentioning that certain older Mac models may not enjoy GPU compatibility. To clarify, the list below encompasses Mac machines that receive comprehensive support, ensuring smooth functionality for both CPU and GPU components.
- Mac mini 6,1 – Early 2012 or newer
- iMac 13,1 – Late 2012 or newer
- Mac Pro 4,1 – Early 2009 or newer
- MacBook Pro 9 – Mid-2012 or newer
- MacBook Air 5,1 – Mid-2012 or newer
- MacBook 8,1 – Mid-2015 or newer
How to Install macOS Sonoma on Unsupported Mac
1. Create macOS Sonoma USB Installer
To start the process, we first need to download macOS Sonoma. While there are multiple methods available, the easiest approach is to directly download it from the Apple Server using the InstallAssistant.pkg file. This file contains a compressed package of the macOS Sonoma installer, when open InstallAssistant file on macOS, reveals the "Install macOS Sonoma.app" file in the Applications folder.
Download macOS Sonoma Final:
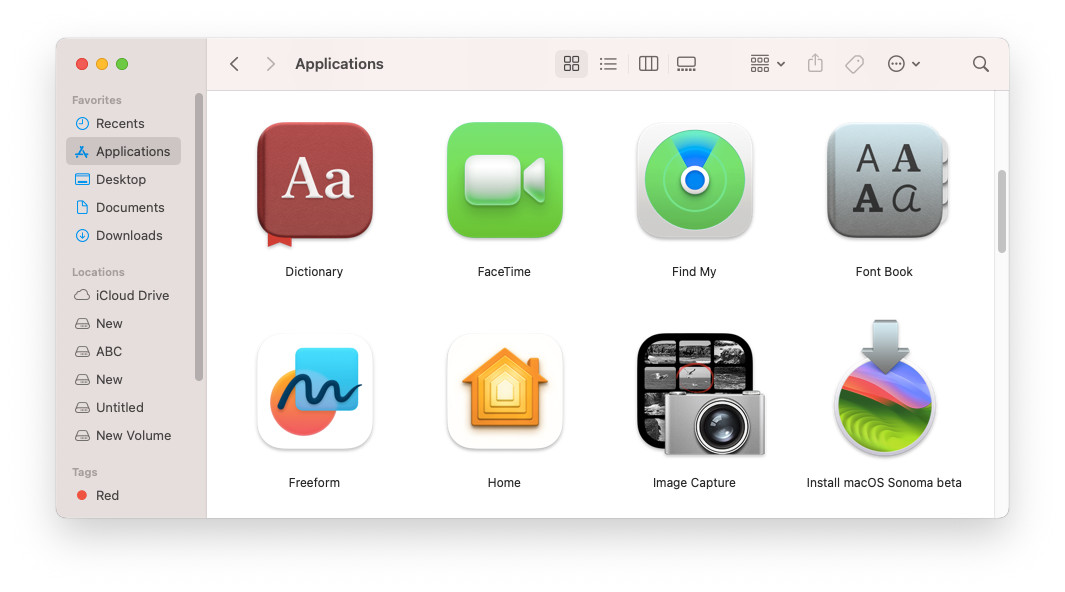
Once you have obtained the macOS Sonoma installer, the next step involves utilizing an external USB drive with a minimum capacity of 16GB to create a bootable macOS installation.
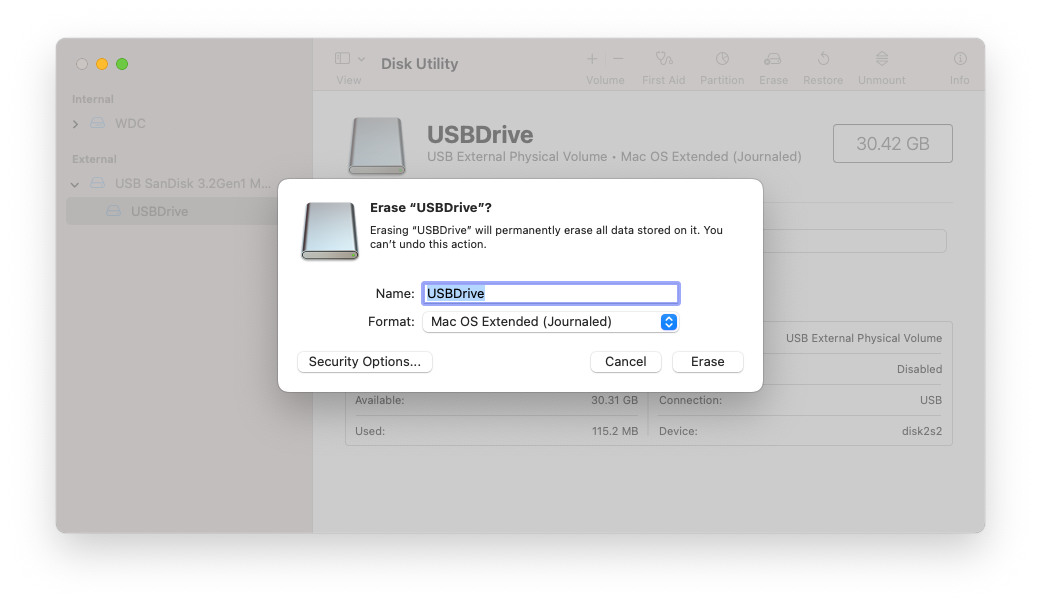
Connect the USB drive to your Mac, then use Disk Utility to format it in compliance with Mac standards. Access Disk Utility through Spotlight search or navigate to Applications > Utilities folder. Select your USB drive and click on the Erase button. You can choose to format it with either APFS or HFS partitions.
Now, let's proceed with the creation of the macOS Sonoma installation on the USB drive. We'll be utilizing Terminal for this task. Launch Terminal on your Mac via Spotlight search or by navigating to Applications > Utilities folder. Then, execute the following command to initiate the creation process. Please note that since the command begins with 'sudo,' you'll be prompted to authenticate using your password.
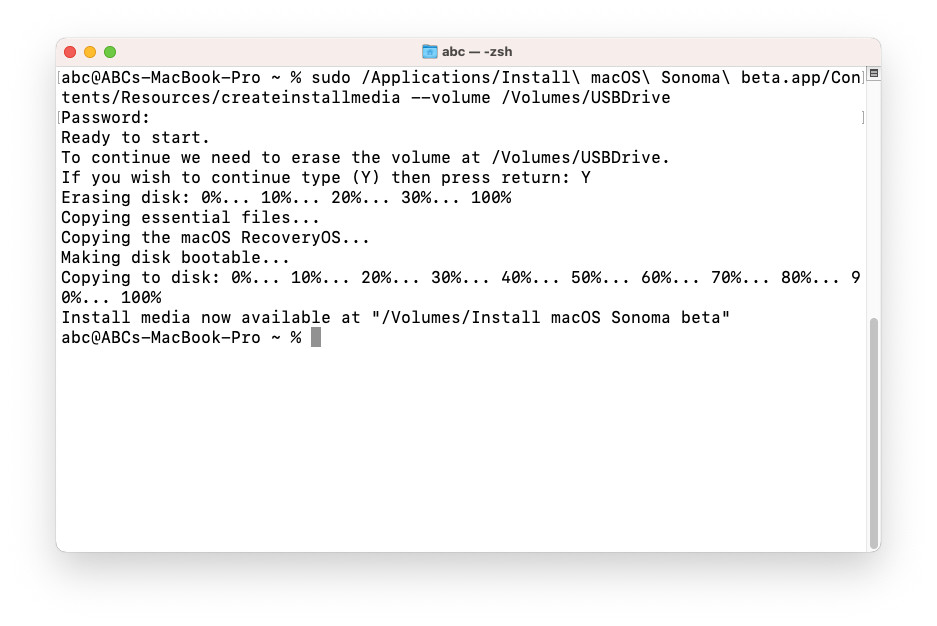
sudo /Applications/Install\ macOS\ Sonoma.app/Contents/Resources/createinstallmedia --volume /Volumes/USBDrive
Note that in the command above, my macOS USB Installer drive is named "USBDrive." So, make sure to substitute it with the actual name of your own drive.
2. Install OpenCore Legacy Patch on macOS USB Installer
To begin, you can download OpenCore Legacy from this link. Afterward, we need to configure and install OpenCore on the EFI partition of the macOS Sonoma USB Installer. Launch OpenCore and start by navigating to the Settings section, where we'll customize OpenCore specifically for your Mac.
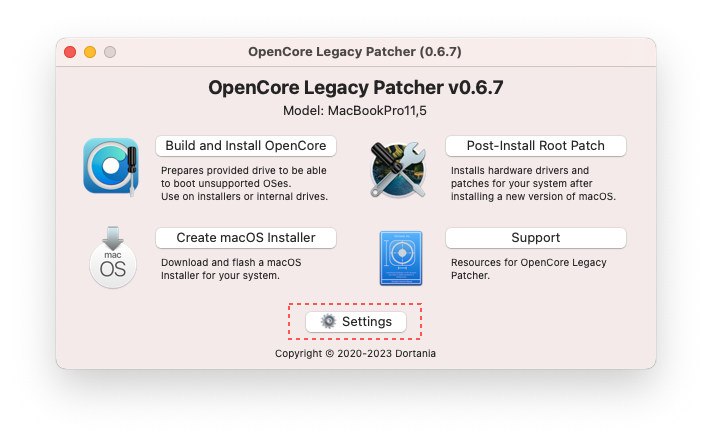
Firstly, let's edit the Target Model to match your exact Mac model. To find your Mac's model, you can use Spotlight to access "System Information" or click on the Apple menu > System Information > Hardware. Look for the Model Identifier, which corresponds to your Mac model.
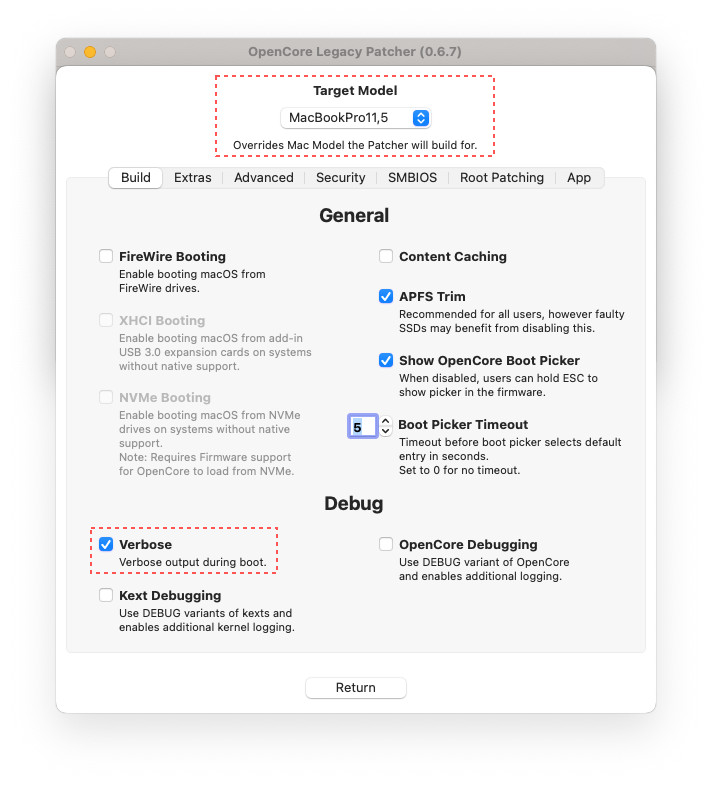
Next, we have the option to enable Verbose mode. This is useful if you encounter any errors during the installation of macOS Sonoma on an unsupported Mac. By enabling the Verbose (-v) option, you'll see detailed command lines displayed during the boot process, allowing you to identify any occurring errors. If the boot process into macOS Sonoma proceeds without issues, there is no need to select this option.
Moving on to the SMBIOS tab, simply select the Moderate option for the SMBIOS Spoof Level. Choose the appropriate Model that matches macOS Sonoma. It's important to note that macOS Sonoma only supports certain Mac models, so make sure to select the model that aligns with your Mac. For example, if you own a MacBook Air, choose the corresponding MacBook Air model. Selecting an incorrect model may result in errors during the installation process.
- iMac 19,2 2019 and later
- Mac Pro 7,1 2019 and later
- MacBook Air 8,1 2018 and later
- Mac mini 7,1 2018 and Later
- MacBook Pro 15,1 2018 and later
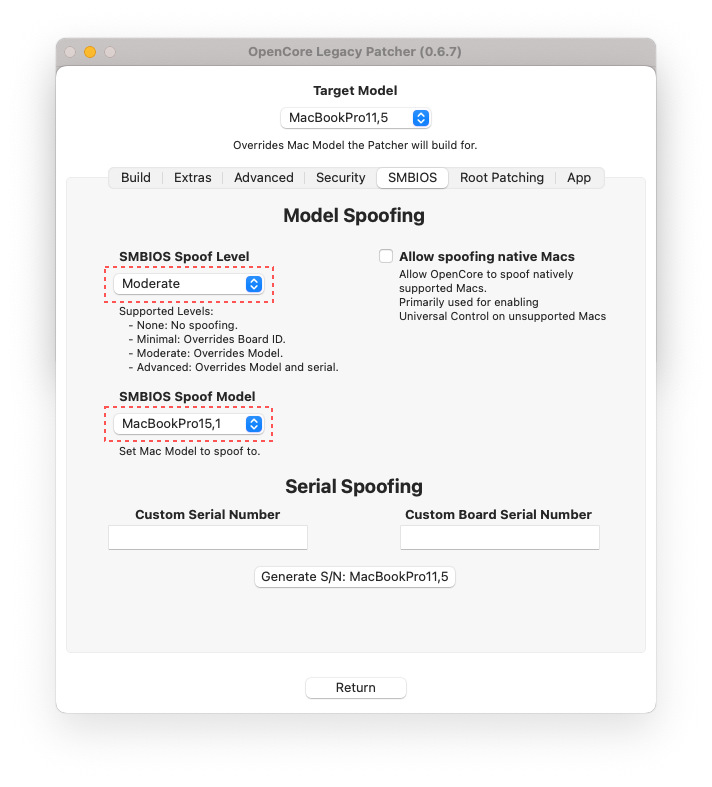
To initiate the installation of macOS Sonoma, we simply need to set up two options within the Settings as mentioned above. However, you can make changes to other options if you encounter any errors during the Sonoma installation process. Once you have made the necessary adjustments, exit the Settings menu.
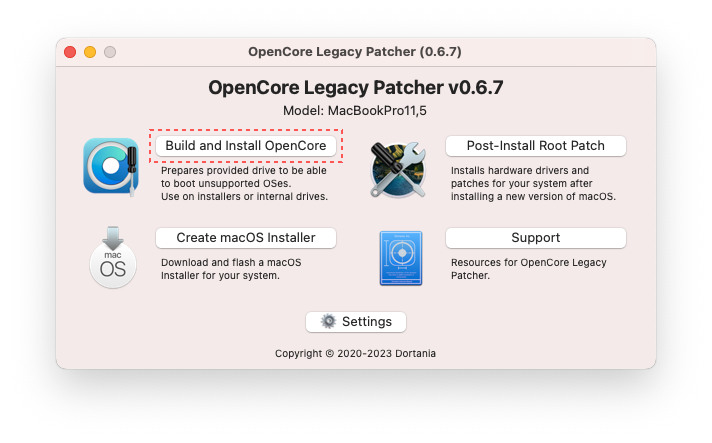
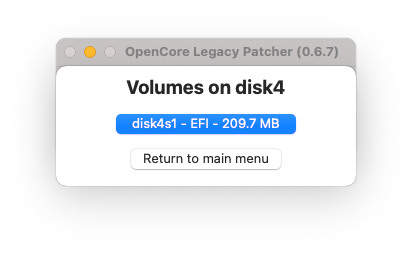
Next, navigate to the Build and Install OpenCore section to proceed with installing OpenCore on your USB Installer. From there, select your USB drive and then choose the EFI partition. After completing these steps, you'll be ready to install macOS Sonoma on your unsupported Mac.
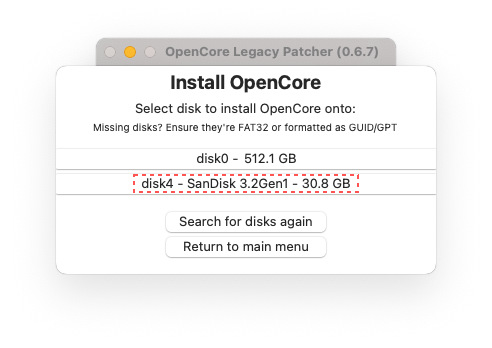
3. Install macOS Sonoma on Unsuported Mac
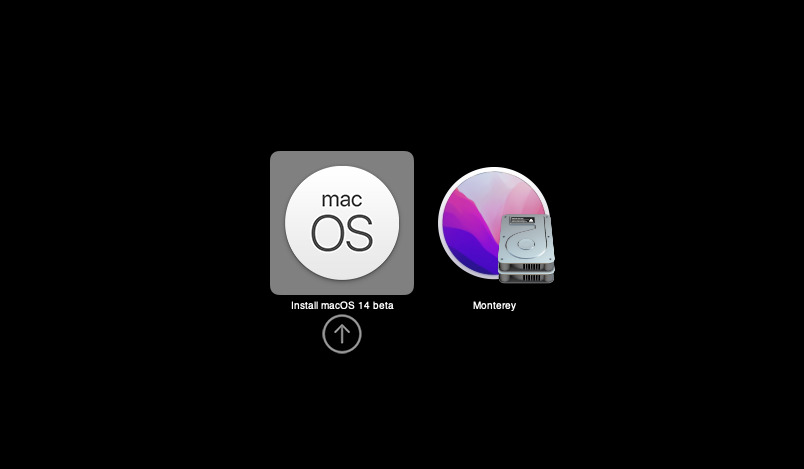
Next, restart your Mac and then press and hold the Option key to access the boot menu. From there, choose the macOS Sonoma installation on the USB Installer.
Within the macOS Sonoma setup, we need to access Disk Utility to either erase the existing partition or create a new one specifically for macOS Sonoma. It's important to note that if you choose to erase the current macOS partition, all data, including Time Machine backups, will be permanently lost. Therefore, make sure to back up your data to an external disk before proceeding. Alternatively, you can create an additional partition for macOS Sonoma by clicking the Add button. This will allow you to have two macOS operating systems running simultaneously on the same Mac.
Once you have prepared the installation drive for macOS Sonoma, exit Disk Utility and proceed with the macOS installation process. The installation typically takes around 15 minutes, depending on your hardware, and you may need to restart your Mac multiple times.
4. Install OpenCore Legacy Boot on macOS Sonoma
We have one more crucial step left, which involves installing OpenCore Legacy on the EFI partition of macOS Sonoma. Once the macOS Sonoma installation is complete, open OpenCore and ensure that you set the Target Model correctly to match your specific Mac model. Once the Target Model is correctly set, you will notice the reappearance of the "Build and Install OpenCore" option.
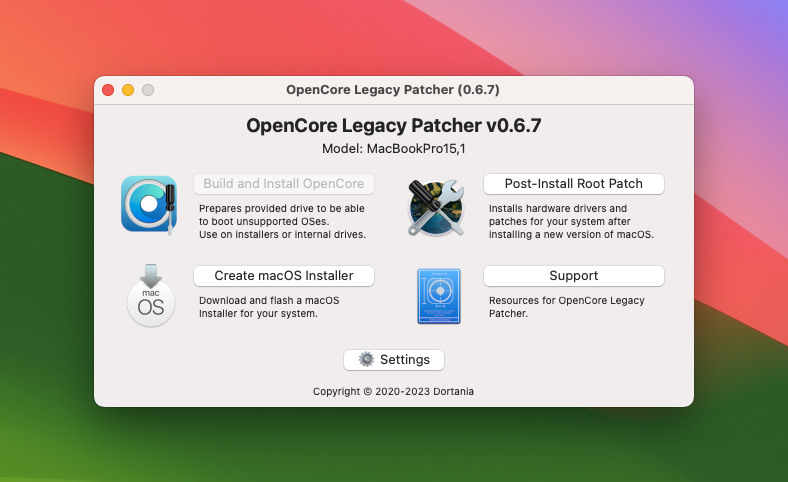
Next, make the necessary adjustments to OpenCore, following the steps outlined in Step 2. Then, click on the "Build and Install OpenCore" button. However, instead of installing it on the external USB Installer, you will now proceed to install it on the macOS system's hard drive. This step is crucial as it will allow you to boot directly into macOS Sonoma without relying on a macOS USB Installer.
5. Post-Install Root Patch
The final step is to click on the Post-Install Root Patch. In this section, OpenCore will search for and install the necessary Kexts (drivers) for the hardware components on older Macs or fix any related errors to ensure a seamless experience with macOS Sonoma. Sometimes, an internet connection may be required during the Post-Install process to download the relevant components.
Congratulations! You can now enjoy using macOS Sonoma on unsupported Macs. However, it's important to note that during the installation process, certain hardware components may not work properly or you may encounter errors while using macOS Sonoma. If you encounter any issues, please leave a comment below, and we will do our best to help you resolve them promptly. Keep in mind that macOS Sonoma is currently in its Beta version, and the installation process will be similar for upcoming versions as well.



Leave a Comment