Virtual Machine Disk is the “containers” for virtual hard disk drives to be used in virtual machines like VMware Workstation or VirtualBox. In simpler terms, just like the hard disk for your PC or Mac, a Virtual Disk is a disk drive for virtualization software. It is a container file that acts similar to a physical hard drive. Like a physical hard drive, a virtual hard drive file contains a file system, and it can contain an operating system, applications, and data. VMDK is the short form for Virtual Machine Disk.
Types of Virtual Machine Disk
There are two types of Virtual Machine Disk and they are:
- VDI file: This is a type of virtual machine disk specifically for VirtualBox.
- VMDK/VDH: This is the most popular type of Virtual machine disk, and it is a file specifically for VMware.
You don’t need to have a master’s degree in computing to use the virtual machine disks because they are very simple. To make things simpler and user-friendly, you can always convert a .VDI to a .VMDK or vice versa. Also, you can create more partitions, increase or decrease the size of the virtual disk easily.
Expanding Virtual Disk: What is it all about?
In this article, we are going to provide you with an easy way to increase the size of the virtual disk without losing data. Expanding the size of your Virtual Disk is not rocket science. It is very simple and easy to do as long as you follow the steps. When you need more space, the Virtual Disk in VMDK or VDI files can be increased in size easily without any rigorous process, but when the Virtual Disk is full, you will have to expand the virtual disk file.
You can always expand your Virtual Disk or in simpler terms “add more space” to the Virtual Disk by using VMware or VirtualBox. After expanding your Virtual Disk, you will then have to use Terminal to convert the new disk space to your APFS Container Disk in macOS.
The real size of VMDK or VDI files also increases with time. To reduce the size of the VMDK or VDI files, you will have to write zero data for VMDK or VDI files. We’ll make another tutorial article to help you fix this problem, so stay tuned! Enough beating around the bush let us dive into how you can add more space for a Virtual Disk Image.
How to Expand macOS Virtual Disk in VirtualBox and VMware
Before we begin modifying the virtual machine, it’s a good idea to back up the VDI or VMDK file beforehand, if you are not familiar or comfortable with backing up using the Terminal tool, you should probably back up the entire Mac first.
Step 1. Add New Virtual Disk Space
This is the most essential step and to do this, you will need VirtualBox or VMware. you can also check out other functionalities of VirtualBox and VMware by checking out other articles on this website.
VirtualBox:
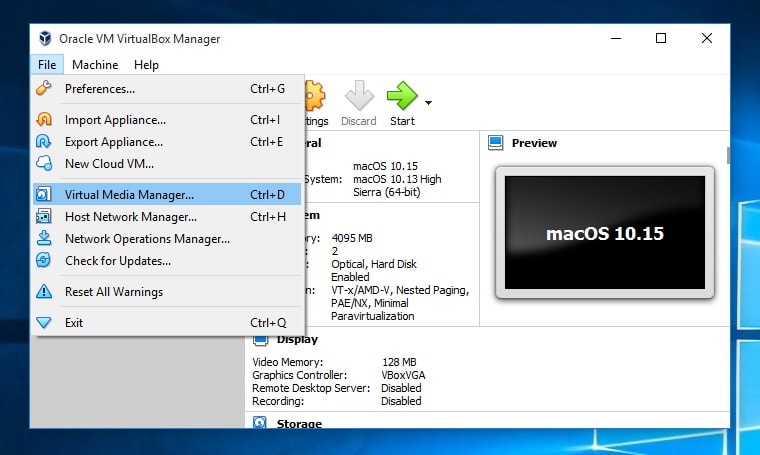
With your VirtualBox installed and ready to use, go to “File” and select "Virtual Media Manager".
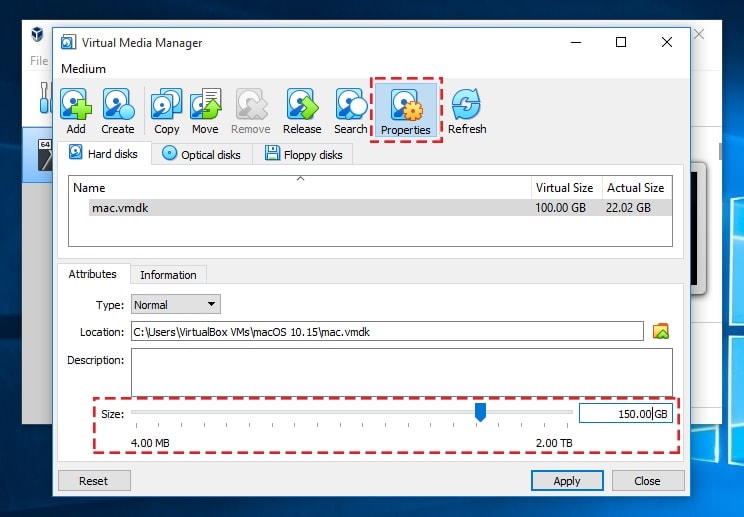
In the “Virtual Media Manager” section, select your virtual drive and select the “Properties” tab, you will see a “Size” section where you can change the size of your virtual drive. It is as simple as that.
VMware:
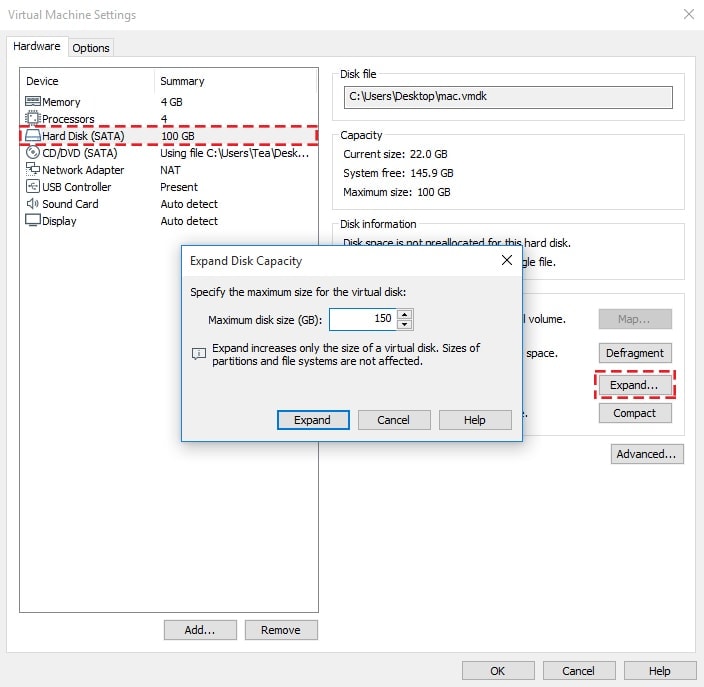
If you are using VMware, go to “Hard Disk”, click on the “Expand” button, then type in the new size you want your virtual disk to be, then click on the “Expand” button to resize your virtual disk.
Step 2: Add Free Space to APFS Container Partition
After creating extra space or expanding your virtual disk, the next thing to do is to add space to the APFS Container Partition.
First of all, you have to check whether VirtualBox or VMware has added the new space in the virtual disk. This can be done easily through the help of Disk Utility. On your Mac, go to the search section in the top-right corner and type “Disk Utility”. You can also use the spotlight search by clicking Command + Space. The moment the Disk Utility window pops up, click on “View” and then “Show all hard disk”. You should see the newly added virtual disk space. If you don’t find the new virtual disk space there, you have to redo Step 1 above.
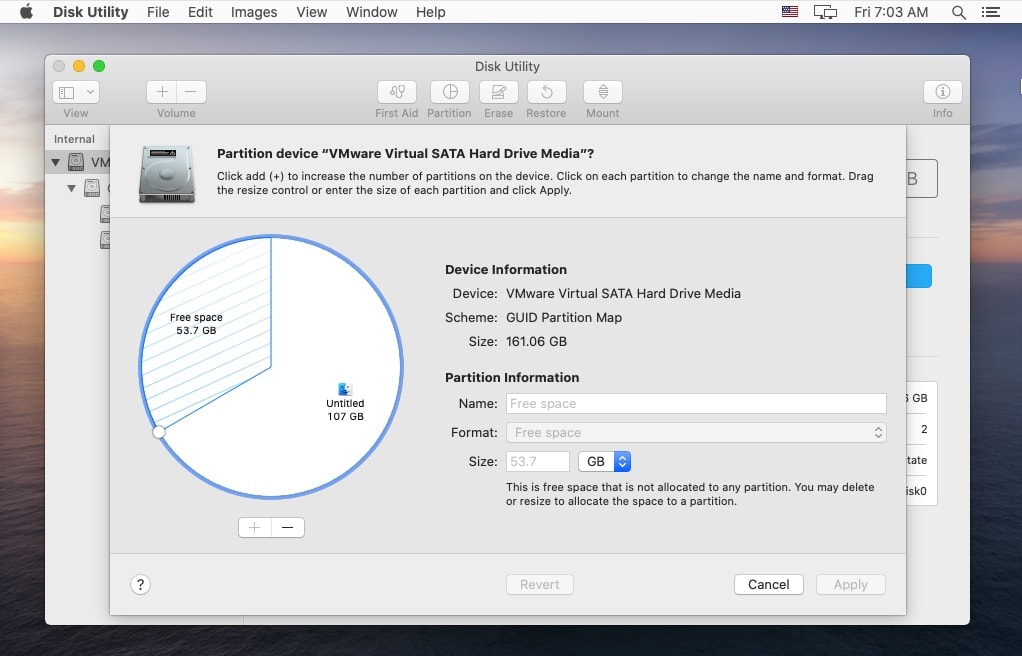
Next, open up “Terminal” by going to the search section in the top-right corner and typing “Terminal”. The Terminal tool will be used to transfer the new virtual disk size to the APFS partition. In addition, you can also use Terminal to reduce the APFS partition. But then let’s learn how to transfer the new virtual disk size to the APFS partition using the following commands:
Locate the APFS Disk that needs to add new capacity, Type: “diskutil list”. You will see the new disk space labelled as “disk0s2”
You will see the area of APFS Container Disk1 running on disk0s2. We need to transfer the space to disk0s2 hard drive. I have about 100GB of Hard disk, and I have about 50GB of new free disk. By using the following command to add 150G to my disk: “sudo diskutil apfs resizecontainer disk0s2 150G”
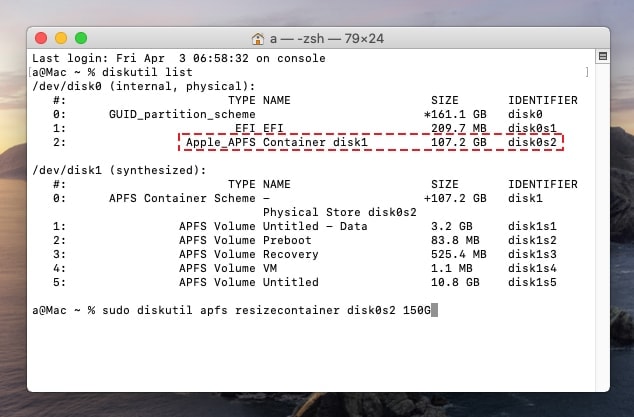
After using typing in the command, Go to Disk Utility, click on “View” and then “Show all hard disk”. You should see the newly added virtual disk space and you will be able to check whether your virtual drive has been resized or not.
In this article, we have talked about what Virtual Machine Disk (VMDK, VDI) is, the types of Virtual Machine Disks and how to expand the size of your mac’s virtual disk using VMware or VirtualBox. If you encounter any problems during the expansion process, kindly leave a comment below. We will always be in touch and ready to help you solve the issues. Thank you.



Leave a Comment