Whether you're a pro or beginner, there are so many things to love about macOS Big Sur! The new user interface is gorgeous and intuitive. It's also the first version that supports ARM Processors for Mac Mini M1 as well as MacBook Air and Pro M1 models.
With the release of macOS Big Sur 11.7 on September 12th, Apple has provided important security updates to their operating system which makes it still a worthwhile choice for those who are looking into this macOS right now!
Download and install macOS Big Sur in a few easy steps with this tutorial. The first method uses the Terminal software on your Mac, while another way requires that you visit Apple's AppStore.
How to Direct Download macOS Big Sur
1. Big Sur Download With Terminal
The Terminal application provides a command line interface on Mac. When downloading Big Sur with this tool, you can download any version of macOS Big Sur if it is still supported by Apple. Example: macOS Big Sur 11.6 or 11.5 version.
Click on the ‘Magnifying Glass’ icon in your Menu bar. Or, you can use the ‘Command+Space’ command to open the Spotlight Search of your Mac. In the search bar, type ‘Terminal’ and click ‘Return.’ Then, click on the ‘Terminal’ application icon you see on your screen.
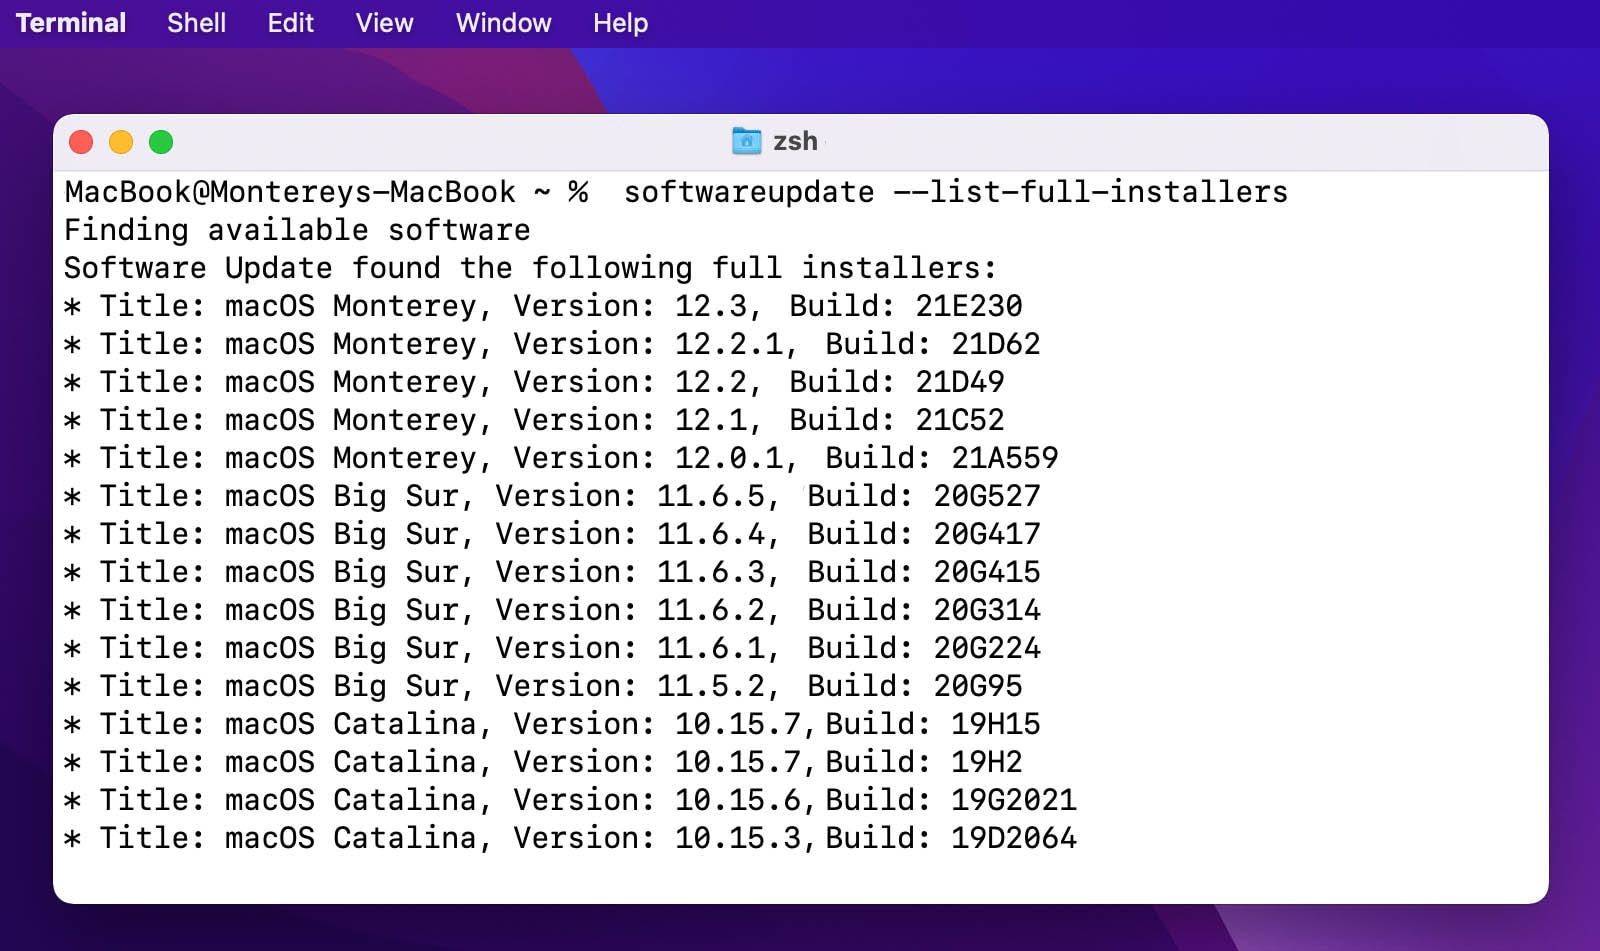
In the Terminal, type ‘softwareupdate --list-full-installers’ to list all version of macOS

Type this commands to download macOS 11.6.5 Big Sur: ‘softwareupdate --fetch-full-installer 11.6.5’

After executing the mentioned command, it will start searching for the available macOS Version. It will now automatically start downloading the macOS after finding them. You will see the macOS on your Application folder.
2. Download Big Sur From App Store
Downloading macOS Big Sur on the App Store is easy, just go to search for it in your App Store. When downloading using this method you will always be able install latest versions which are updated regularly with new features and improvements!
Head over to the App Store, and search for the ‘Search’ icon in the navigation menu. Type ' macOS Big Sur' in the 'Search Bar' and press the 'Return' key.
You can use AppStore link here to download macOS Big Sur.

How to Install macOS Big Sur
Next, we will learn how to install macOS Big Sur. If you are installing a newer version than the existing one then just open up your macOS Big Sur Installer file and it'll start updating that old macOS into something more modern! But if want access older versions on macOS like Downgrade, you need a macOS USB bootable drive to clean install macOS.
When you clean install macOS Big Sur, all of your data on the partitions will be erased and then re-installed with new software. This process gives a fresh start that's perfect for those who want their Macs to look like they were brand new!
1. Backup your Data
You should back up your data before proceeding with the clean install. If you don't, all of that important information could be lost forever! You can use an external drive or create a new partition in Disk Utility for backup purposes if needed; just make sure not to miss any files because there is no going back once they've been deleted from disk: even after performing another restore process.
2. Create macOS USB Installer with Terminal
Now that you’ve formatted the USB drive, you’re ready to turn it into a bootable drive with the help of Terminal. Follow the steps mentioned below:

- Search for the Terminal app with Spotlight Search and open it.
- Copy and paste the following the commands in Terminal, replace ‘Untitled’ with your USB drive’s actual name.
sudo /Applications/Install\ macOS\ Big\ Sur.app/Contents/Resources/createinstallmedia --volume /Volumes/Untitled - Hit the Enter key and once you see “Done” written in the Terminal app, you’re ready to install macOS 11 Big Sur with the USB drive.
3. Boot to macOS USB Bootable
- M1, M2 Mac: Turn on and hold down the power button on your Mac until you see Startup Options window, which will allow for booting from external drives.
- Intel Mac: To access the bootable volumes on a Mac, press and hold Option key when turning it on or restarting. Release this key once you see your computer's startup screen displaying all available drives.
4. Use Disk Utility to Format Hard Disk
Before clean install macOS 11 Big Sur, it is always good to create a backup of your Data. So, connect an external device and backup your macOS with Time Machine.
- Connect the USB drive to your Mac and restart your system while holding down the Option key.
- When the boot option appears on the screen, select the USB Installer drive.
- From the list of MacOS Utilities you see on the screen, click on Disk Utility.

- Select your volume, usually named Macintosh HD and click on "Erase" button.
- Give it a name and in the format field, select APFS partition.
- Hit the Erase button to delete all data and create new partition (We suggest you take the backup of your Data to External Disk).

5. Install macOS Big Sur
Once the disk has been erased, you’ll be taken back to the Utility screen. Click on Install macOS Big Sur and then click on Continue.

Select the destination of the disk you just formatted and wait for macOS to finish installing. Once it’s done, your Mac will restart and you’ll be able to use macOS 11 Big Sur.
With that said, we hope you finally upgraded to macOS Big Sur without any hassle. If you face any issues, then do let us know in the comments. We will try to help you solve those issues.


Leave a Comment