With the invention of Bootcamps, Virtual Machines there have been different ways to run Windows OS on a Mac. You can decide to install the latest Windows OS, Windows 10 1909 OS on your Mac directly (i.e. without using Bootcamp) or running a virtual machine or using the conventional macOS Bootcamp. Whichever way you chose to install Windows on your mac, know that it is a complicated process but with proper guidance help and guidance, you should be fine. Check out our previous articles to know how to install windows on a mac. Today, we reveal a new way you can install Windows 10 version 1909 on a USB drive and run it directly without Bootcamp. You can use it for any Mac or Windows because it is portable and intelligent.
Enough beating around the bush, what is “Windows To Go”? Windows To Go is a full installation of Windows 10 on a USB Drive. It runs directly on the USB Drive without using Bootcamp. You can use Windows To Go from your Mac when you need to read Windows data, or work on a Windows machine or even run it from a Virtual Software. Windows To Go allows you to take your operating system with you everywhere. It serves as a backup just in case your computer fails.
How to Create a Windows to Go on Mac
There are many ways to create setup Windows To Go, but we are going to be talking about the simplest way to set it up and running. We will guide you on how to install it for free and how to use a trusted tool like VirtualBox. You will need to create a Virtual Machine or use a VirtualBox to install Windows 10 on a USB Drive. All you need for this operation is a USB Drive with 20GB space or more to create this installer.
1. Download Windows 10 ISO image.
The very first step is to download the Windows 10 Installer image (ISO). This is a full-size Windows installer, you can click here to be redirected to the Official Microsoft website. The installer size is about 2 - 4 GB, depending on the version you want to use. On a Mac, Open Safari and click this link to download it.
2. Use VirtualBox to install Windows on USB Drive.
As discussed in our previous articles, VirtualBox is a virtualization software and most especially free. VirtualBox will be needed to install Windows on your USB. Go to the VirtualBox page to download and install it
3. Create a VMDK image from USB Drive
Open Terminal in your Mac, type this commands:
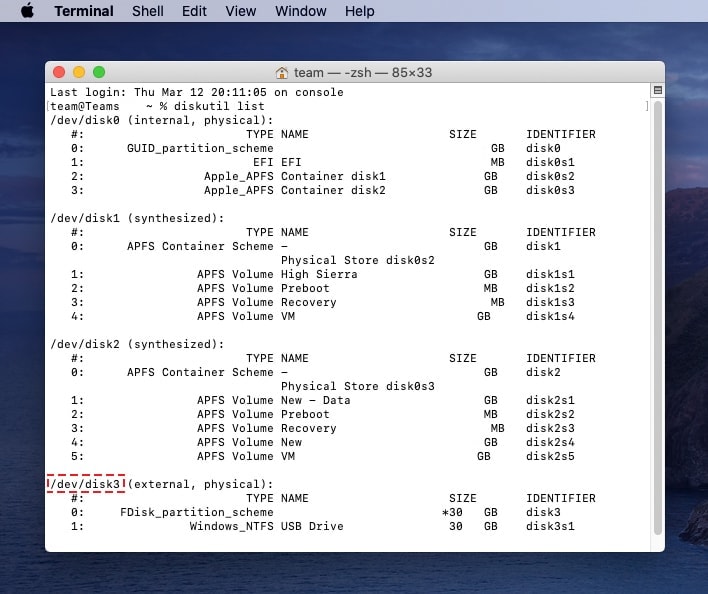
1. To find your USB Drive disk number:
~ diskutil list
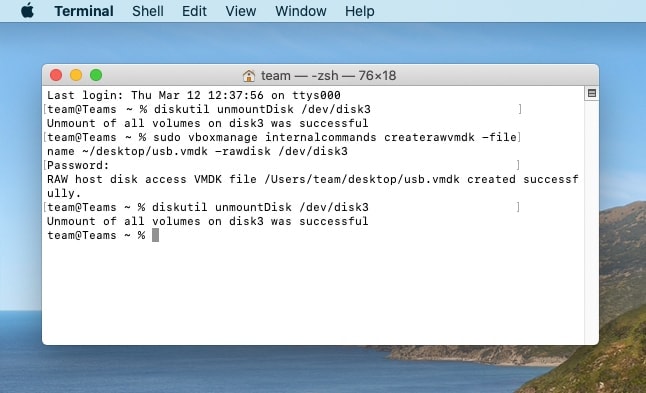
2. Unmount Disk#
~ diskutil unmountDisk /dev/disk#
3. Create VMDK image from Disk#
~ sudo vboxmanage internalcommands createrawvmdk -filename ~/desktop/usb.vmdk -rawdisk /dev/disk#
4. Unmount Disk# again
~ diskutil unmountDisk /dev/disk#
4. Create a new Virtual Machine in VirtualBox.
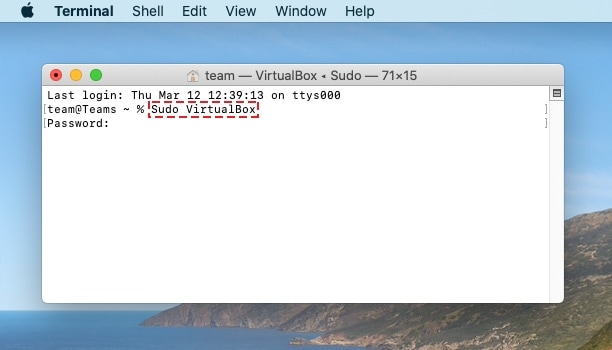
Run VirtualBox with Sudo command in your Mac. Type this: sudo VirtualBox.
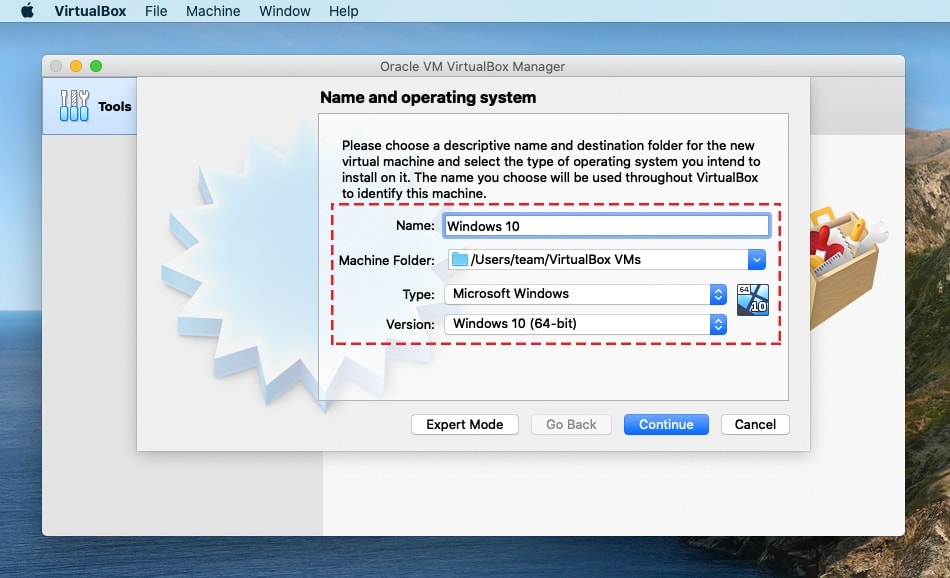
Open VirtualBox and then click the “New” button to create a new virtual machine. In the Name and OS section, select the name “Windows” and “Windows 64bit OS”. Click “Next” to go to the next step.
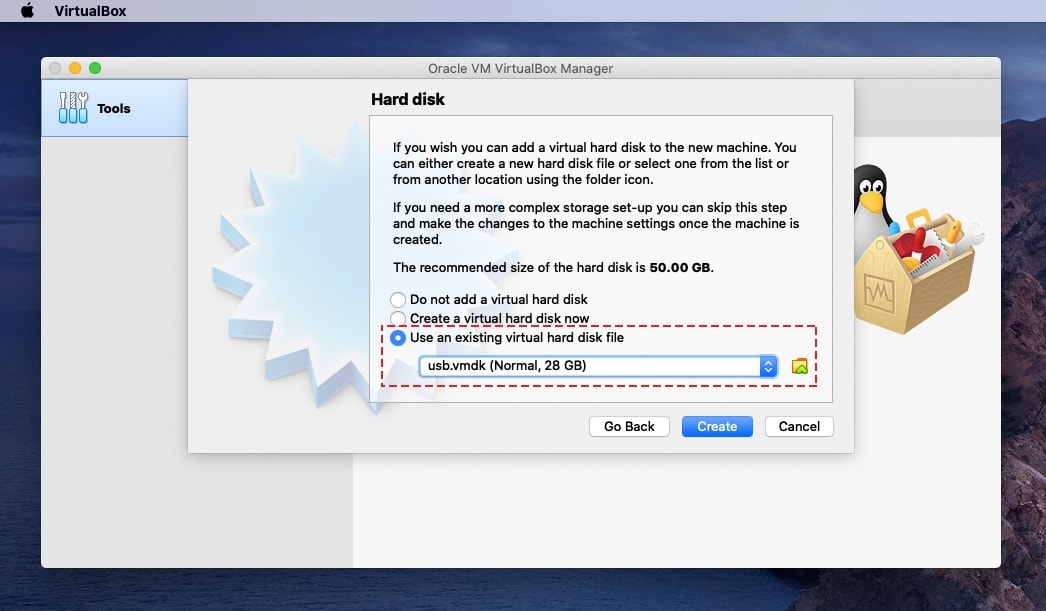
In this step, you will have to choose the amount of RAM and CPU you want to allocate for this new Virtual Machine. For this installation, it is advisable to allocate 2GB - 4GB RAM and 50% of CPU. Click “Next” to move to the next step. In the hard disk select "Do not add a Virtual Hard disk", we will add the USB.vmdk in your desktop. Click “Next”.
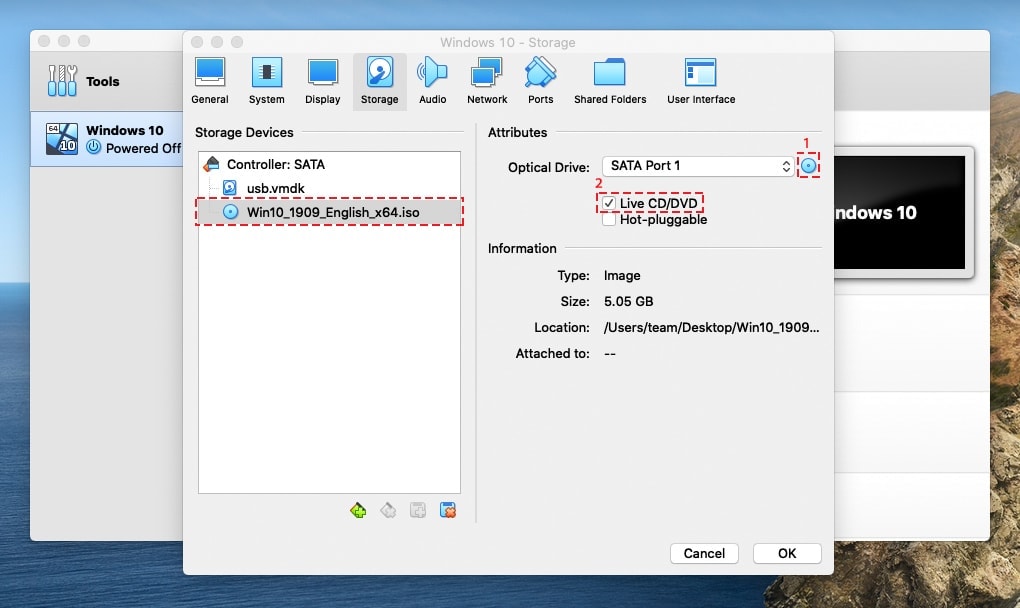
Select the virtual machine you just created then go to Settings and Storage. At Storage tab, click on the “Add” button with the CD/DVD icon and Open your Windows 10 ISO file.
5. Install Windows 10 on USB Drive
Turn on your Virtual Machine and press Enter to enter the Windows installation. Press the key combination Shift + F10 to open CMD in the Windows installer.
The next step is to format the USB Drive to GPT partition with Diskpart Tool in Windows. Execute the following commands.
~ Diskpart
~ List Disk
~ Select Disk 0
~ Clean
~ Convert GPT
~ Exit
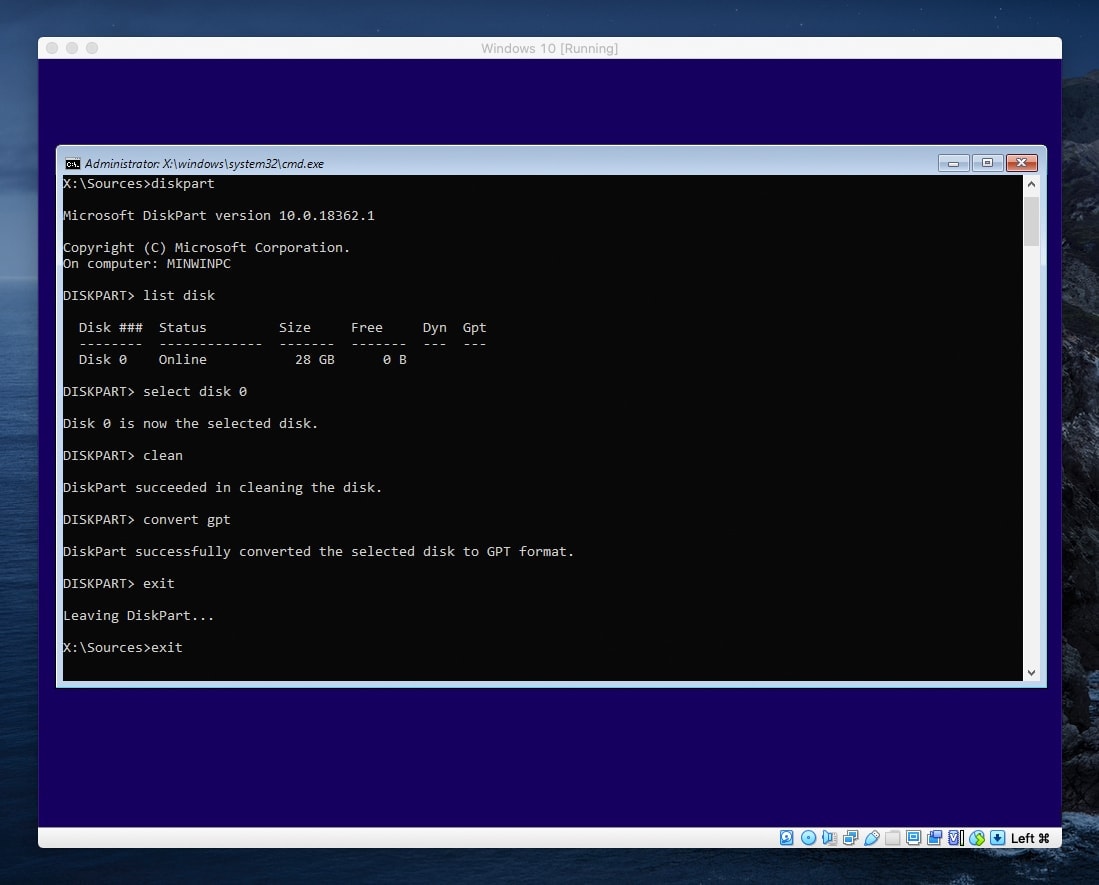
After converting USB Drive to GPT standard, it will be easy to install Windows 10 on your USB Drive. Wait for the installation to finish then turn off the virtual machine. Your Windows To Go is ready!
6. How to use Windows to Go on Mac
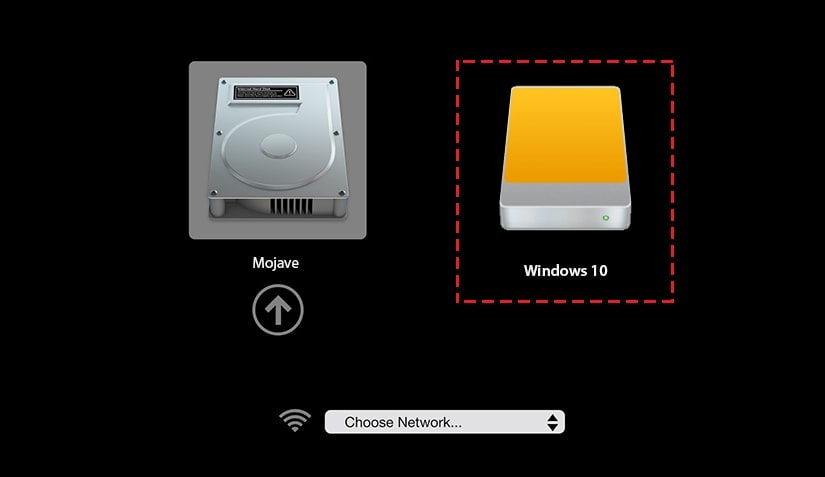
Connect the USB Drive to your Mac then Shut down your Mac and reboot, hold down "Option" key (or press right Alt key repeatedly) to enter the boot menu on the Mac. Here you will see the Windows operating system right next to macOS, select the Windows 10 OS. You will get to use Windows OS without bootcamp.
The next step is to create an account on your Windows To Go, the account creation is like the conventional account creation on a PC. This process will take just a few minutes.
After setting up your account on Windows, the next step is to install the recommended drivers for your Windows OS. A driver is a component that helps Windows and other software connect to the hardware on your Mac.
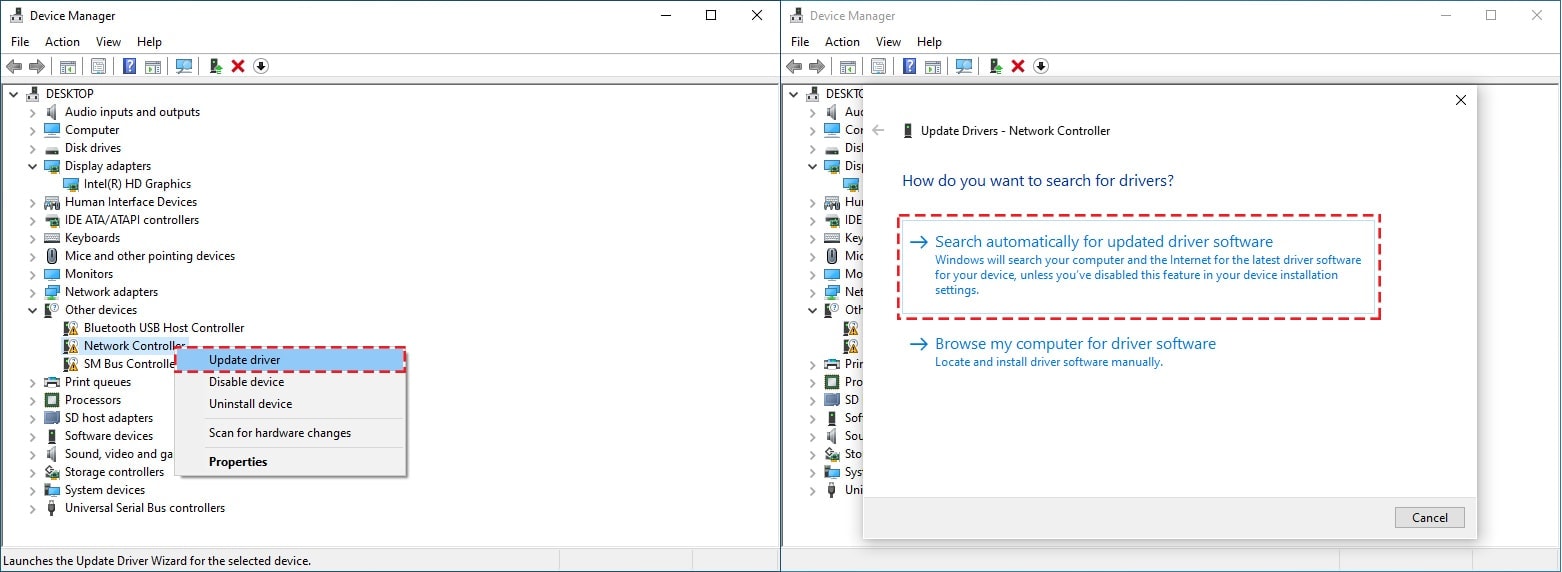
To install the drivers, Right-click on the Windows Icon on left and select "Device Manager" then select the missing driver, right-click and select "Update driver" then click "Search automatically for updated driver software". The process is complete and you will have a complete set of Windows on your USB drive. Your Windows To Go is ready to be used on any Mac.
Thanks to the development of USB 3.0 or USB C, there are USB drives that are bigger and faster. With a USB C drive, you can easily install Windows on a USB drive and use it when needed. This is a very interesting tutorial and we hope you liked this tutorial. If you have any questions, kindly leave it in the comment section. Thank you!



Hi, thank you for the great and easy-to-follow instructions. I was able to make it through all the steps except for the last one. When I restart my mac and hold the option key, I still only have the mac os option instead of the mac and windows. Any advice?
I tried googling around and some make it seem like it had to do with windows being in NTFS format (?) but I saw this say boot camp is not required so I am not sure if that is the issue. Any advice would be great. Thanks.