Apple's 18th major release of their macOS operating system, macOS Monterey, is now in its final version. Single user can start testing out its new features like visual scripting Shortcut applications to create macros on iOS devices and a brand new Safari internet browser. Apple released the macOS Monterey 12 final version, which means it should be fast and easy to use.
So is Monterey slow for you, too? If you're still following along, the answer is likely 'yes.' More than a few macOS 12 Monterey users are struggling with performance issues and lag on their Mac. What’s worse is that there may be more than one reason why your computer is slow, and finding the cause of your problem can be frustrating without some guidance.
Don't waste time searching "mac slow after Monterey update" just to become more confused than when you started. We've put together this quick guide with simple fixes to help with your macOS Monterey problems. Follow our recommendations to speed up macOS 12, make your Mac boot faster, and clear up storage for Monterey to run tasks faster.
How to Speed up macOS Monterey 12
You can’t get much of your development or testing work done with a Mac running slow all the time. The sections in this article break down how to quickly speed up your version of macOS 12 with simple instructions.
The best part about making macOS 12 run faster is that you only need a few minutes of time. Whether it's disabling one or two things or cleaning up your storage, improving your Mac's performance is easier than you may think. As you read through the sections below, remember to regularly follow our recommendations and keep up with your maintenance schedule.
1. Reset SMC and NVRAM/PRAM
These days, Macs use NVRAM (non-volatile random-access memory) to quickly load their operating systems, and System Management Controllers (SMC) to manage voltage, fans, and temperatures. SMC and PRAM that have become corrupted can directly affect operating system load speeds and can make any MacBook slow after Monterey update installations are complete.
Let's focus on SMCs first, which is what keeps your power supply unit (PSU) and your computer processing unit's (CPU) fans working properly. We'll show you how to reset SMCs on several different Mac computers below.
Reset SMC on Mac
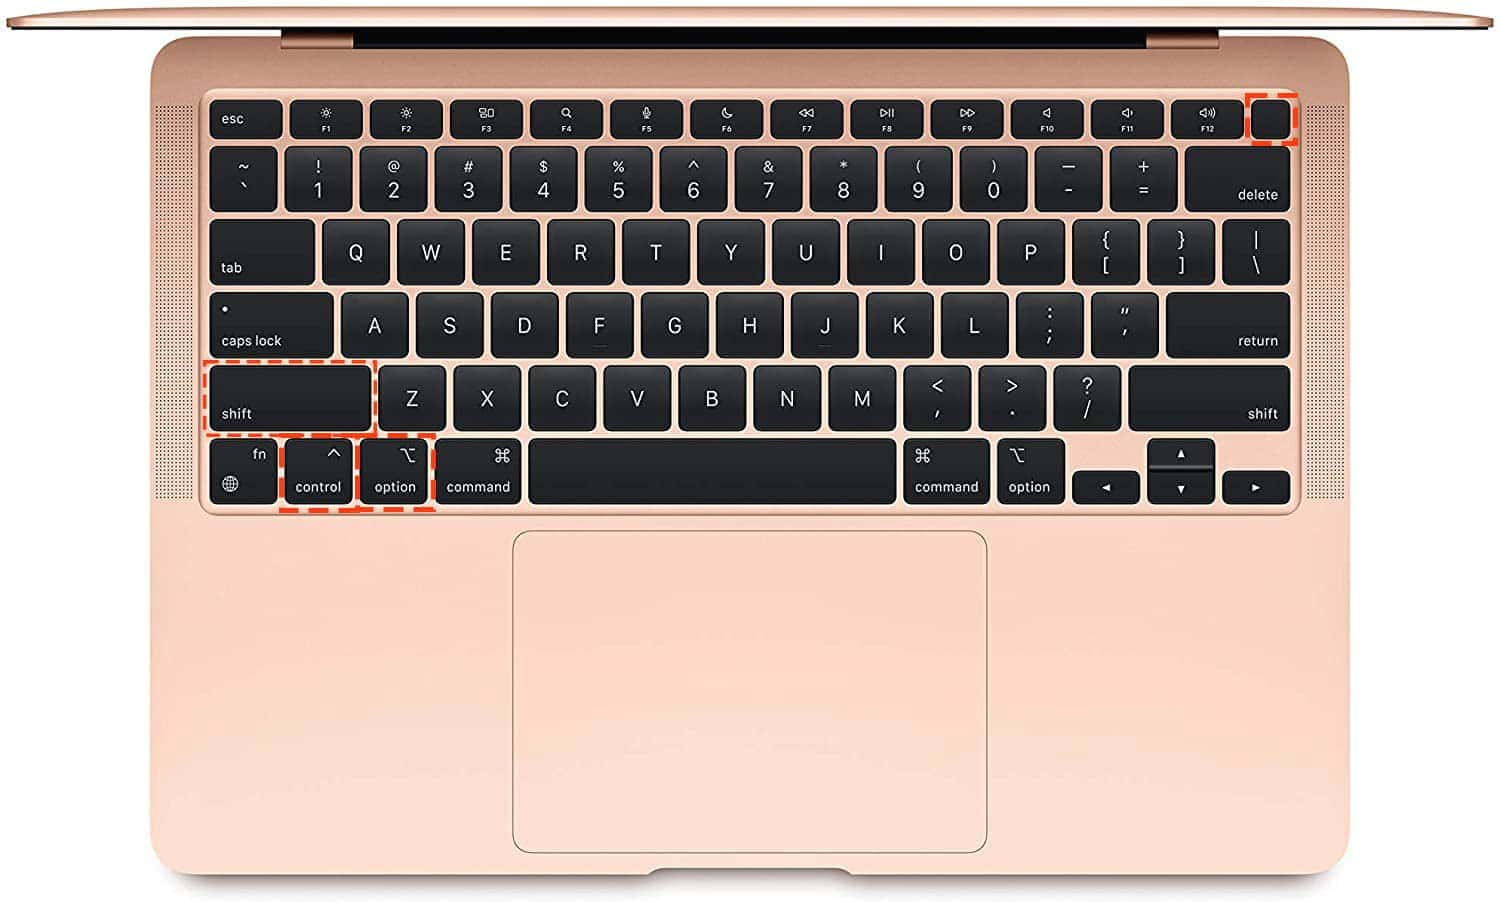
Reset the SMC on a MacBook Air, MacBook Pro, or MacBook:
- Shut down your MacBook and remove its power cord.
- After waiting 15 seconds, plug your power cable back in.
- Before turning your MacBook pack on, press and hold the left shift, option, control, and power buttons down for at least 10 seconds.
- Release the keys and power your MacBook on as you normally would.
Reset SMC on iMac, Mac Pro, Xserve, or Mac Mini
- Shut down your MacBook and remove its power cord.
- After waiting at least 15 seconds, plug your power cable back in.
- Wait another 5 seconds and power your MacBook on as you normally would.
Reset Mac NVRAM
If your operating system is still taking a while to boot after you reset your SMC, it's time to consider resetting your NVRAM. It's recommended to reset MacBook VRAM if you're experiencing screen resolution issues, inaccurate battery charge reports, or issues with booting from the wrong storage device.
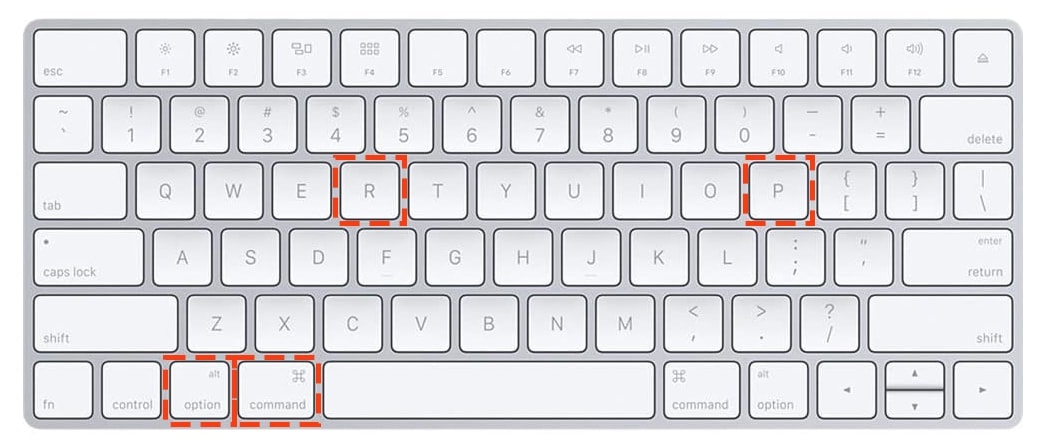
Follow these steps to reset your Mac NVRAM and screen resolution:
- Shut down your MacBook and wait at least several seconds.
- Power your Mac back on and press and hold down the option, command, P, and R keys at the same time.
- Hold the keys down until your Mac restarts and you hear a beeping sound.
For users who may feel uncomfortable with resetting their Mac's SMC and NVRAM, it's important to note that SMC and NVRAM resets don't cause data loss. Mac users can safely reset their NVRAM and SMC if they're experiencing long operating system boot times or screen resolution issues.
2. Disable Hidden Startup Programs
Not every startup program that impacts your startup speed is visible in your system's preferences. You'll need to follow a few extra steps to display and disable hidden startup items that are still slowing down Monterey.
When you download and install certain applications on your Mac, those apps may try to keep themselves updated as often as possible. These applications install hidden services and auto-update features that run in the background as soon as you boot up your Mac. If you’re still experiencing a Monterey slow login issue, you need to remove hidden startup processes.
We'll be using the Clean My Mac tool, to disable our hidden startup items:
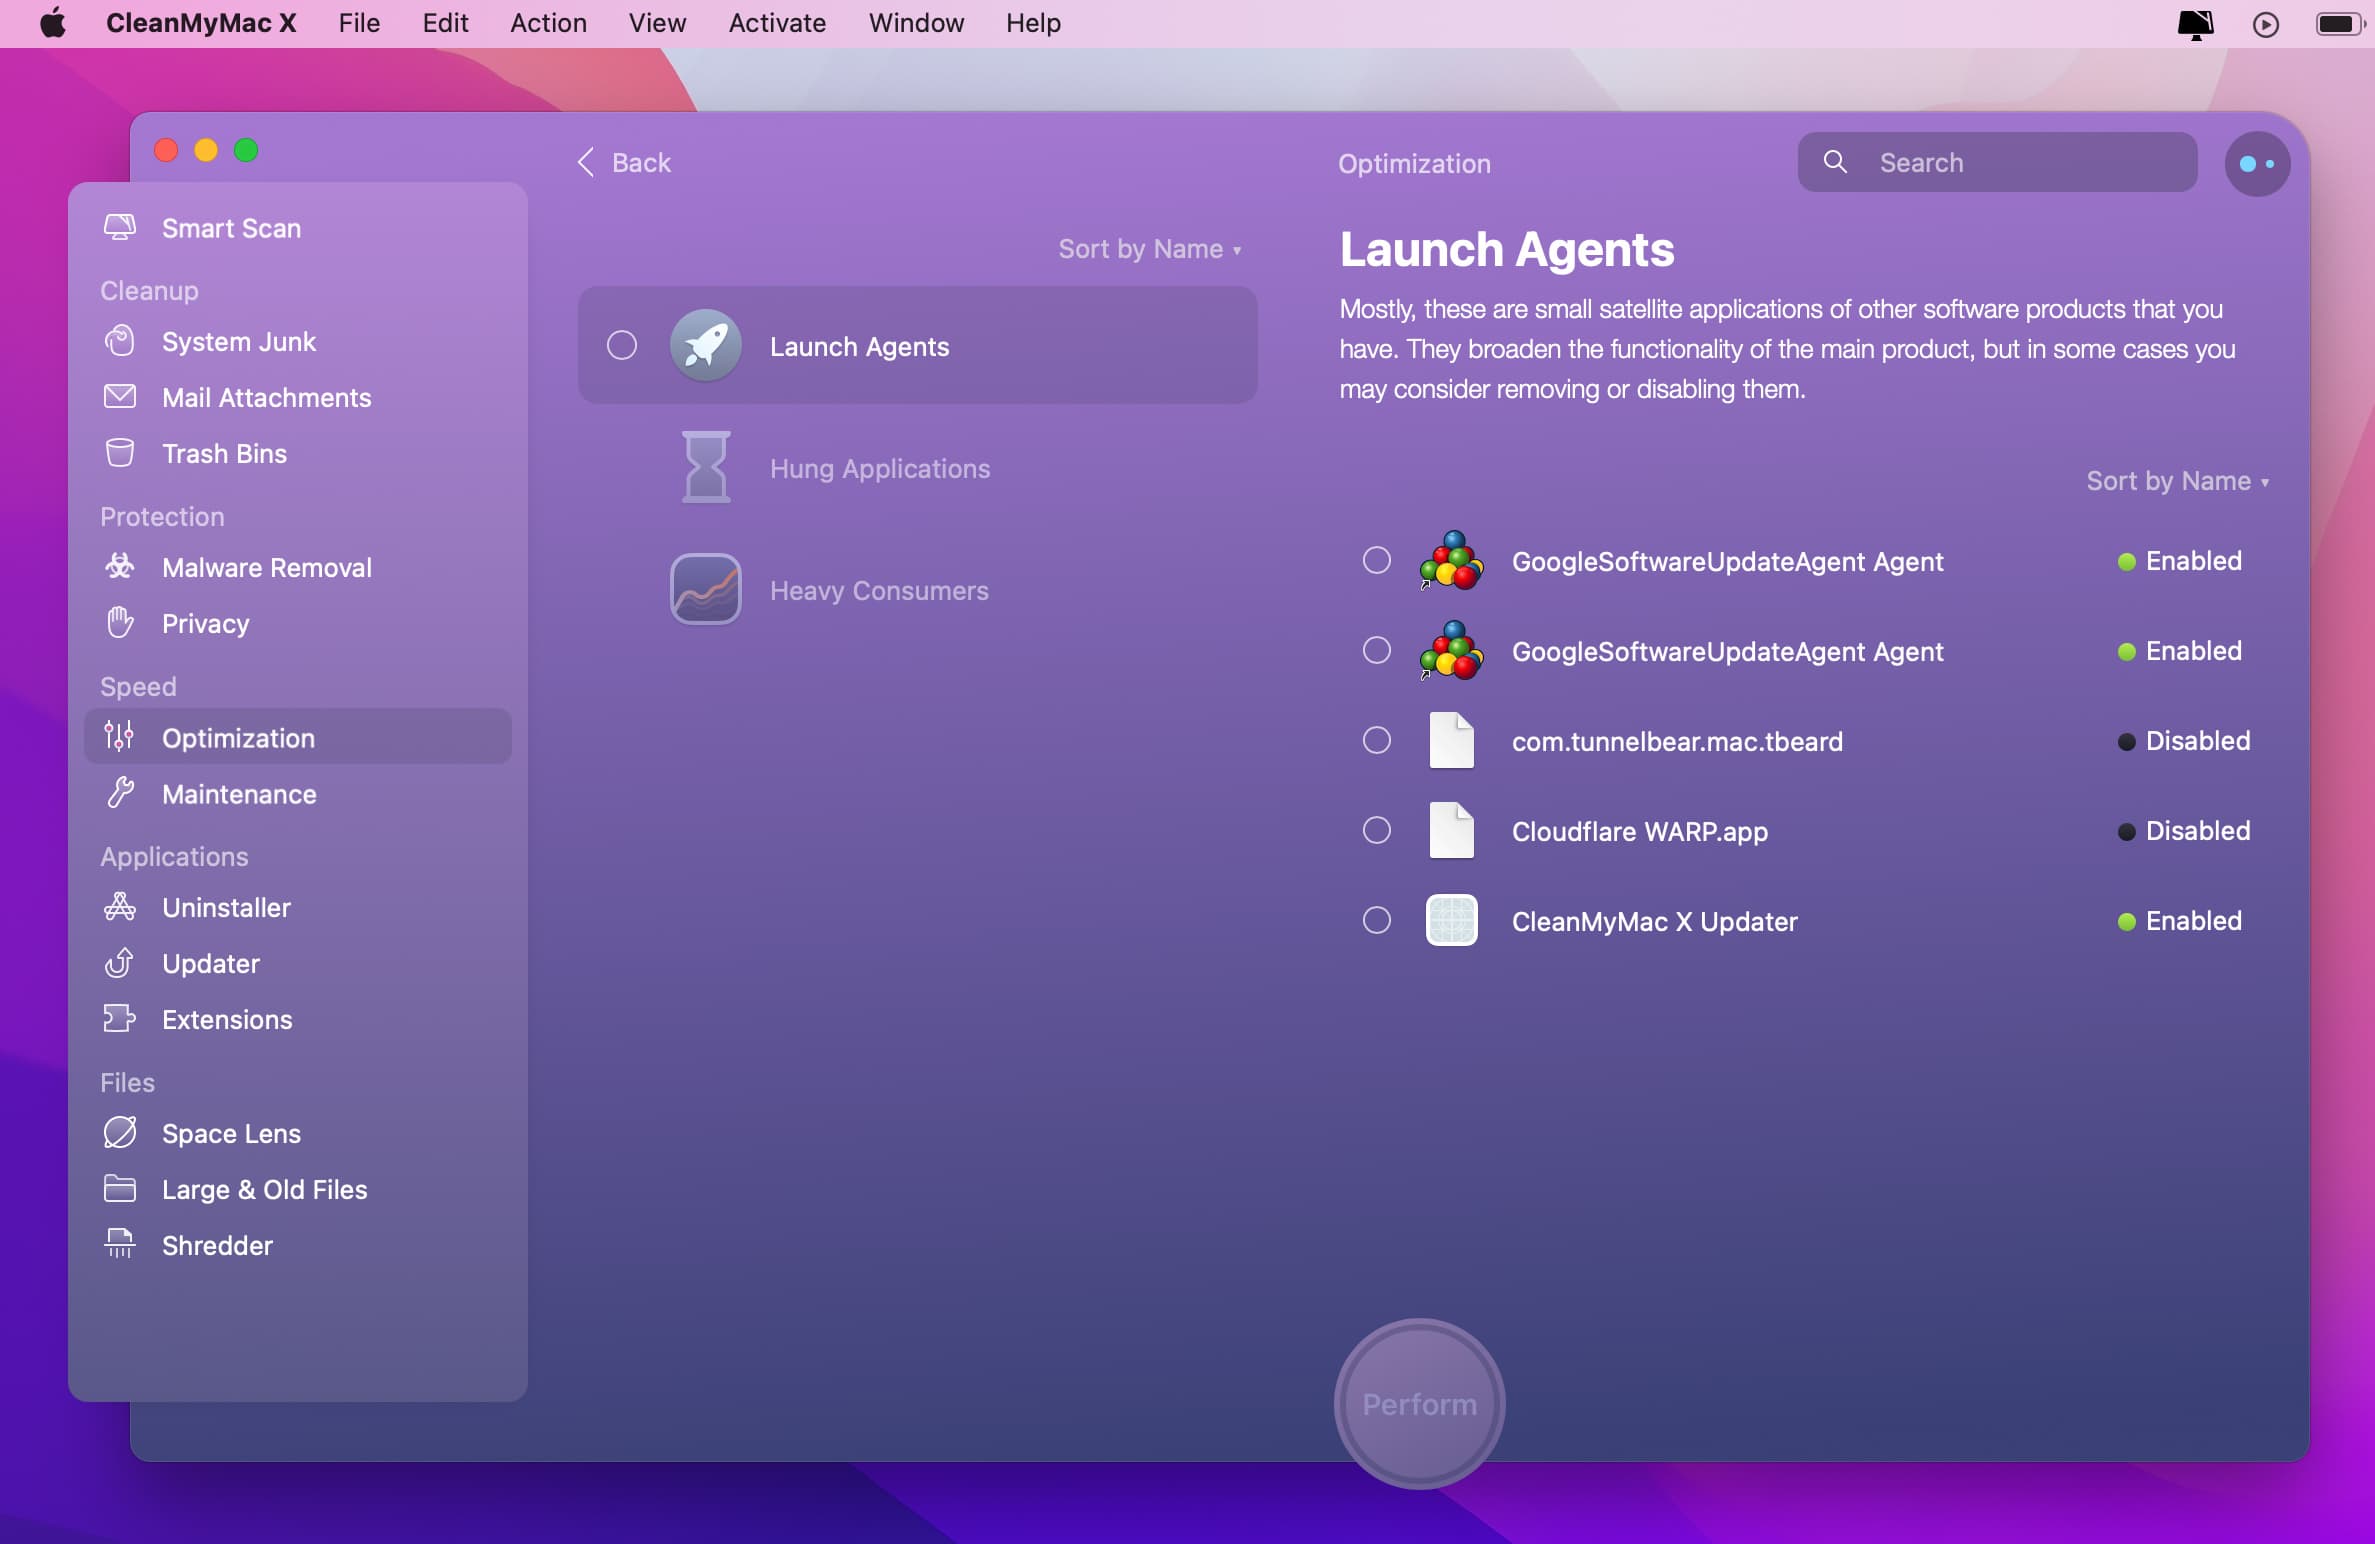
Follow these steps with Clean My Mac to disable hidden app services:
1.Open the Clean My Mac tool.
2.Navigate to the Speed module on the left side of the window.
3.Select Optimization and then click Launch Agents. This displays a list of hidden updates and service apps that run every time you power on your Mac.
4.Choose the hidden startup programs that you want to disable or remove.
If you've followed our steps so far, your Mac should already boot noticeably faster. It's recommended that you take a minute or two more to update your most-used applications for macOS12 while you're at it. Newer versions of your applications may be better optimized to run with Monterey and will also run more smoothly once you disable startup programs.
3. Use The macOS Monterey Optimize Storage Feature
There are more than a few benefits that come with a clean hard disk drive, but having a messy one can turn things into a nightmare. With the macOS Monterey Optimize Storage feature, users can organize their drive and optimize its.
The Optimize Storage feature automates the task of organizing SSD files and freeing up storage space.
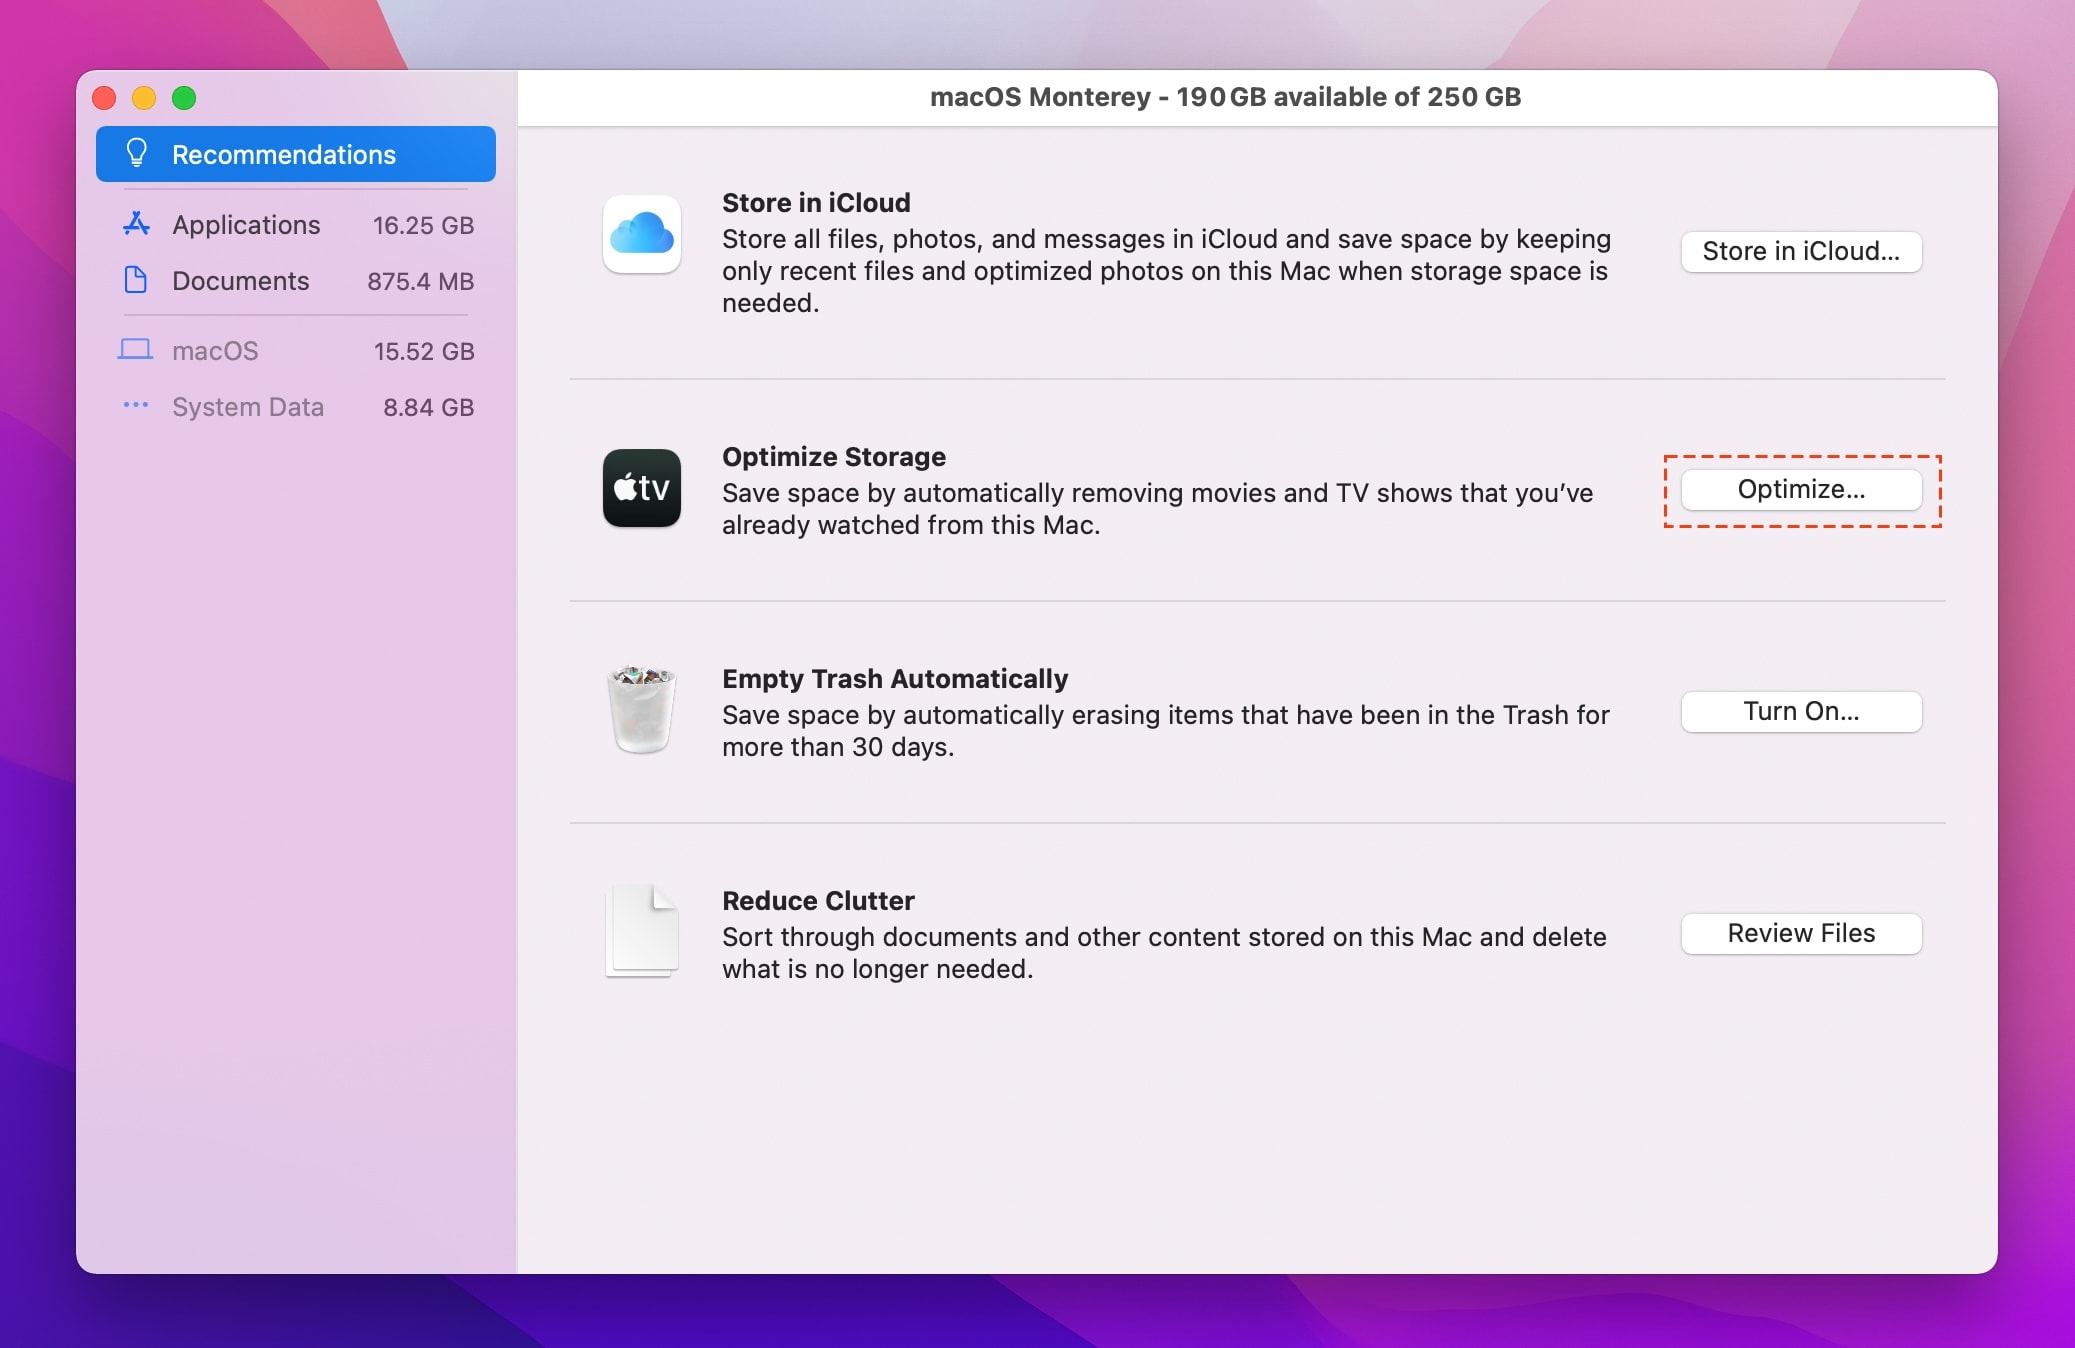
Follow these steps to get started with Optimize Storage with macOS Monterey:
- Click on your Apple menu on the top-left side of your screen.
- Navigate to the About This Mac option, select Storage, and then click Manage.
- In the pop-up window that appears with options to Store in Cloud, Optimize Storage, and Reduce Clutter, select the Optimize Storage option.
Now that you've activated macOS Monterey's Optimize Storage feature, the application and program files, as well as the media and documents on your HDD, will be organized based on their category. Optimize Feature also removes idle and unused files from your drive, which reduces hard drive clutter and makes it easier for macOS to execute operations faster.
4. Use the Activity Monitor to Disable Power-Hungry Apps
Is Monterey slow even after you've followed the above tips and tricks? A Monterey Update can make MacBook slow and cause the RPM of your fans to skyrocket. If your MacBook's performance suddenly takes a nosedive after your Monterey update, it's time to take a look at your applications.
Power-hungry applications often gobble up your power supply's voltage and slow down your MacBook. These apps run in the background and can be difficult to detect if you aren't looking for them. If left unchecked, background applications can use excess RAM and CPU resources that cause your operating system to come to a standstill.
Limited RAM and CPU space leave your OS with little room to execute even simple tasks and commands.
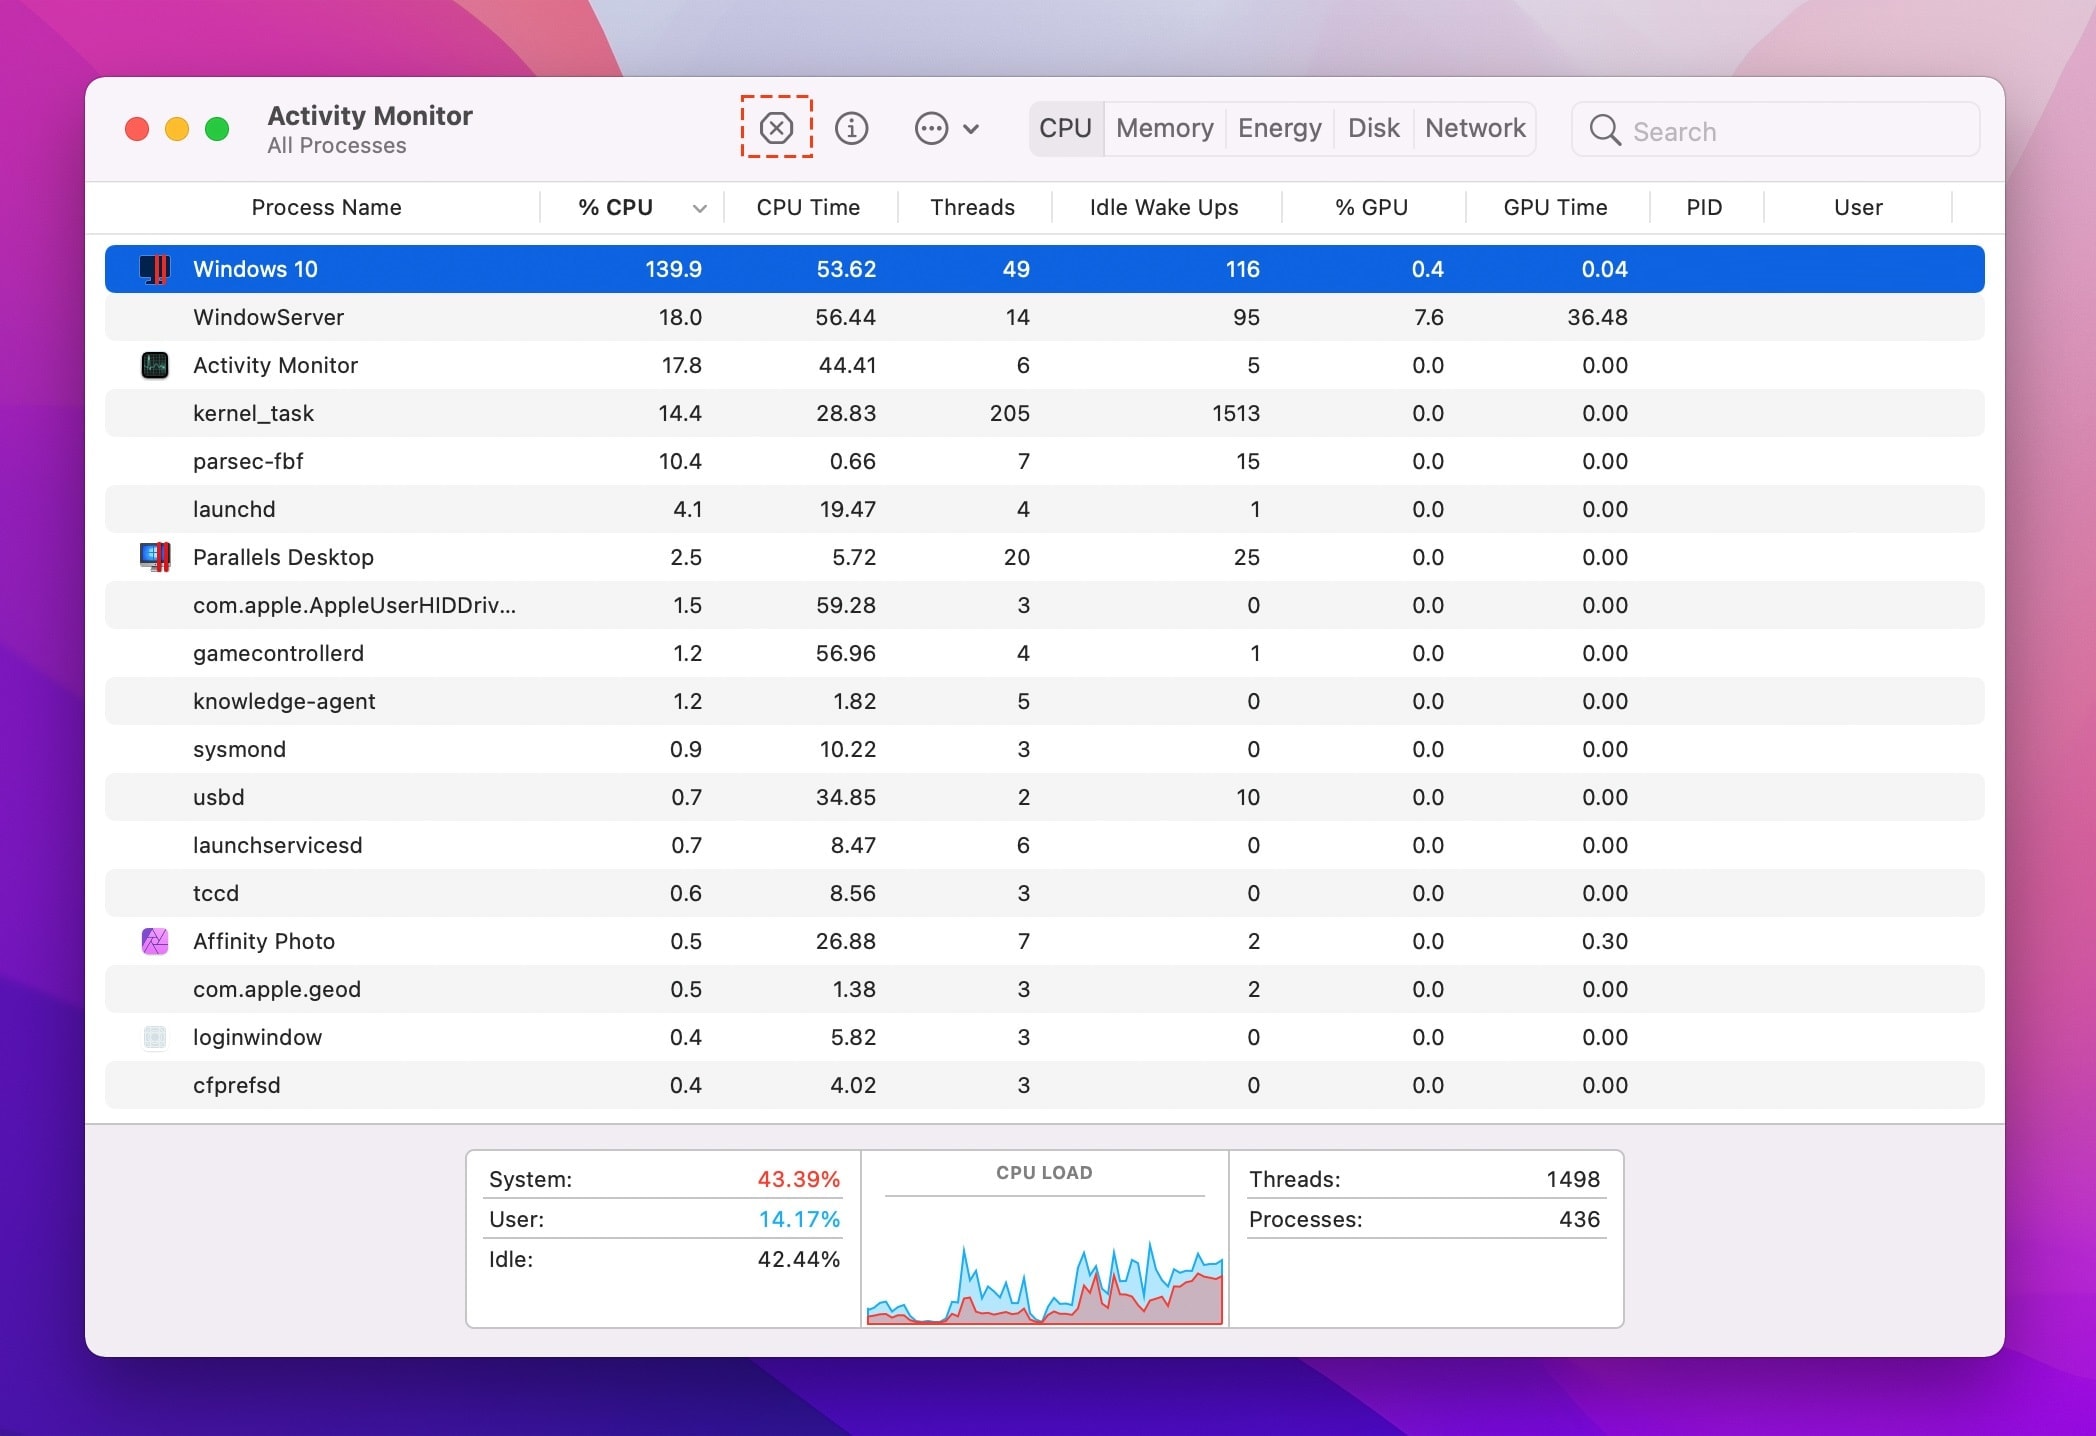
Follow these steps to disable power-hungry apps running in the background:
- Navigate to Applications in your Apple menu and select Utilities.
- Double-click Activity Monitor to launch the Activity Monitor module.
- Check for applications taking up excess CPU resources by clicking the %CPU column. You should look for apps using the highest percentage of CPU resources.
- Disable power-hungry apps you don't regularly use by selecting them and clicking the X at the top-left corner of the window.
- To locate apps using too much RAM, click the Memory tab and follow the same process outlined above.
If you need to save your changes during the above process, you can always choose the Quit option to save all changes and close the application. You can also select the Force Quit option for a faster application shutdown, however, this option does not save any changes you've made. The latter option is the most effective as it's also the quickest and often results in the largest speed increase while running macOS Monterey
5. Clean up Your System Junk and Free Up RAM
Slow Mac often have heaps of system junk such as logs and cache files that accumulate over time. Macs can end up generating too much junk over time which takes up gigabytes of precious space. Too much system and app junk make it difficult for your MacBook to read and write new data on its drive, eventually causing it to slow down.
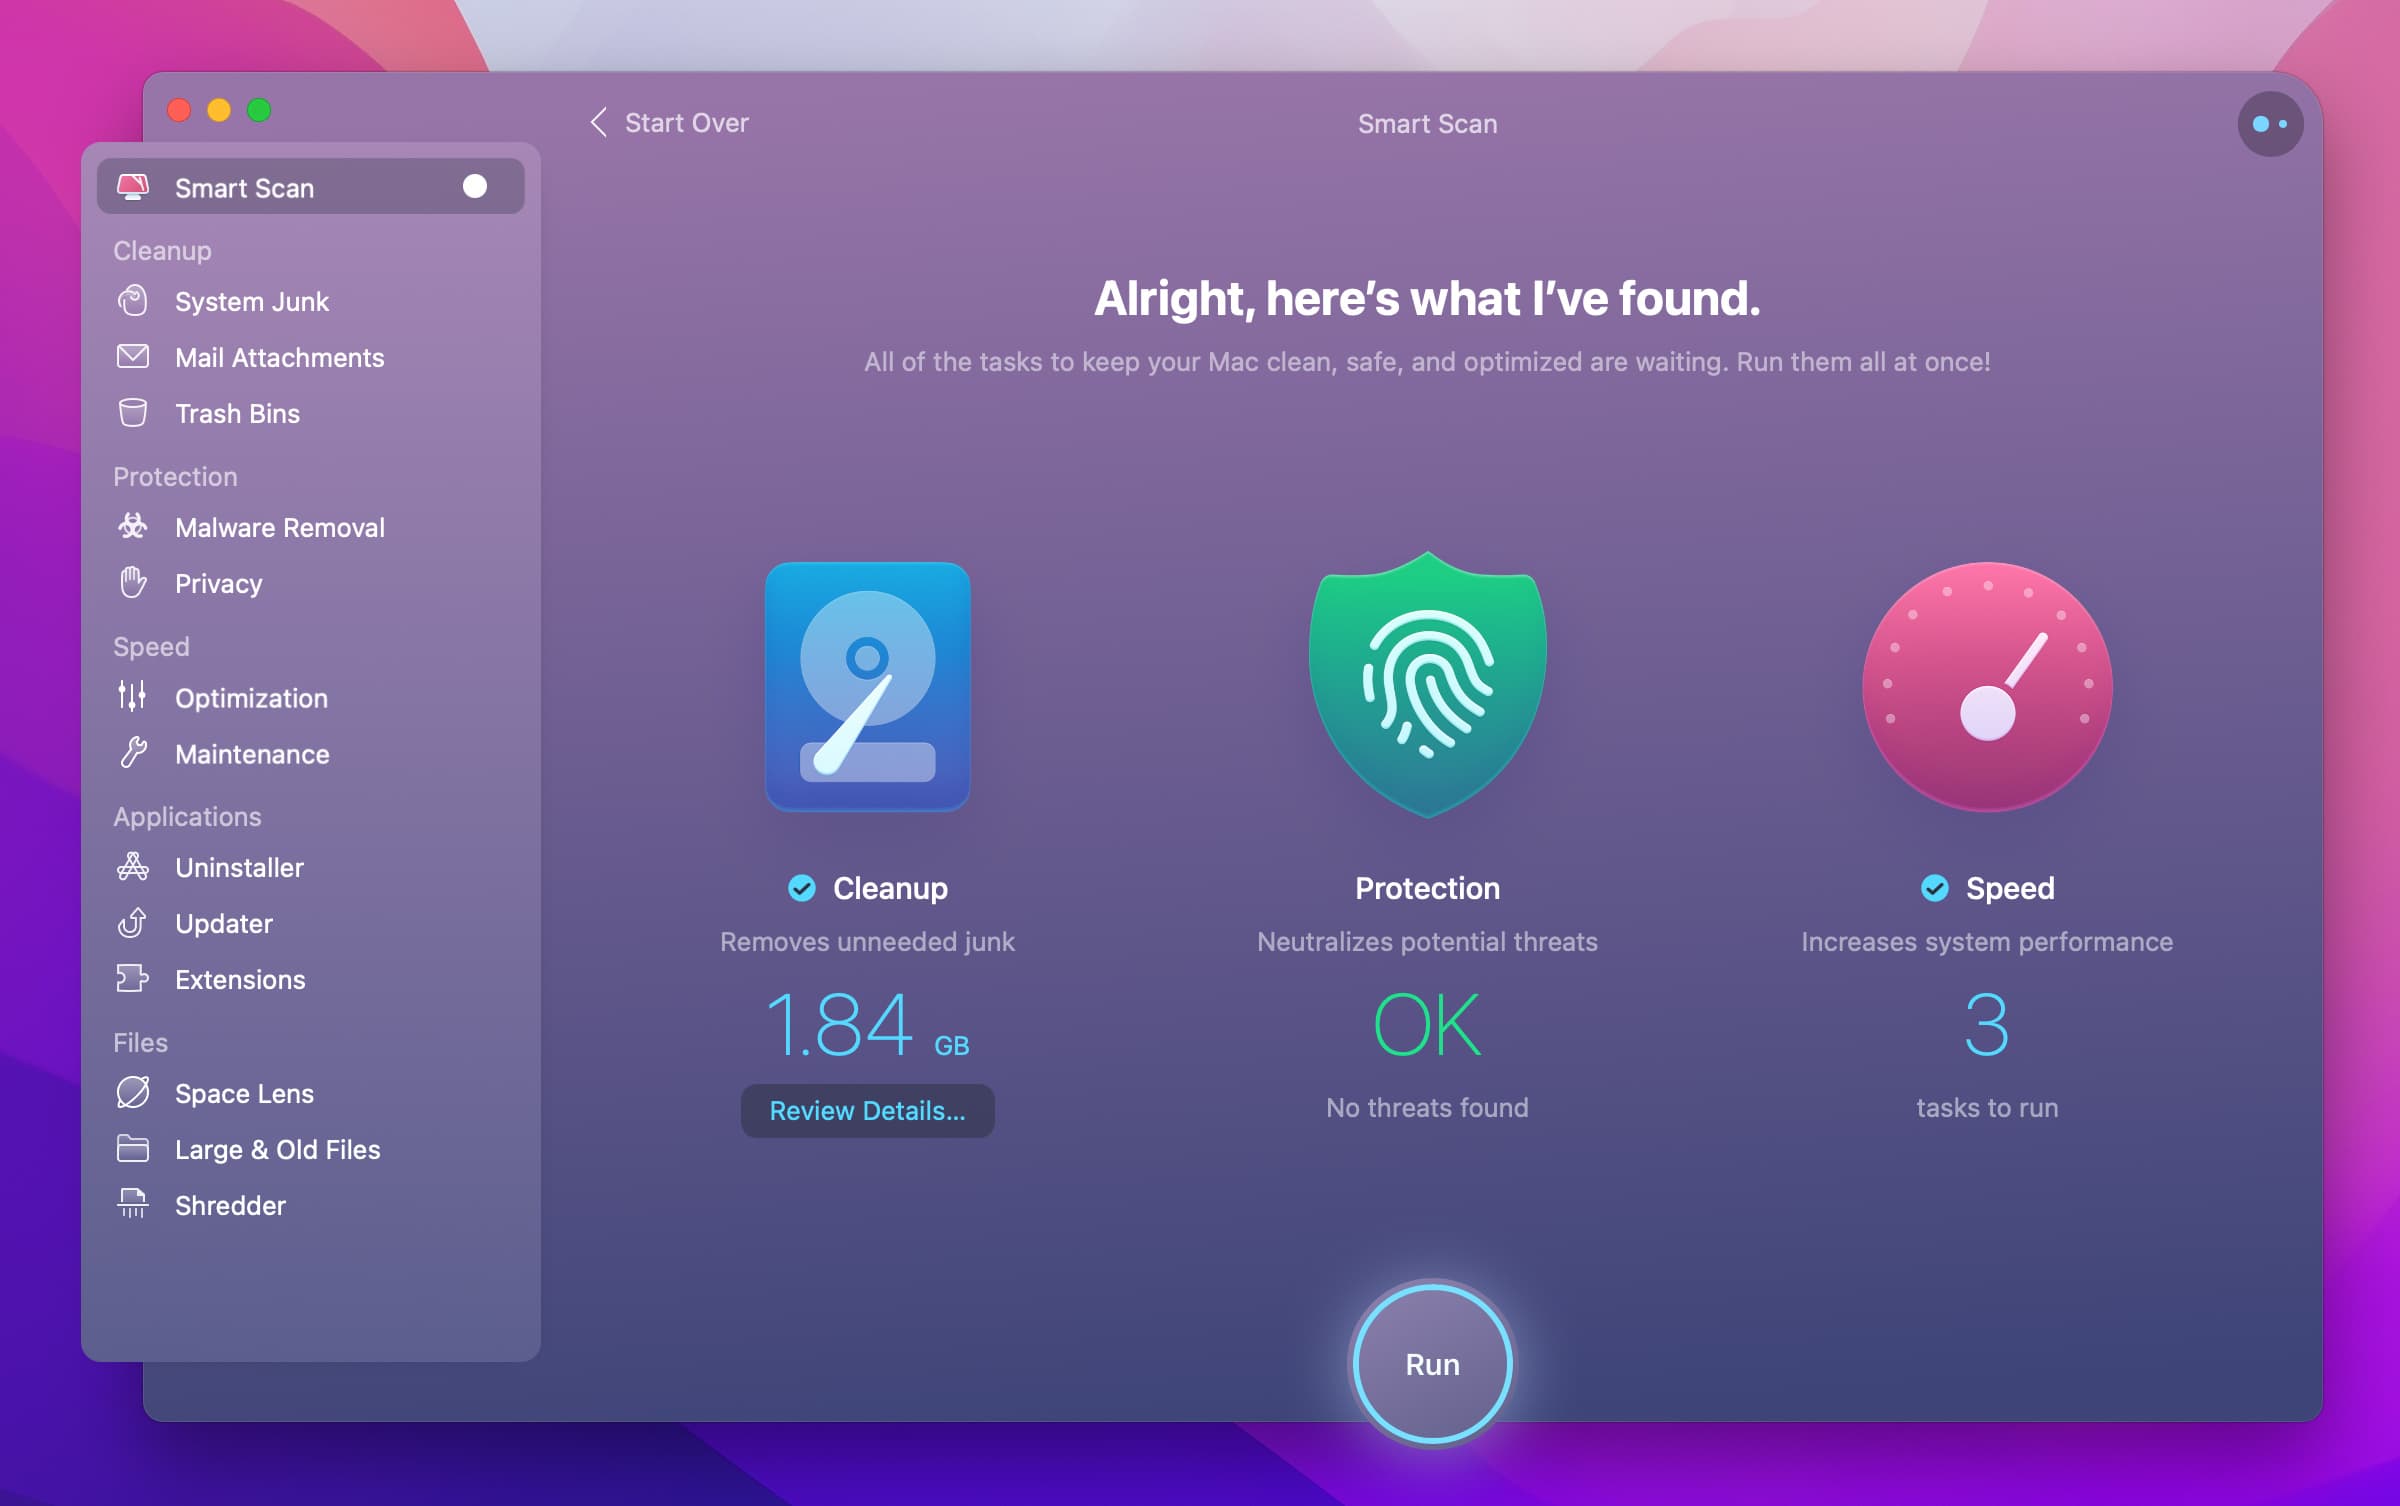
The main advantage to using third-party applications to remove system and app junk is the efficiency they provide. Tools like Clean My Mac X automate the process of scanning for and deleting unneeded files, trash bin data, iTunes junk, and mail attachments. Smart automation means you don't need to spend time manually cleaning through your critical system files and potentially causing system issues.
6. Confirm That Your Mac is Compatible with macOS Monterey
As is the case with most operating systems, minimum hardware qualifications are required for an operating system to boot properly. Depending on your Mac's hardware and the year it was released, you may run into some issues when trying to finish an update install of macOS Monterey.
As a general rule of thumb, MacBooks that were released before 2012 are not compatible with the Monterey operating system. Attempts to install the Monterey operating system on a pre-2021 mac will cause severe performance lag and slow operations.
The following devices support macOS Monterey:
Mac Pro (late 2013)
iMac Pro (2017 or later)
iMac ( late 2012 or later)
Mac Mini (late 2012 or later)
MacBook Pro (Mid 2012 or later)
MacBook Air (Mid 2012 or later)
MacBook (Early 2015 or later)
If your Mac doesn't fall under one of the categories in the above list, it likely does not have the graphics processing power to support macOS Monterey. Double-check with further research, though, whether your hardware specifications meet the minimum requirements for macOS Monterey.
7. macOS 12 Slow Wifi Speed
Multiple factors can potentially impact the Wi-Fi speed you get on your Mac. Between the internet browser that you use to the amount of clutter on your Mac, Wi-Fi connections are sensitive and can cause slow internet browsing.
Some things that impact your Wi-Fi speed have nothing to do with your Mac. In fact, it's a good idea to first start with your router if you're experiencing slow Wi-Fi. Restart your router by simply turning it off, waiting a few seconds, and turning it back on. If this doesn't seem to do the trick, you can try relocating your router to a room that's closer to where you normally use your Mac.
Next, check the Domain Name Server (DNS) settings currently configured on your Wi-Fi network. Your DNS system is similar to a phonebook: it's like a directory of device names that match with IP address numbers
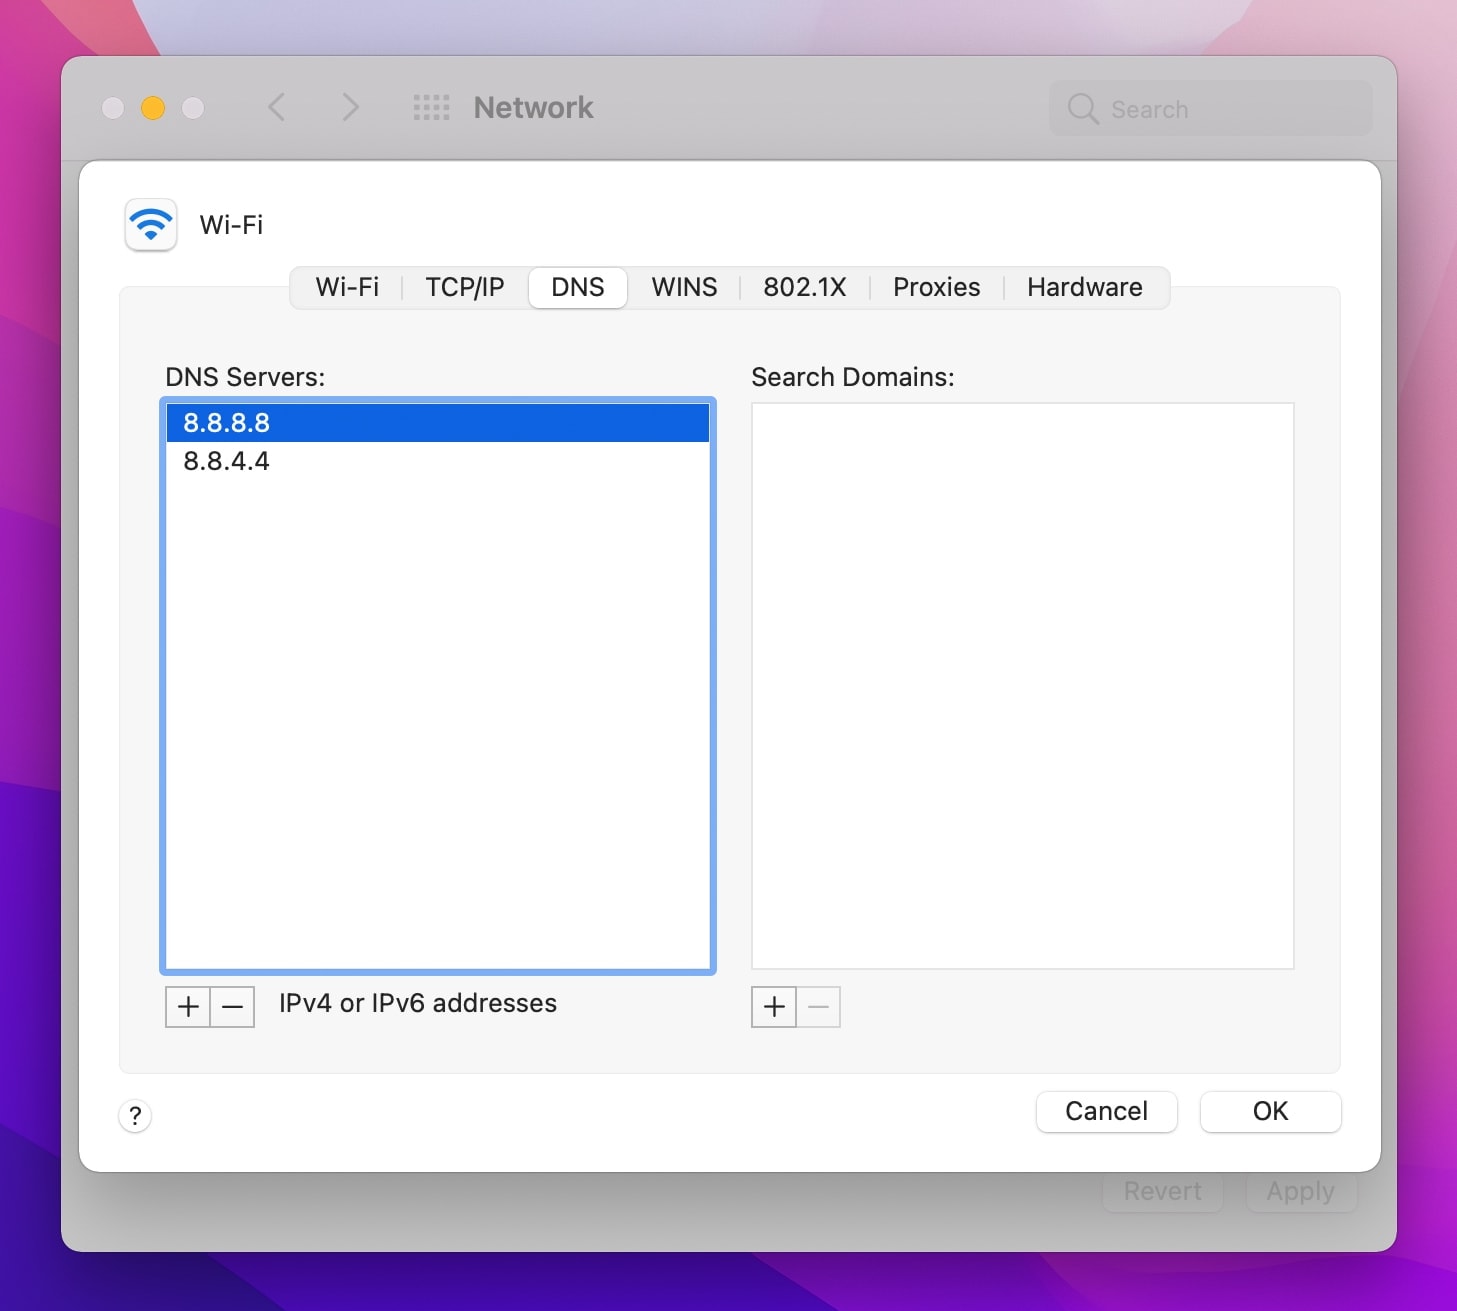
Follow these steps to check DNS settings on your Wi-Fi network:
- Navigate to your Apple menu and select System Preferences.
- In the Control Panel, select Network.
- Choose Wi-Fi if you're using a wireless connection or choose Ethernet if you're connected via Ethernet cable. Select the DNS tab in the pop-up window that appears.
- Add a new Google DNS server by clicking the add (+) button and adding the IP addresses "8.8.8.8" and "8.8.4.4." Whichever address is the fastest for your DNS server to access will be selected first.
8. Moderate the UI Experience
macOS Monterey brings with it an improved user interface that includes more customizable settings. It's recommended that you moderate the UI experience before going all-in on the new features.
Certain effects such as transparency and motion, while enjoyable, can negatively impact your Mac's processing resources. macOS Monterey will slow down when your UI is using too many resources, so you should consider reducing these effects for the best performance.
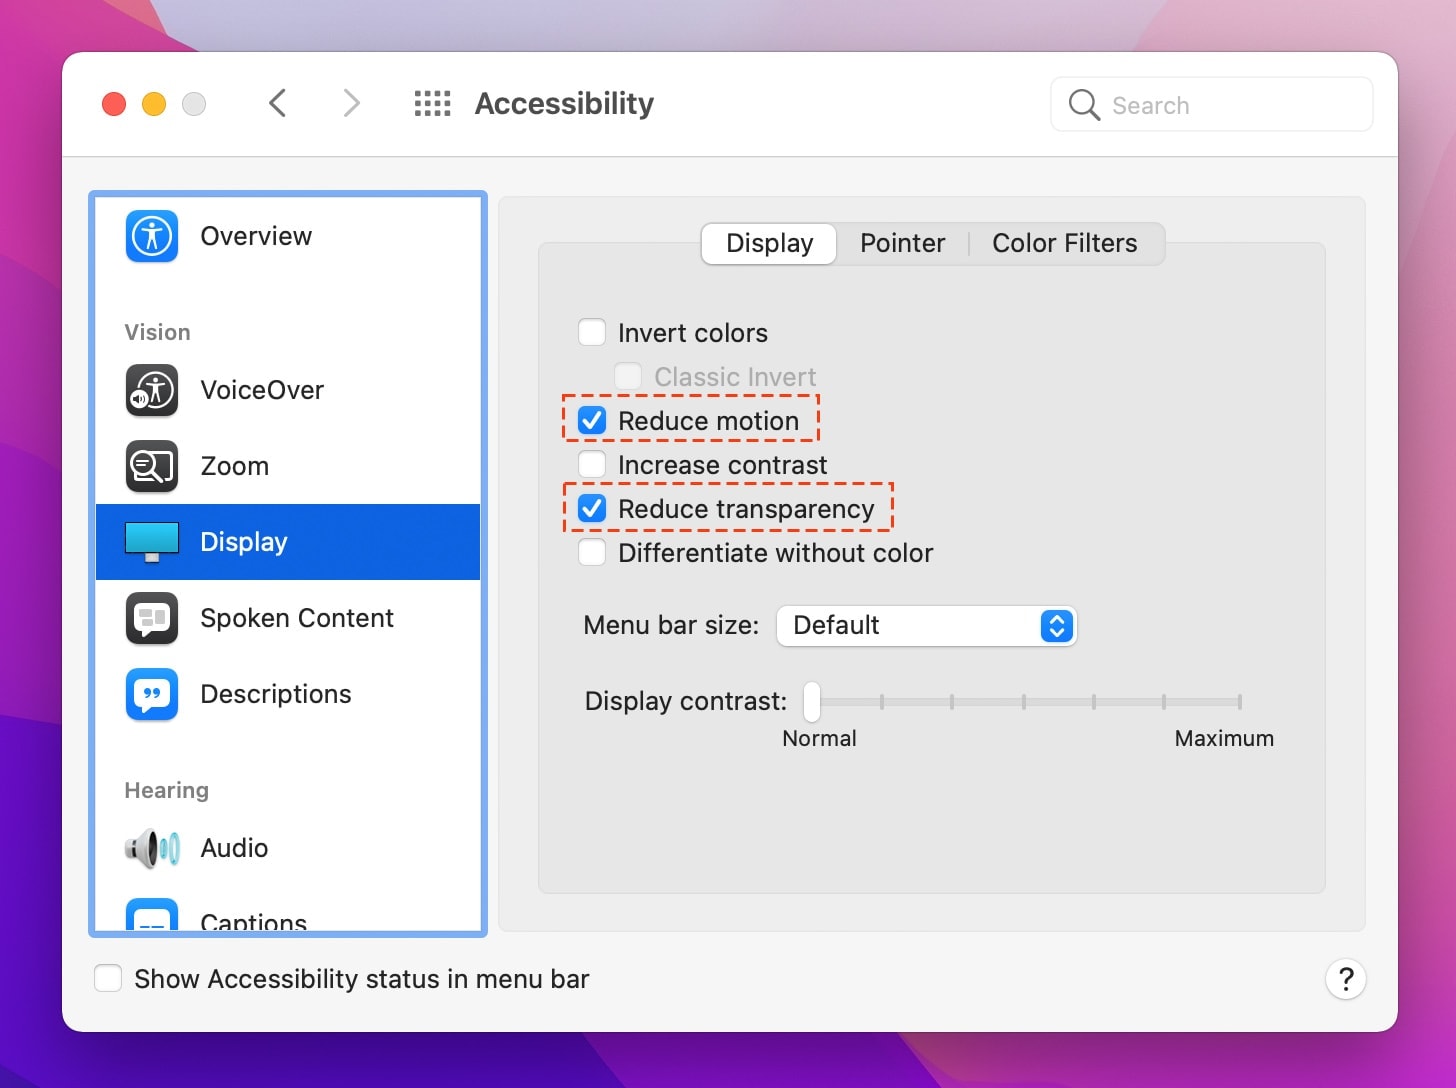
Follow these steps to Reduce Montion and Transparency
- Navigate to System Preferences and select Accessibility.
- Select Display and check the box next to Reduce Transparency and Reduce Motion
The software you previously used with an older OS X may be no longer compatible with macOS 12 Monterey. In this case, a simple update of your software applications may be all you need to improve your Mac's performance.
9. Make a Clean Install of macOS 12 Monterey
If all else has failed you up to this point, it's highly recommended that you make a fresh install of your macOS 12 Monterey operating system. A clean install of macOS 12 Monterey can be desirable to certain users who need to erase the data on their Hard Disk and install a fresh image of Monterey.
A fresh install will convert your Mac to its factory settings and remove any customizations, third-party apps, user accounts, preferences, settings, and personal files and data. It's best to make a clean install of macOS 12 Monterey if you've followed our above steps and are still experiencing poor performance with your system while running Monterey.
When it comes to speeding up macOS 12 Monterey, the bottom line is that there's more than one thing you can do. Issues with your Mac's hardware may be the cause for performance lag after you update to Monterey, but other factors that have nothing to do with your computer may also be responsible. You must take the time to follow each step we've laid out to address as many potential issues as possible.
It can be intimidating trying to fix hardware, software, network, and systems by yourself if you have no previous experience. Fortunately, the steps that we've laid out above can be easily followed by even novice macOS 12 Monterey users who need some help improving their Mac's performance. If you need to speed up your Mac that's running the latest version of Monterey, you can quickly get started with our list of suggested actions and steps to take. Don't be afraid to consult further resources if you get stuck along the way, it's never too late to ask for more guidance, especially when it comes to something as important and valuable as your Mac!




Leave a Comment