If you have just updated your Mac with the Big Sur software update and you are experiencing slower speeds while booting up your Mac, you might be sitting there, scratching your head wondering “Why is my Mac so slow? I just updated it!”
Do not fear! In this article, you will get answers to questions like why is Big Sur slow? Why is my Mac slow after Big Sur update? And, of course, get several tips and tricks to make your Mac run faster. Let’s get into the details of what the Big Sur update is, why your Mac is running so slow, and how you can fix it!
To start, let’s first make sure you understand what the macOS Big Sur update is, and what it is supposed to do for your Mac or MacBook. The Big Sur update is meant to take all the programs on your Mac and elevate them to run better and with higher security and protection. Another goal for the Big Sur update is to make the interface that you interact with sleek and modern. The search engine application Safari experiences the biggest update yet, to increase security and power.
Both Maps and Messages get several new features each to make them more powerful and convenient, as well as more transparent about where your private information is going and where it is stored. The Big Sur update has more clear policies about your privacy.
So, now that we know what the Big Sur update was supposed to do for your Mac, let’s talk about your problem with the macOS Big Sur update running slowly on your computer. You may find that booting up time is much longer than it used to be, or that the apps take forever to load when you try to open them and use them.
You might find download or upload speeds slower or glitchy sometimes when you are trying to upload or download larger files. So what can be done to speed up your Mac after it began to run slow after the Big Sur update? Plenty of things! Read on to discover several tips and tricks to keep your computer running smoothly and quickly after the Big Sur update!
How to Speed Up macOS Big Sur 11.0
This section is going to inform you of several tips and tricks that you can do on your own to quicken the running and booting speeds of the Big Sur update on your mac, and how to fix your Mac running slow.
1. Disable Start-Up Items to Speed Up Login Time
Whenever you try to boot up your Mac and it feels like no matter how long you wait, the loading bar never advances, you can feel defeated, inpatient, inconvenienced, and most of all frustrated. Although all these emotions might feel overwhelming and upsetting, the good thing is that this issue can usually be fixed by some quick, simple, and easy at-home work to make the boot-up time quicker, so you can get into your computer to do what you need to do!
First, you must identify the reasons that are causing your macOS Big Sur to start up slowly in the first place, so you can target those issues and solve them. Just as many reasons could make your Mac run slower, there are just as many solutions, so do not lose heart! By the time you are finished reading, you will have all the necessary knowledge and tools to fix the running speed of you Mac!
Turn Off Auto-Run Programs
The first reason that the boot-up speed your Mac is slow is also the most common. This reason is auto-run programs that automatically begin running the moment you press the power button. These programs are also called start-up items.
So this means that each time you turn on your Mac, not only is the process in which the operating system booting up is initiated, but the auto-run programs are also triggered to start running as well. This can make the loading time during boot-up way longer than it has to be, since the machine has too many tasks to complete at once, and so it drags downloading time.
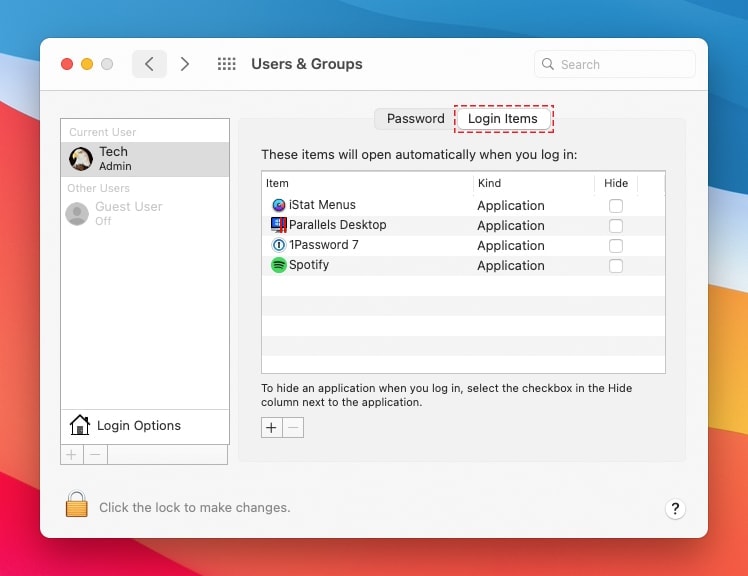
To remove start-up/auto-run programs follow these steps.
1. Click on the Apple menu.
2. Click on "System Preferences".
3. Click on “Users & Groups”.
4. Next, click on your username on the right side of the screen. On the left, click on the “login items” tab. This will show the login items that are currently enabled.
5. Click on the boxes of items that you wish to remove.
6. Once you selected all the items you want to remove, click the minus (-) button at the bottom of the screen.
Turn Off Hidden Start Up Items
The steps that you followed above this section will allow you to remove the login items and auto-run programs that are visible when you turn your Mac on, however, there are still other start-ups and auto-run programs that are hidden deeper in your Macs interface.
Many apps will install a hidden service to keep up with updates (automatic updates,) or keep the app running in the background if it is not being used as the primary app. If you have the Big Sur slow login issue, you will need to disable and remove these services from these apps to increase the booting speed of your Mac.
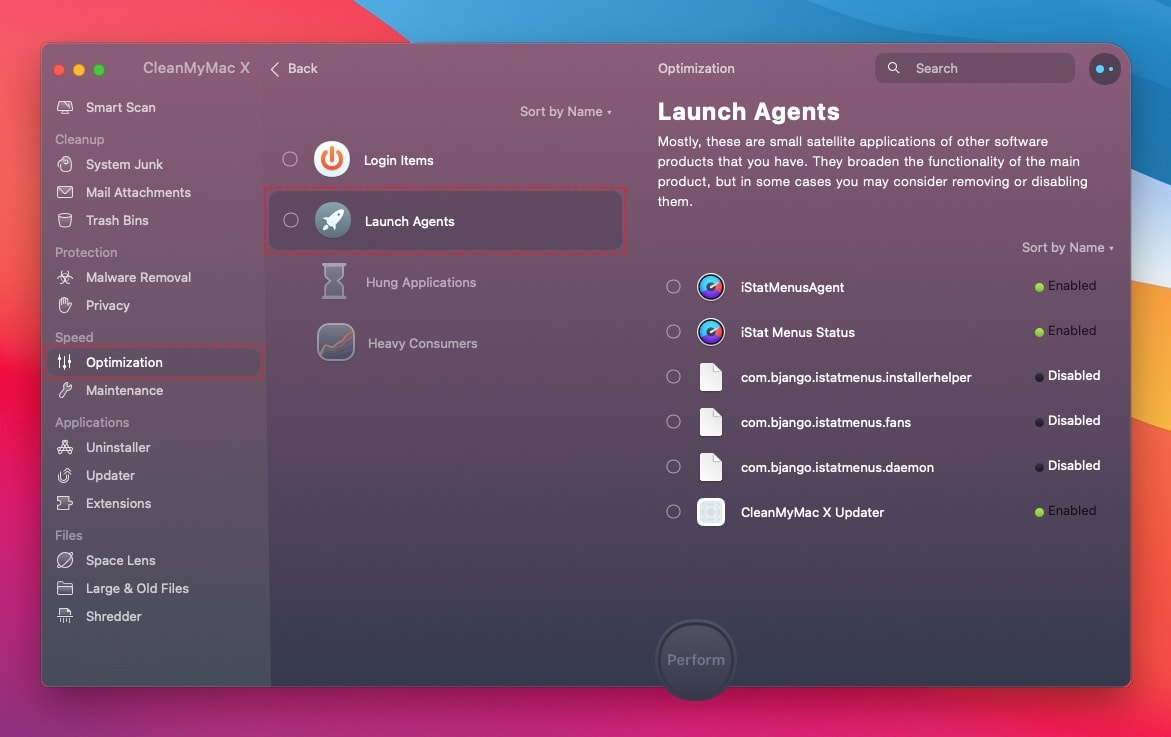
To find these hidden auto-run programs, all you have to do is use the “Optimization” in Clean My Mac. Follow these steps to find it.
1. Ope the application.
2. Click on the “Speed” module.
3. Go to “Optimization” and then continue to “Launch Agents”.
4. This will bring you to a list of helper and service applications that automatically run when you boot up your Mac.
5. Disable or remove all the applications (unless that are critical to something you need, but removing all of them helps the speed of your Mac.)
Once you start managing and removing unnecessary start-up and auto-run programs, your Mac should boot up much faster. Keeping up with the updates for these apps that had hidden auto-run programs can also help keep you Mac running well. Update them to the new macOS Big Sur to make them flow with the rest of the software.
Disable Hidden Startup Items with Clean My Mac (free download)
2. Reset SMC and NVRAM/PRAM
If the SMC and PRAM in your Mac get corrupted in any way, they can slow down the boot-up speed of your Mac considerably. When this happens, the SMC and PRAM need to be reset to increase the startup speed on your computer.
The System Management Controller (SMC) is what runs all kinds of hardware things like the fan and the batteries on your laptop. To reset the SMC, you have to know what kind of Mac you are using, since the procedure is different for each type of Mac.
Resetting the SMC on a MacBook Air, MacBook Pro, or MacBook
1. Shut down and power off your Mac and unplug the power cable from the machine.
2. Wait 15 seconds then plug the power cable back in.
3. Press the left shift key, left option key, and the control key all at once and hold down for 10 seconds.
4. Release the keys and power on your machine as usual.
Resetting the SMC on iMac, Mac Pro, Xserve, or Mac Mini
1. Power down your Mac and unplug the power cable.
2. Wait for 15 seconds and then plug the power cable back in.
3. Wait for 5 seconds and then turn the power on your Mac as usual.
The NVRAM/PRAM should be reset only when there is an issue with the resolution of the screen, incorrect battery charge reports, the machine booting up with the wrong disk.
To reset the NVRAM/PRAM follow these steps:
1. Power off the Mac and leave it be for a few seconds.
2. Turn your Mac on
3. Press the option key, the command key, and the P and R keys at the same time.
4. Hold the keys down until your Mac restarts and makes an audible beeping sound.
If you are worried that doing any of these solutions to speed up your slow Big Sur Mac will impact your Mac in a bad way, or that you will lose data, do not worry. These are perfectly safe and will not cause any data loss.
3. Optimize Your Macs Storage
This is a very cool feature that helps to ensure all the files on your drive are organized and balances the optimization of your storage. Essentially, it frees up unused disk space so that it can be used for new files. This also helps keep all your files in order.
To activate this feature, you must go to the Apple menu and click on "About this Mac." Next, click on "Storage" and then "Manage." You will see a message box asking to "Store in iCloud," "Optimize Storage," and "Reduce Clutter." In this message box, you should see a button that says "optimize." Click on that box.
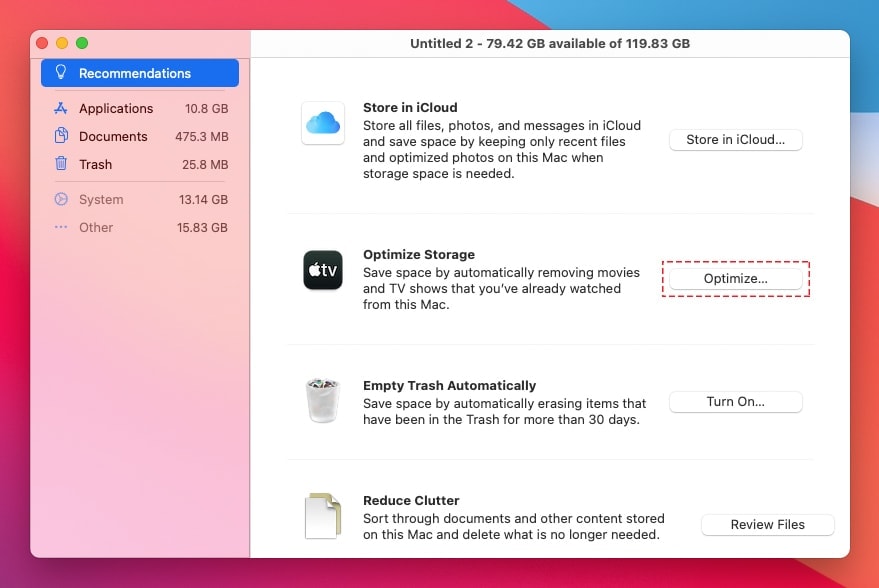
Once this is activated, the optimization of your storage will begin. It will organize the files you have in the drive into different categories and removed the unused or idle files from your Macs storage.
These files could be old, unused apps, old screenshots, and photos, old documents and text files, or anything that is not in constant or recent use. The feature detects if the file or app has been opened or used recently, and goes from that information to decide where it should go.
By eliminating any clutter in your hard drive, you allow more space for the Big Sur software to run its operations which can help boost the loading speeds of your Mac. It is also just a good idea to clean up your hard drive now and then, as old files can build up very quickly, and slow down the operations of your Mac.
4. Clean Up Your System Junk and App Junk
One of the most common reasons for any computer getting slow is having way too much old system junk. If you have too much old system junk in your old macOS software and you update to the new macOS Big Sur 11.0, your Mac will slow after the Big Sur update.
Another common reason for slower speeds is installing a new app on macOS Big Sur because it could create a problem involving App Junk that is already in your macOS software. If you do not remove an app completely in your old macOS Version, the new app could have a conflict with the app junk from the older app.
To delete this app junk, you will probably need to use a third-party app like Clean My Mac, which will be able to get rid of any junk that has made its way into the dusty corners of your Macs hard drive. It is just like cleaning the corners of your house. Junk piles up and dust gathers and eventually, you have to get in there and clean it out.
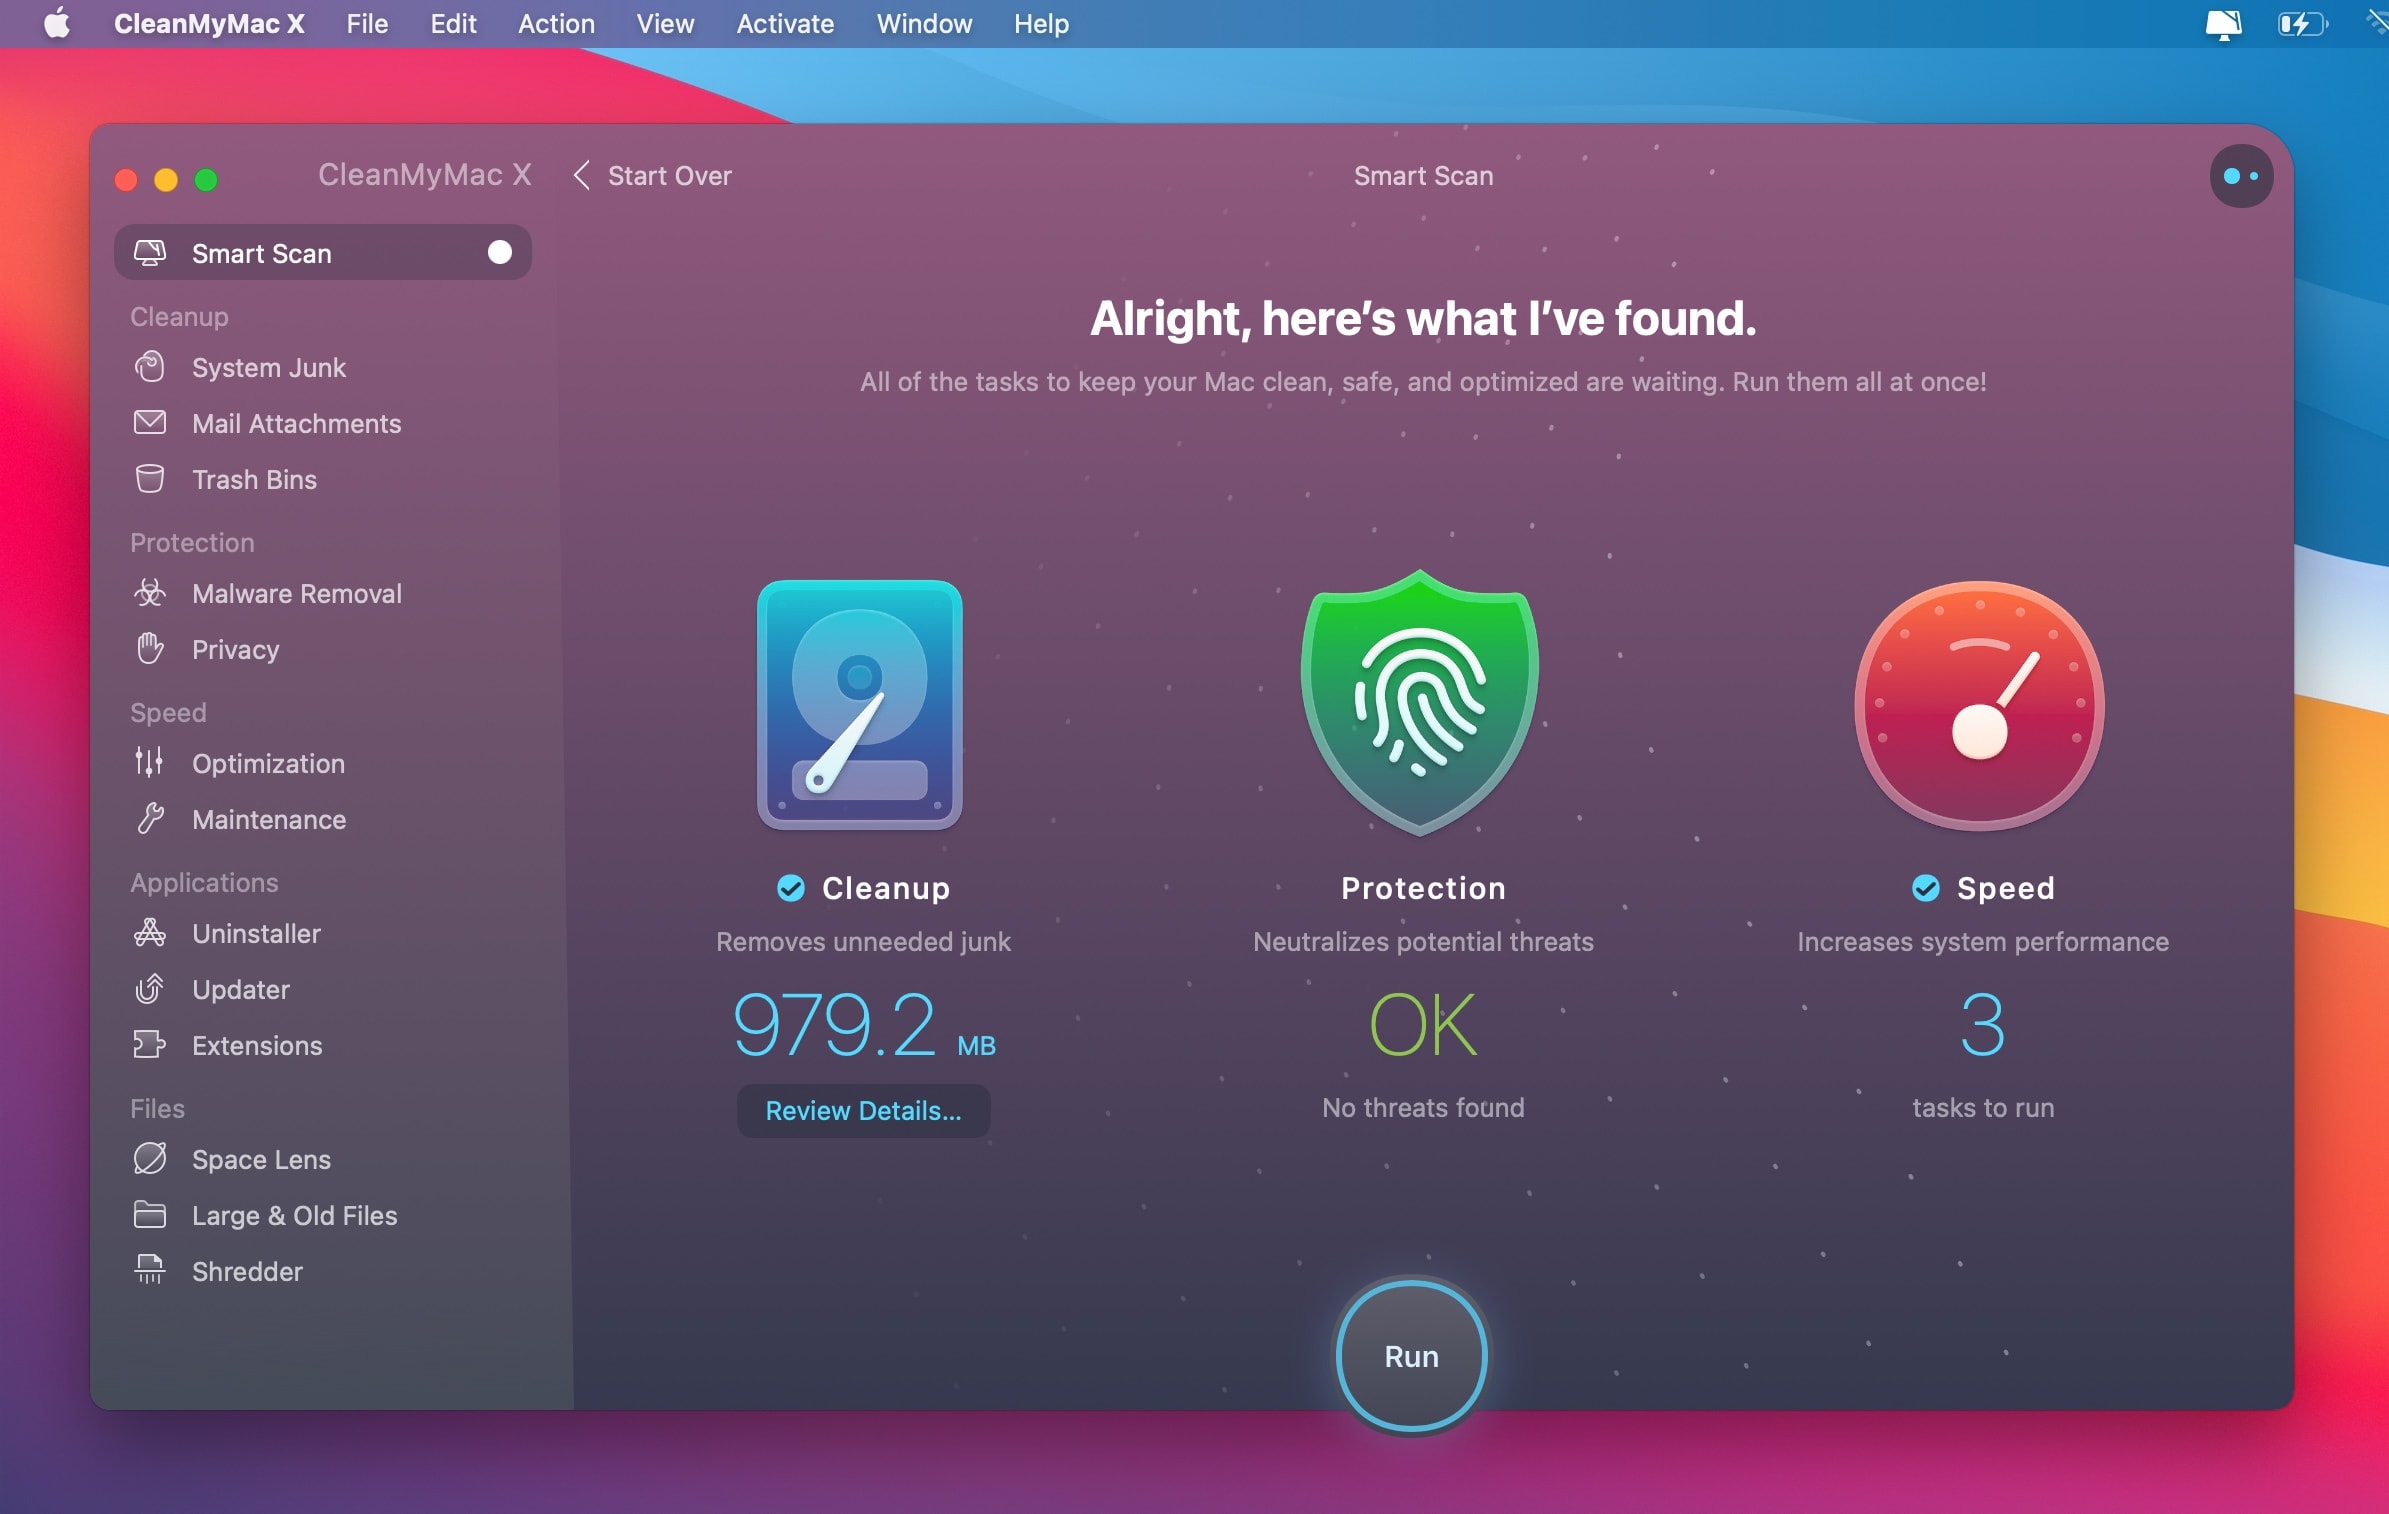
With a third-party app, you can select what types of materials you want to have cleaned up, or if you want to have everything cleaned up. The categories that can be cleaned include old files, large files, data from the trash bin, iTunes junk, mail attachments, photo junk, and general system junk.
The best thing about this type of cleanup software is that it is intelligent. This means that it only cleans up what it can clean without affecting the critical files in the system. Your Mac will function normally while Clean My Mac cleans up the junk from your hard drive.
5. Use the Activity Monitor to Disable Power Hungry Apps
If your Macbook is running slow after the Big Sur update for no obvious reasons, and the fans in your machine are constantly running at very high speeds there is only one explanation for the slow running Big Sur: power-hungry background apps.
These power-hungry background apps take up tons of RAM and CPU space, leaving very little room for the operating system. This makes the OS run very slowly, even when executing basic tasks and demands, which can also heat your machine.
To stop power-hungry background apps from slowing down your speeds, you can use the activity monitor. To open this feature, click on “Applications” then “Utilities”. Next, double click on the “Activity Monitor” and this action will launch the monitor.
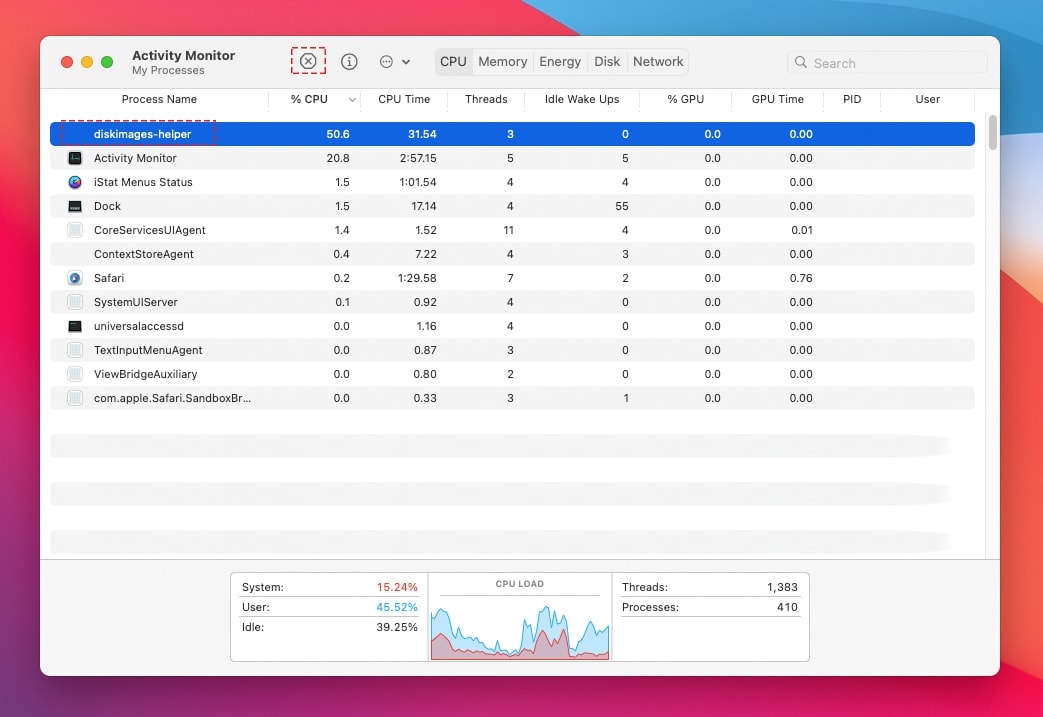
To find out which applications are taking up too much CPU space, click on the “%CPU” column. Look to see which app is using up most of the CPU space, then analyze your usage of this app. Do you use this app constantly? Is it important? If you are not using it constantly and it is not important, stop it by selecting it and then clicking on the “X” in the top left corner.
Additionally, to find apps that are taking up too much memory space, click on the Memory tab and then follow the same process as above to stop these apps. Choosing the “Quit” option will save all the changes you have made, and then will close the application. This will take a while. For a more immediate response, you can force quit the app, but any recent or unsaved changes will be lost. Force quitting an app is the more effective option and the effects are seen immediately after forcing the app to quit. This means that the macOS Big Sur speed will improve immediately.
6. Confirm That Your Mac is Compatible with macOS Big Sur
Like any other software operating system out there, the macOS Big Sur has certain minimum hardware qualifications. While some Mac computers have these qualifications, others are not as lucky. Typically, if your Mac was released before 2012, your Mac cannot support the Big Sur operating system, and downloading it can only make your system run slower.
Here is a list of the devices supported by Big Sur:
Mac Pro (late 2013)
iMac Pro (2017 or later)
iMac (lat 2012 or later)
Mac Mini (late 2012 or later)
MacBook Pro (mid-2012 or later)
MacBook Air (mid-2012 or later)
MacBook (early 2015 or later)
Any Macs made before these years do not have the graphics power and other qualities that are needed to support macOS Big Sur.
7. macOS Big Sur Slow Wifi Speed
Many factors could contribute to slowing down your wifi speeds. It could be anything from the browser you chose to use, a cluttered system, or the location of your wifi router. Some of these do not have anything to do with your Mac, like the location of a router, so make sure you check things like that out before doing stuff with your Mac, just in case they are fixable that way.
Firstly, try restarting your router to fix a slow connection. All you have to do is turn it off, wait a couple of moments, and then turn it on again. You could also try to relocate your router to be closer to your location so that the connection is stronger. Make sure there are no metal objects or microwaves in the way since they can affect the connection.
Second, check the DNS or Domain Name Server setting in your Wifi network. The DNS system is a directory of a bunch of names that will match with numbers. The names are the names of devices, while the numbers are the IP address or Internet Protocol address.
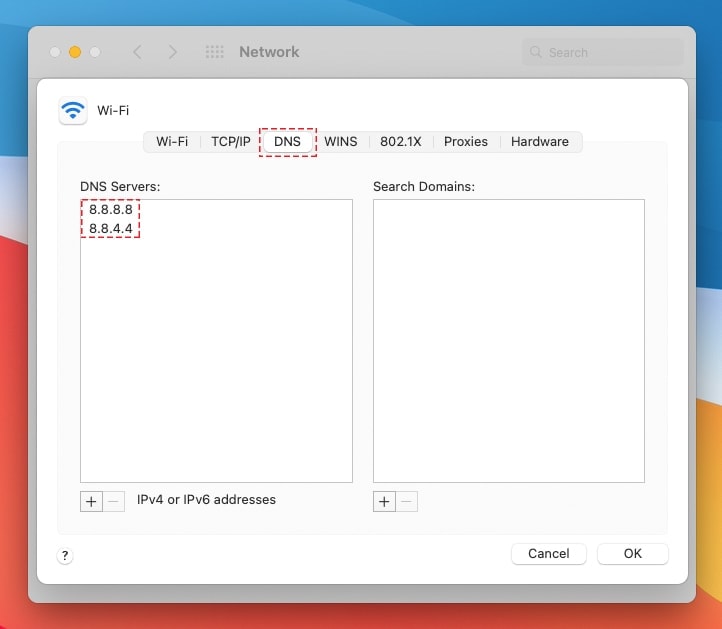
To check on this, go into the Apple Menu and click System Preferences. Then, hit ‘Network’ in the control panel. Once you are at that window, you should select ‘Wifi’ if you are connected wirelessly and ‘Ethernet’ if you are connected via an ethernet cable.
Next, select the DNS tab in the new window. Now, you need to add a new DNS by clicking the [+] button we are going to want to add Google DNS servers by adding in the IP addresses ‘8.8.8.8’ and ‘8.8.4.4’ which means they will be accessed first, which is beneficial as they are the fastest DNS server.
8. Moderate the UI Experience
The interface that the user interacts with in the Big Sur has been improved and has more customizable settings, however, going full hog on the user experience will make your computer run slower.
Big effects like the transparency will heavily influence the resource your machine has access to and will slow down the macOS Big Sur. When the system has to multitask, it gets even worse, so try to avoid this, or follow these steps to remedy the situation.
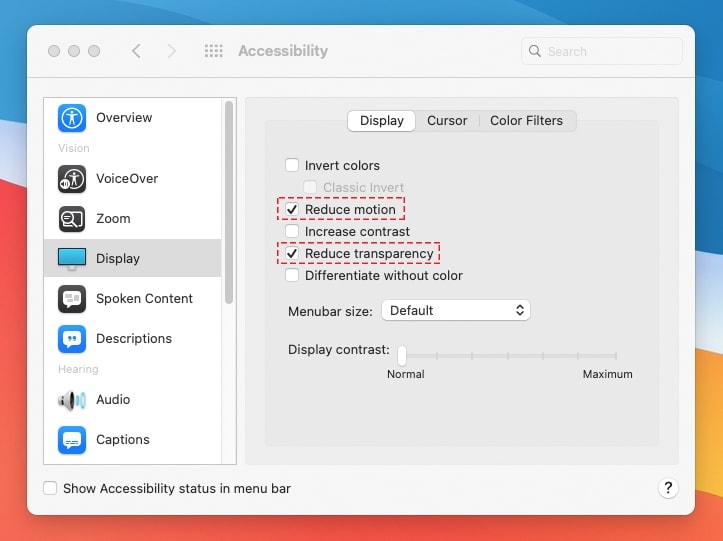
Follow this information:
1. Go to “System Preferences” and click on “Accessibility.”
2. Click on “Display” and check the box next to “Reduce Transparency” and “Reduce Motion.”
Also, updating all the compatible software and apps on your computer can help speed up the Big Sur interface.
9. Install Clean macOS Big Sur 11.0
Performing a clean install of macOS Big Sur might be what some Mac users need or want. A clean install means erasing all the data on the hard drive and then installing a new installation of macOS Big Sur.
The idea is that a clean install starts fresh, sort of like how a new Mac comes when you first open the box, with no customization, no third-party apps, no user accounts, no user data, preferences, settings, caches, no personal files or data, it's just a new clean installation of macOS Big Sur, and nothing else.
Thank you for reading, and good luck with speeding up the performance of macOS Big Sur!



I followed these steps, but still had issues. What I found my major contributor was that if I did not have my TimeMachine drive hooked up properly it took AGES. Resolved when I plugged it in!
Wow! This made a huge difference!!!! Thank you immensely!!!
Adding DNS helped me with the WiFi, Thanks 🙂
Thanks, John ! My MacOS was very slow and now it is very fast after the changes I used from this page.
Thank you!! The suggestion to reduce motion and transparency seems to have made a big difference on my early 2015 MBP
WOAH – yeah now I have improved startup for another issue. The reducing motion and transparecy has made my i5 Macbook from 2019 fly!!! The transpareny windows were very pretty, but I can live with not having them for the increased speed!!!