Local hosting gives more control and flexibility. It saves cost and allows you to learn new skills to efficiently set up your site. If you plan on setting up a WordPress website, it may be advantageous to host your site locally than to avail of the services of a hosting provider.
If you are a Mac user, you can set up WordPress locally on macOS and host it with the MAMP software. We will take a look at what is needed to successfully set up and host WordPress locally on Mac.
What is MAMP, Apache and MySQL?
MAMP is a solution stack to install a local server environment on your Mac. MAMP is an acronym for Mac, Apache, MySQL, and PHP. You can install the application easily on your Mac to access a local MySQL server. MAMP provides all the tools needed to run WordPress on macOS for testing and development purposes.
The setup and management of the application make it convenient for web developers to manage multiple projects. The intuitive control panel allows you to change ports and server addresses easily. Online documentation for MAMP is detailed and there are plenty of features that can be configured for various tasks.
Apache is a web server software maintained by Apache Software Foundation. It is a free and open-source software allowing users to deploy websites to the internet. It is reliable, fast, secure, and highly customizable. Extensions and modules can be used to meet the needs of different environments. Apache is used as the web server software by many WordPress hosting providers.
MySQL is an open-source relational database management system (RDBMS) developed by Oracle. A database is a digital collection of data while a relational database is the collection and organization of data according to the relational model. RDBMS is a set of software tools to create, manage, and query databases on a relational model.
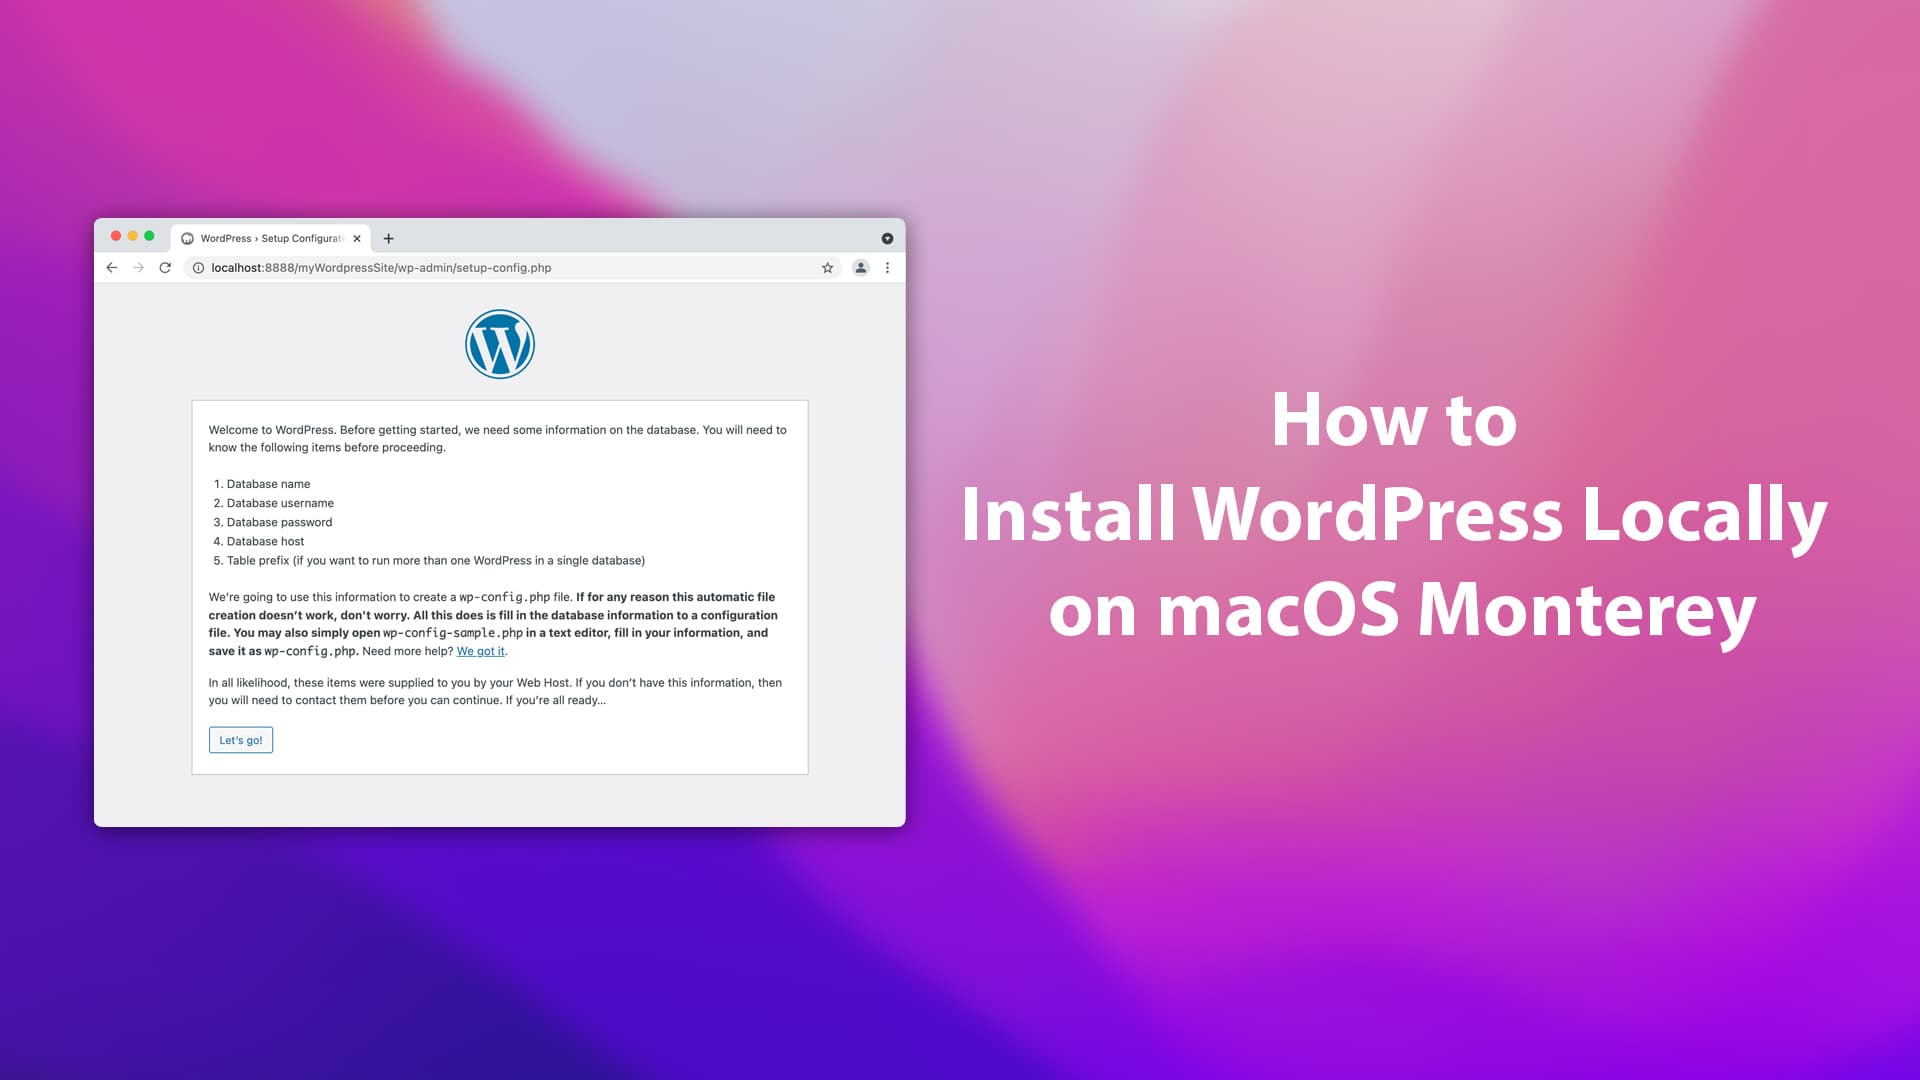
How to Install WordPress Locally on macOS Monterey
You can install WordPress locally on Mac. Even if you’re using the latest macOS Monterey, you can still follow the steps below to ensure the installation of WordPress on Mac.
Step 1: The easiest way to set up a local server on macOS is by using a software called MAMP. Go to MAMP site. Click and go to the download page. Depending on whether you use the Intel chip or M1 chip, you have different download options. Choose the relevant option and your download will begin.
Step 2: Open the package you downloaded and continue to install MAMP. Go through the installation process and on the final screen, click on ‘Install’. Your Mac will prompt you for the username and password to install the software. Provide the relevant details and install MAMP.

Step 3: Click on the ‘Finder’ app and select ‘Applications’ in the left sidebar. Go to MAMP > htdocs folder. This will be where we will have the websites we are hosting including WordPress sites. Create a new folder inside the ‘htdocs’ directory and name it as ‘myWordPressSite’.

Step 4: Go to WordPress Site and download the latest version of WordPress. Once the download is completed, unzip the download and open the WordPress folder. Select all the files inside the WordPress folder and drag them into the ‘myWordPressSite’ folder.
Step 5: Launch MAMP by clicking on the MAMP application inside the MAMP folder. On the MAMP application launch screen, click on ‘Start Servers’, and in a few seconds you should see everything needed to install WordPress locally load up. Since you’re using your local server, you’ll see the localhost and the port number on your address bar.

Step 6: Open this address to create a database: http://localhost:8888/phpMyAdmin5/. We are going to create a database for our WordPress site. Click on ‘New’ in the left sidebar and add a database name for your new database and click ‘Create’.
Database Name: mywordpresssite
Collation: utf8_genaral_ci

Step 7: Copy the address: http://localhost:8888/myWordPressSite. Paste it in a new browser tab and add a trailing slash followed by the name of the folder you created. Your address should be.
Go to the address and you’ll see a WordPress installation screen. Click on ‘Continue’ and you’ll see that WordPress needs some database information before proceeding with the installation.

Enter the database name, username, and password in the respective fields:
Database Name: mywordpresssite
Username: root
Password: root
Database Host: localhost
Table Prefix: wp_
Step 8: Add a site title, username, password, and email. You can also use the default strong password generated by WordPress.

Step 9: Click on ‘Install WordPress’ and WordPress will be installed locally and you’ll be taken to the login screen.

Step 10: Enter the username and password to log into your WordPress site.

You can change the site title and do other changes directly from the WordPress dashboard. Feel free to customize the site according to your needs.
You have now successfully installed WordPress on Mac. Whether you need a testing website or a website that uses your computer as a server for hosting your site to users connected online around the world, you have it. MAMP runs natively on Intel and Apple CPUs. Depending on your configuration, you can select the respective installation program to install WordPress locally on Mac.


Hi there!
Since upgrading to Monterey whenever I try to install a new WP site I get an error message after your step 7: Error: “Table Prefix” must not be empty.
The only workaround I found so far is to create a site in Catalina then copy and import the database into Monterey
I am using an admin account