The most reliable version of macOS that can be used with virtual machines is unquestionably macOS Big Sur. This operating system has improved performance and is quicker than earlier iterations. It also fully supports the APFS hard disk standard. We will learn how to install macOS Big Sur on VMware in this article. However, let's first get a little more knowledge regarding VMware.
VMware Player and VMware Workstation are its two versions. As it is free and more widely available, in this article we will install macOS using VMware Player. Although VMware Player is a free edition, it still has all the features required to install Mac operating systems. Additionally supported by this version are the VMware Tool and more features like Drag and Drop files, Change Resolution, and Shared files.
Given the variety of options to obtain and use macOS Big Sur on your virtual machine software, installing Big Sur on VMware is pretty easy. Utilizing an ISO image and a VMDK image are two popular techniques. But in this guide, we'll use the Base System file to install macOS Big Sur. You may cleanly install macOS Big Sur on your virtual machine with the aid of Base System, which will assist you in booting into Recovery mode. In order to install macOS Big Sur using the Base System file, you must have a continual Internet connection since Recovery mode will download the full operating system, which takes about 12GB, while you are installing it on VMware.
After installing macOS Big Sur on your virtual machine, you can use it for a number of things, such as creating and downloading brand new macOS installers for your Windows computer when your Mac experiences issues, testing out macOS and its features before deciding to switch to a Mac operating system, and using it to use and learn Xcode, an excellent environment for learning software development. This tutorial will walk you through the quick and simple installation of macOS Big Sur.
How to Install macOS Big Sur on a VMware Virtual Machine
1. Download and Convert BaseSystem File
We will require the assistance of the OpenCore tool and the Python programming language in order to download and convert the Base System files. OpenCore is a tool that will let us install macOS on your computer, and Python is a programming language that we'll need to execute specific instructions in order to retrieve the base system files. After obtaining the BaseSystem file, we must convert it to the VMware-specific VMDK standard format. Two programs, dmg2img and QEMU, are required in order to convert DMG to VMDK.
Go to Opencore-0.8.3 in Downloads folder:
cd %USERPROFILE%\Downloads\opencore-0.8.3-RELEASE\Utilities\macrecovery
Download Basesystem file
macrecovery.py -b Mac-2BD1B31983FE1663 -m 00000000000000000 download

Next step, you need to move Basesystem.dmg to your Desktop

Use dmg2img to convert this Basesystem.dmg to img image
cd %USERPROFILE%\Downloads\dmg2img-1.6.7-win32
dmg2img %USERPROFILE%\Desktop\BaseSystem.dmg %USERPROFILE%\Desktop\BaseSystem.img

Convert Basesystem.img to VMDK image with QEMU
cd "C:\Program Files\qemu"
qemu-img convert -f raw -O vmdk %USERPROFILE%\Desktop\BaseSystem.img %USERPROFILE%\Desktop\BaseSystem.vmdk

2. Install VMware Player and Patch Tool
You may easily get the free virtualization tool VMware Player from the VMware website. After downloading it, launch the ".exe" file in the Download folder to begin the installation process.
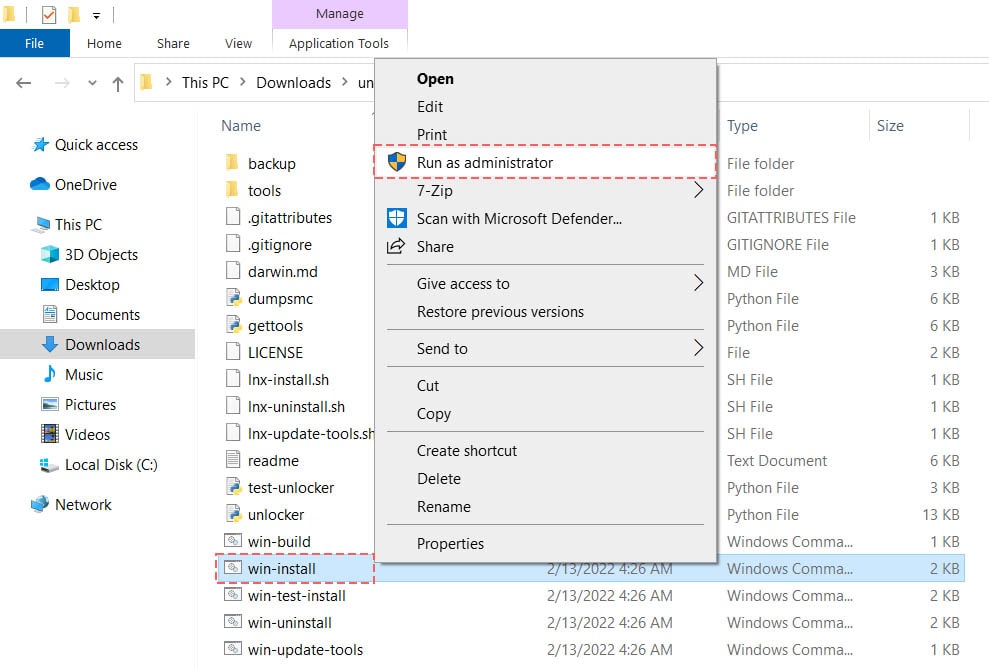
Patch Tool is software that enables you to use VMware for macOS's hidden features. This utility is freely available for download on Github. To install Patch too, right click on win-install file and select "Run as administrator"

3. Create a New Virtual Machine
After installing VMware you can start creating a new virtual machine. The hardware and characteristics of your computer have an impact on how your virtual machine is set up. We set the virtual machine's power to be between 50 and 80 percent of your computer's actual power.
Open your VMware, click on "New" button to create a virtual machine then select macOS 11 for Guest OS.

We need 120GB for Virtual Disk and click on "Store virtual disk as a single file".

Next step, go to Virtual Machine Settings and click on "Add" > Hard Disk > SATA > Use an existing virtual disk, then click on on "Browse" button and open your Big Sur Basesystem.vmdk file.

4. Edit VMX File
The virtual machine configuration file, or VMX file, contains all the setup data once a new virtual machine is created. In order to prevent issues during installation, we must modify the SMC settings. Go to Documents > Virtual Machine > Big Sur, right click on "vmware virtual machine configuration" file and open with with Notepad.

You may change this option by adding the line smc.version = "0" in the VMX file.

5. Install macOS Big Sur
We need to make a new partition so that we may install macOS Big Sur. Before installing the new operating system on your VMware Virtual Machine, keep in mind that you must have an Internet connection. To make a new partition for macOS, launch your virtual machine and choose Disk Utility in Recovery mode

Create a new virtual disk for macOS by choosing VMware Virtual Disk in the Disk Utility. Keep in mind that for this disk partition, you must choose the APFS and GPT options.

You can quit Disk Utility after making the macOS Installation Partition so that you can start installing Big Sur. Choose "Reinstall macOS Big Sur" from the Recovery screen, then choose the newly created disk to install it on. An Internet connection is necessary for the installation since Recovery mode will first download the whole macOS Big Sur installation package, which takes around 12GB.

Remember to install VMware Tool after successfully installing macOS Big Sur on VMware. This application is incredibly useful since it gives your virtual machine more options like altering the resolution and allowing features like change resolution, drag-and-drop file functionality on macOS. Additionally, you may use this program to speed up your Mac's operating system.

If there are any problems during the installation process, leave a comment below and we will help you fix all related errors.


Leave a Comment