Step into the world of macOS Ventura, the latest operating system designed exclusively for Mac users. But what about those Windows PC users who long to explore this new frontier? Well, fear not, because VMware, a renowned virtualization software, can help you experience macOS 13 Ventura on your Windows PC without any hassle.
Now, you might be wondering about the different ways to install macOS Ventura on your virtual machine or VMware. Sure, there are several methods with their own perks and downsides, but in this exciting new guide, we'll take a fresh and innovative approach to installation. Say goodbye to pre-made Ventura Virtual Disk sets and dubious Ventura.ISO image files of unknown origin that can harm your computer. Instead, we'll walk you through a cutting-edge installation method that uses Recovery Mode, making it easier and safer for you to enjoy the wonders of macOS Ventura on your Windows PC. So, buckle up and get ready to embark on an adventure like no other!
Enable Intel VT-X or AMD-V on your PC
Here comes the important thing. To install macOS 13 on Windows on VMWare, your PC must support Intel VT-X or AMD-V Standard. Any of these is needed to install and run virtual machines smoothly.
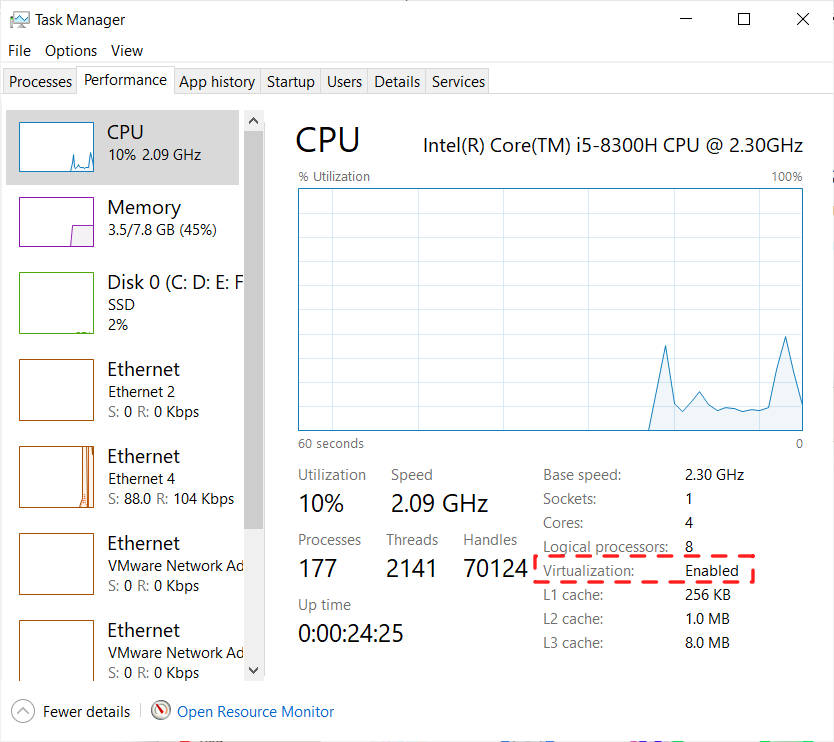
Now, you need to check whether this feature is enabled or not. Open Task Manager by press ‘Ctrl+Alt+Del.’ After that, click on ‘Performance’ tab and CPU, check the bottom right section. If you see the Virtualization: Enabled, it means it is already enabled. You don’t need to make any changes. If you don’t see anything like that, you need to ‘Restart’ your system, open the ‘BIOS’ setting, and enable Virtualization from the ‘BIOS Features’ setting.
How To Install macOS 13 Ventura on VMware on Windows PC
1. Download Ventura Recovery Image
Are you ready to download the Ventura Recovery Image or Basesystem.dmg file? With the assistance of OpenCore, a toolset designed to help install macOS on your PC, you can easily obtain these files. To simplify the process, OpenCore includes several Python language-based tools that enable you to download the Basesystem.dmg image effortlessly.
Before you start, download OpenCore from here and follow the guide to install the Python language accurately.
Now, open the CMD (Commands Prompt) in Windows Search and enter the following commands to download the macOS Ventura BaseSystem file.
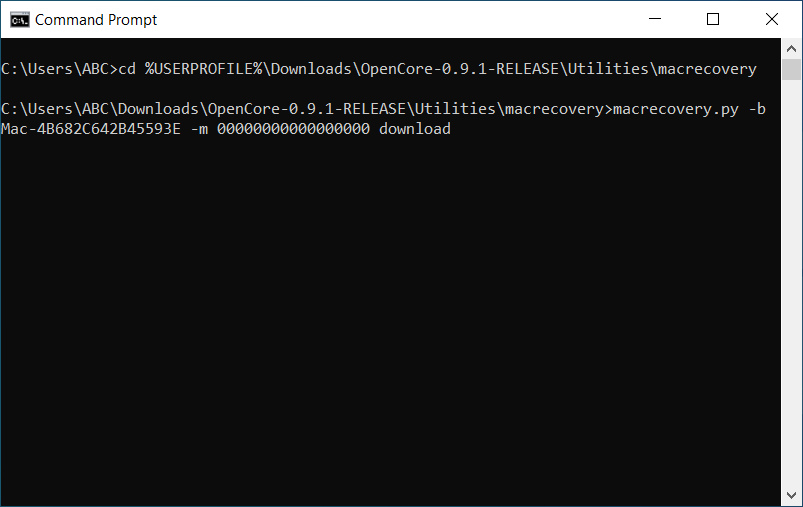
Enter the first command in CMD to navigate to the location where you have downloaded OpenCore. Remember, the command may differ depending on the version of OpenCore you have downloaded. Therefore, you will need to adjust the command accordingly to version 0.9.1 or 0.8.1 to ensure its accuracy.
cd %USERPROFILE%\Downloads\OpenCore-0.9.1-RELEASE\Utilities\macrecovery
After navigating to the correct location, utilize the following command to download the Basesystem.dmg image:
macrecovery.py -b Mac-4B682C642B45593E -m 00000000000000000 download
Congratulations! You have successfully downloaded the Basesystem.dmg file, and it can be found in the Downloads\OpenCore-0.9.1-RELEASE\Utilities\macrecovery folder. Now that you have acquired the necessary file, it's time to move on to the next step, which involves creating the macOS Ventura.ISO installation package.
2. Create macOS Ventura USB Installer
To create a macOS Ventura installation disk, you'll need a USB drive with a capacity of at least 8GB, as the Recovery Image or Basesystem.dmg file is only about 1GB in size. The easiest way to create the macOS Ventura installation disk on Windows is to use TransMac, which you can download here.
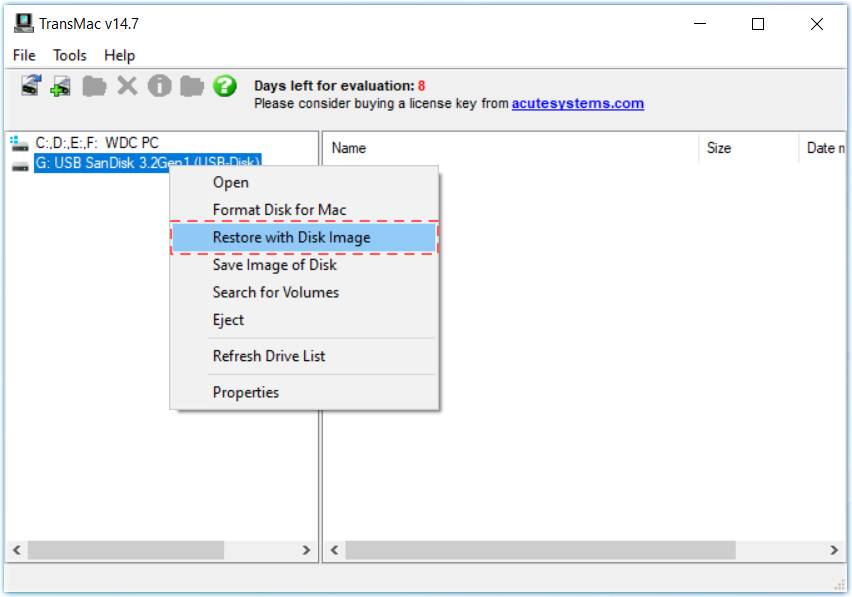
After installing TransMac and connecting the USB drive, launch TransMac. Right-click on the USB drive and select "Format Disk for Mac" to create a partition specifically for macOS. Then right-click again and select "Restore with Disk Image."
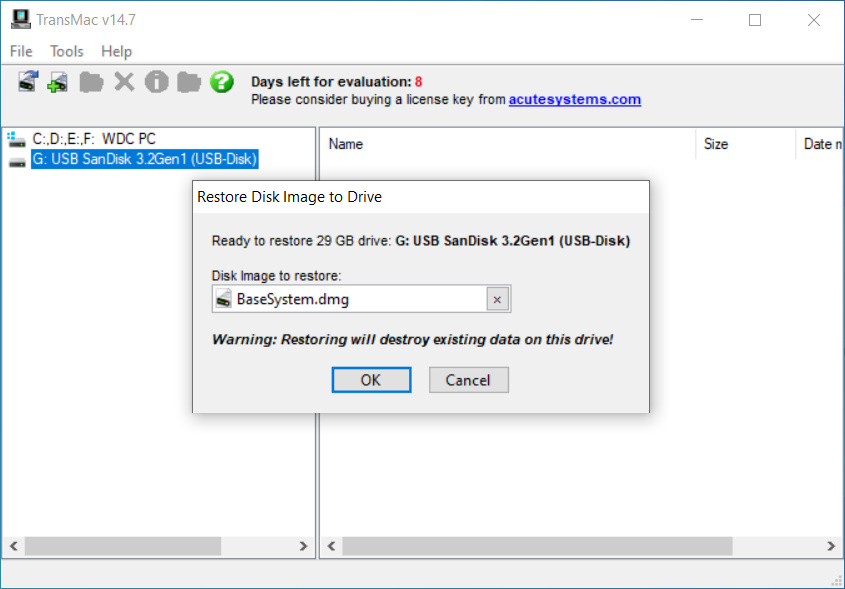
Navigate to the folder where you saved the Basesystem.dmg file and click the OK button to begin creating the macOS Ventura USB install disk. Once you've created the USB installer disk, the next step is to create a virtual machine and install macOS Ventura.
3. Install VMware Player or VMware Workstation Pro
The next step is to download and install the VMware Workstation Player or VMware Workstation Pro on your PC. We have already explained the differences between both virtualization software. You can install any of these according to your requirements. In addition, make sure to download the latest version (v16). Now, jump on the next step to download VMWare on your system.

4. Install Patch Tool
we need to download and install the Patch Tool. Patch tool will show some advanced options on VMware Workstation Player .Now, things become a bit technical from this step. So, follow the steps correctly to avoid any error. In this step, we will install the Patch Tool.
After download this tool, right-click on the ‘win-install.cmd,’ and click on the ‘Run As Administrator’ option.
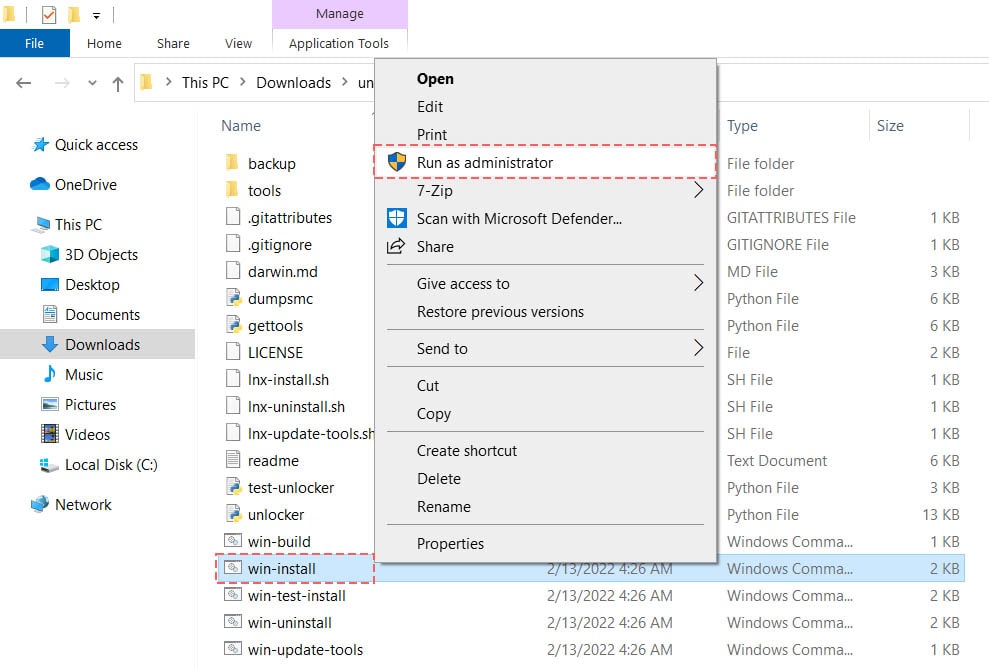
Note: Make sure the VMWare Workstation Player or VMWare Workstation Pro is completely closed. Otherwise, the tool won’t work, as it should be
5. Create a New Virtual Machine
First, launch ‘VMWare’ software, click on the ‘Create a New Virtual Machine’ button, on the next screen, you will see a checkbox ‘I will install the operating system later.’ Check the checkbox, and click on the ‘Next’ button.
After clicking on the next step, you need to make the same mentioned settings in your VMWare. After changing the setting, make sure to click on the ‘Next’ button.
- Virtual Machine Name: macOS Ventura
- Type: select ‘Mac OS X’
- Version: ‘macOS 13’

You will see a popup asking to choose the file location (Documents\Virtual Machine). So, select the location where you want to store your new VM files. After that, choose the hard disk size to ‘120 GB.’ Then, select ‘Store the Virtual Disk As a Single File,’ and click on the ‘Next’ button.

Now, Select your virtual machine, then click on the ‘Edit Virtual Machine Settings’ option to configure your virtual machine. So, make the setting as mentioned below: You need to choose the memory between 4GB to 8GB. In addition, change the processor from ‘2’ to ‘4.’

Next, select "USB Controller", Select USB 3.0 for your mouse and keyboard. After change USB Controller, click on the ‘Close’ button to save all the changes, and then click on the ‘Finish’ to close the setup.
6. Edit VMware VMX File
In the end, we need to edit the VMX File created by VMWare. In simpler terms, a VMX file is VMware virtual machine configuration file. A VMX file contains all information about your Guest Virtual Machine, such as memory, hard disk, processor, and SMC.
Here comes another important step. We need to edit the VMX file, so that your VM can run smoothly without any issues. To edit the VMX file, head to the location which you chose (Documents\Virtual Machine\macOS Ventura). Open the folder, right-click on macOS Ventura.vmx file and open it with any third-party software, such as Notepad.

Then, add the below-mentioned code at the end of your VMX file. After adding the code, click on the ‘Save’ button.
smc.version = "0"

System Management Controller (SMC) is a subsystem of Mac that manages low-level settings, such as screen brightness, battery management, etc. Most of the time, SMC creates problems while installing macOS on virtual machines. So, we will disable SMC to fix problems while installing macOS on VMware.
8. Install macOS 13 Ventura on VMware
We have now made all the changes. It’s now time to install Ventura on VMWare. To install the macOS, open VMWare and click on the ‘Power on this Virtual Machine’ option to start the macOS Installer.
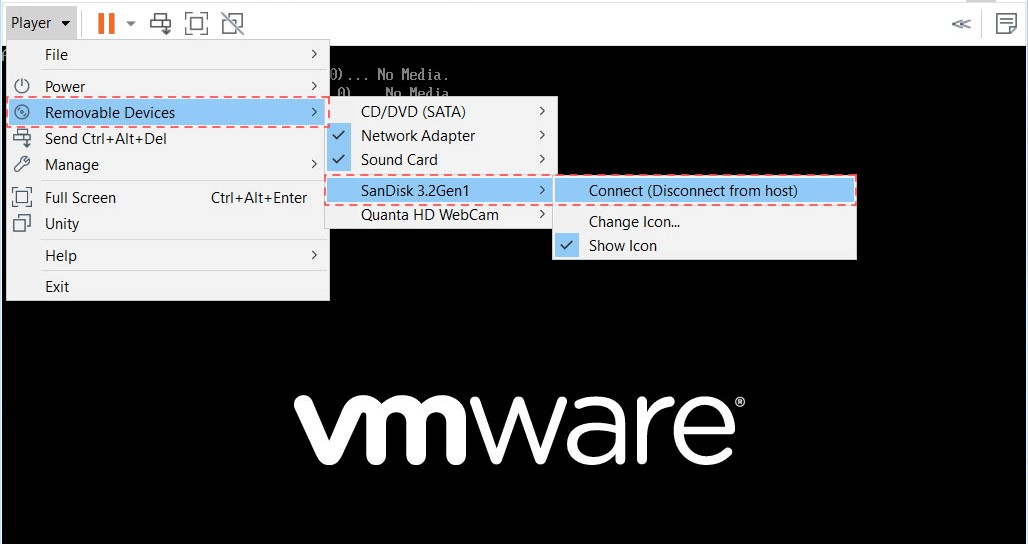
To boot with macOS Ventura USB Installer, turn on your Virtual Machine and click on "Player" or "VM", then select "Removable Devices". From there, choose your USB Drive and click "Connect". Wait for VMware to recognize the Ventura USB Installer. If it doesn't, simply restart VMware and quickly reconnect the USB Installer.
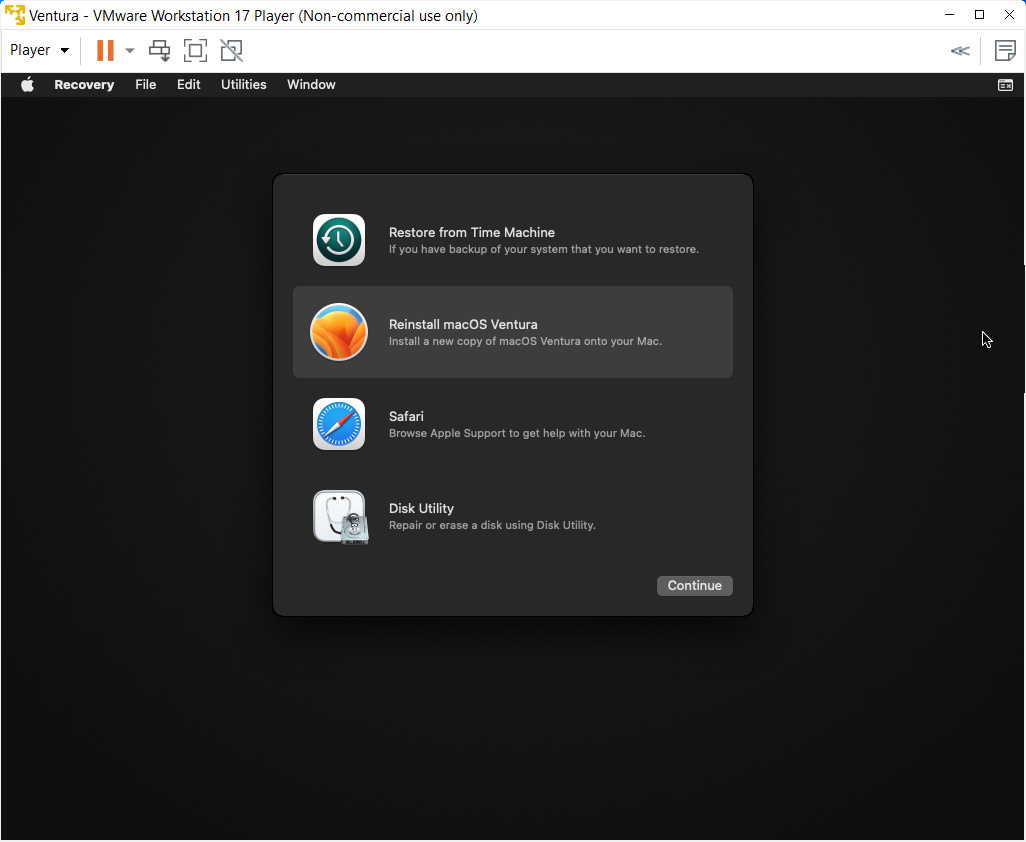
After that, choose the language in which you want to install macOS, and click on the ‘Next’ button. In the next step, select the ‘Disk Utility’ option from the given options, and then click on the ‘Continue’ option.
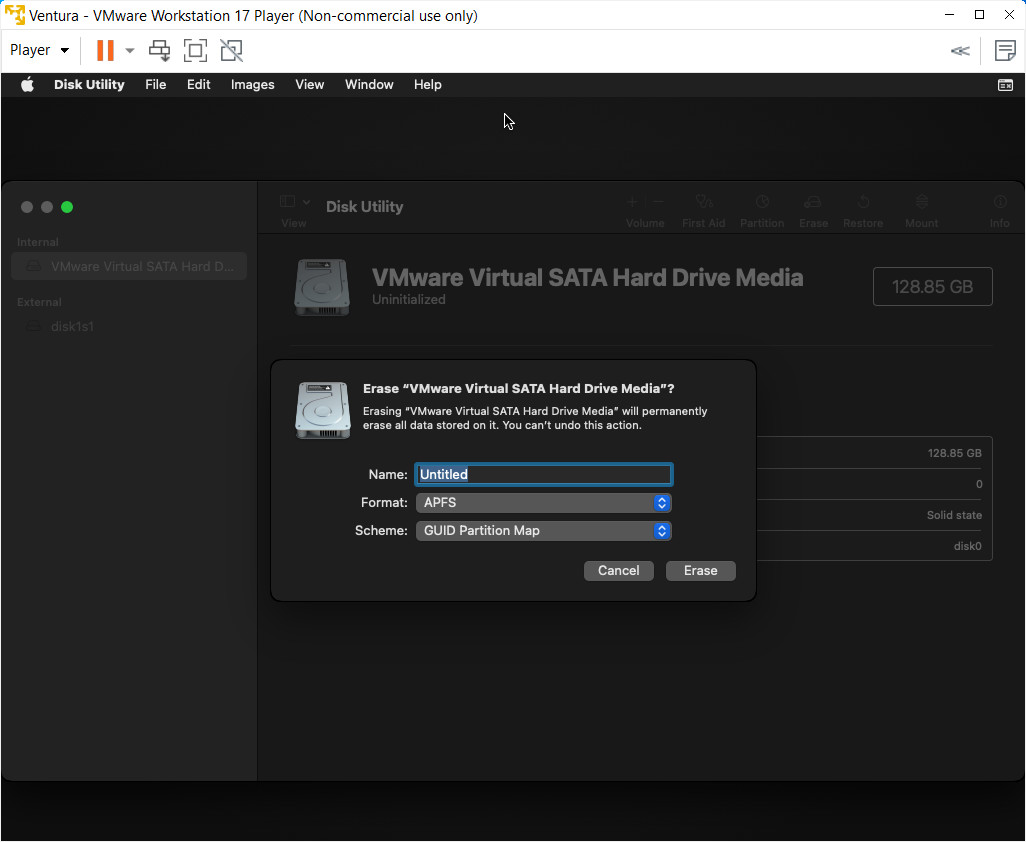
Now, Select ‘VMware Virtual SATA Hard Drive Media,’ and click on the ‘Erase’ option. You will now see a popup with some settings on it. Now, rename the drive to ‘macOS Ventura’ and leave the other two settings as they are. Then, click on the ‘Erase’ button, and close the ‘Disk Utility’ after the process completes.
Close Disk Utility. Then, click on the ‘Reinstall macOS Ventura’ button and then ‘Continue.’ Then, select your macOS Disk. You will now see a new pop-up with a progress bar. You need to wait till the process completes.
During the installation process of macOS Ventura via Recovery Mode, it's important to note that you need to have an internet connection to allow the operating system to complete the download and installation of all necessary components.

9. Install VMware Tool
After installing macOS, you can also install the VMware Tool on VMWare and unlock some advanced options. In VMware, click on Player > Removable Device > CD/DVD > Settings and open VMware Tool (darwin.iso).

Then, click on "Install VMware Tool" to install Guest Tool for macOS 13 Ventura. You need to allow VMware kext in System Settings > Privacy & Security, then click on "Allow" button.
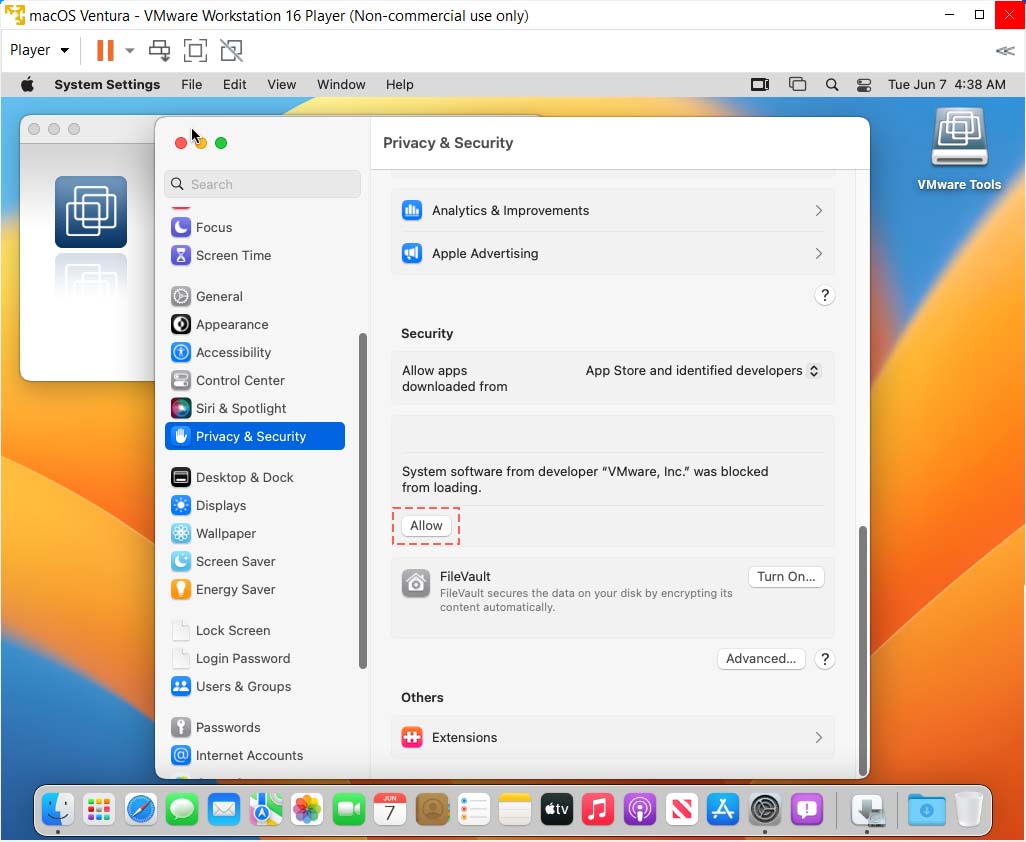
Now, you can use macOS on VMware on Windows PC with full screen mode (128 MB vRam) and enable Drap and Drop feature.

There you go! We have now installed macOS on VMWare on Windows PC. We hope you followed the steps correctly and installed the macOS 13 on VMWare. In addition, do let me know if you have any doubts regarding this. You can leave a comment. We will get back to you with the right solution.
Connect to Network on macOS Ventura on VMware:
To connect to Internet on macOS 13 Ventura, we need to change Network Adaptor e1000e to vmxnet3. Open your macOS Ventura.vmx file with Notepad (step 6) then replace this command: ethernet0.virtualDev = "e1000e" to ethernet0.virtualDev = "vmxnet3".




When I add ethernet0.virualDev, the vm can no longer connect to the usb. any thought? Remobable Devices shows as (none)
You should reinstall new VMware Player version.
I have a similar issue like Phil ending up in the bootloop.
VMware 15.5.7 with MacOS 12.6.1 running, no issues.
All updates were done inline, no fresh install
SysUpdate offers 12.6.2 and 13.1
13.1 ends in the bootloop, 12.6.2 not
Your guide worked well. Thank you.
I am having issues getting the audio device to recognize.
Also when I mount the darwin.ISO, nothing pops up. I did transfer it directly to get tools installed.
Thanks, John for your efforts
everything went very fine with me till the installation of VMware tools then the VM became very very slow ..
any ideas please ?
Phil : It installs, reboot a few times with the (long) loading logo screen, and goes to bootloop.
I mean the apple logo => loading bar + less than 1 second later reboot and etc.
same for me bro! We need help!
Thanks
What is your Version?
Hmm I tried twice.
It installs, reboot a few times with the (long) loading logo screen, and goes to bootloop.
I mean the apple logo => loading bar + less than 1 second later reboot and etc.
I use an AMD (ryzen pro 1700) cpu ; like all my previous VM I added the few lines of cpuid :
cpuid.0.eax = “0000:0000:0000:0000:0000:0000:0000:1011”
cpuid.0.ebx = “0111:0101:0110:1110:0110:0101:0100:0111”
cpuid.0.ecx = “0110:1100:0110:0101:0111:0100:0110:1110”
cpuid.0.edx = “0100:1001:0110:0101:0110:1110:0110:1001”
cpuid.1.eax = “0000:0000:0000:0001:0000:0110:0111:0001”
cpuid.1.ebx = “0000:0010:0000:0001:0000:1000:0000:0000”
cpuid.1.ecx = “1000:0010:1001:1000:0010:0010:0000:0011”
cpuid.1.edx = “0000:0111:1000:1011:1111:1011:1111:1111”
It works with all my previous VMs (from 10.8 to 12.5) but 13 gives me a bootloop at the end.
I first tried to (full) clone my 12.5 + install the 13 beta over. Same bootloop at the end.
It was not working and I found your guide. Then I tried it twice from scratch, and same bootloop…
Host : w10 21h2, 32gb ram, 1Tb SSD for the VMs
Workstation 16.2.3
If you have an idea. Thanks !
Hi I was reading your guide for VMware, then I know and use it for many years I have installed as every year the new version of macOS has been installed however during the last step when it tells me if I have an internet connection I click on the ethernet network him it puts me the manual configuration I change to DHCP at the next step I restart and I start all over again at the end I have to put “I don’t have internet” and so I start but if I go to settings / network there is no card
Hello Rocco. Open your Ventura.VMX file with Notepad (Step 6). Find and replace ethernet0.virtualDev = “e1000e” to ethernet0.virtualDev = “vmxnet3”. This command help you change network adaptor and connect to internet.