Windows has retained its top position among desktop PCs as it has gone through many mutations throughout its life cycle beginning with the first release in 1985. The latest version, Windows 10 which was released in mid-2015 has gained widespread adoption and is the predominant version of Windows running on personal computers around the world. However, the wide adoption of the latest Windows OS doesn’t mean that everything is sunshine and rainbows for the users. The ongoing updates that are aimed to improve the features and functionality of the operating system can sometimes cause inconvenience to users.
The release of the Windows 10 1909 version in November 2019 caused a lot of issues related to speed. Users reported Windows 10 slow login times and were not very happy with the overall release. Some of them opted to roll back to the earlier version (1903) of Windows 10 to solve the issues. While support forums and online groups were filled with complaints from disappointed users who were looking for ways to speed up Windows 10, there was help in the form of advice from experienced users who found ways to work around the issues.
How to Speed Up Windows 10
Windows 10 is a major upgrade from Windows 8.1 and gained a lot of positive reviews from critics and users for its desktop-oriented interface aimed at improving the experience of users. However, certain updates to the operating system throughout the years caused some inconvenience to users, including Windows 10 running slow on updated computers. These issues were voiced by users to the support community and other users which enabled finding ways to solve them.
As Windows 10 continues to evolve with more upgrades in the future, some minor inconvenience can happen that will warrant workaround solutions to continue with a seamless experience.
If you’re on the 1909 version of Windows 10 or are facing general speed problems, this article will give you ways to fix and speed up your Windows OS.
1. Fix Windows 10 Slow Login Problems
Windows 10 is a fast operating system. If you had bought a new computer with the latest specifications along with Windows 10, you would have noticed the power of the responsive operating system. However, over time as you begin to use your computer and add new applications and programs, you might start to see performance lags that weren’t seen initially. There can be Windows 10 slow login problems you might begin to experience with the installation of a lot of programs on your computer. How can you solve this problem?
The main reason for the computer slowing down after installing a lot of programs is the interference of the boot process by these programs. A lot of these programs can startup with the computer for many reasons, including auto-updates.
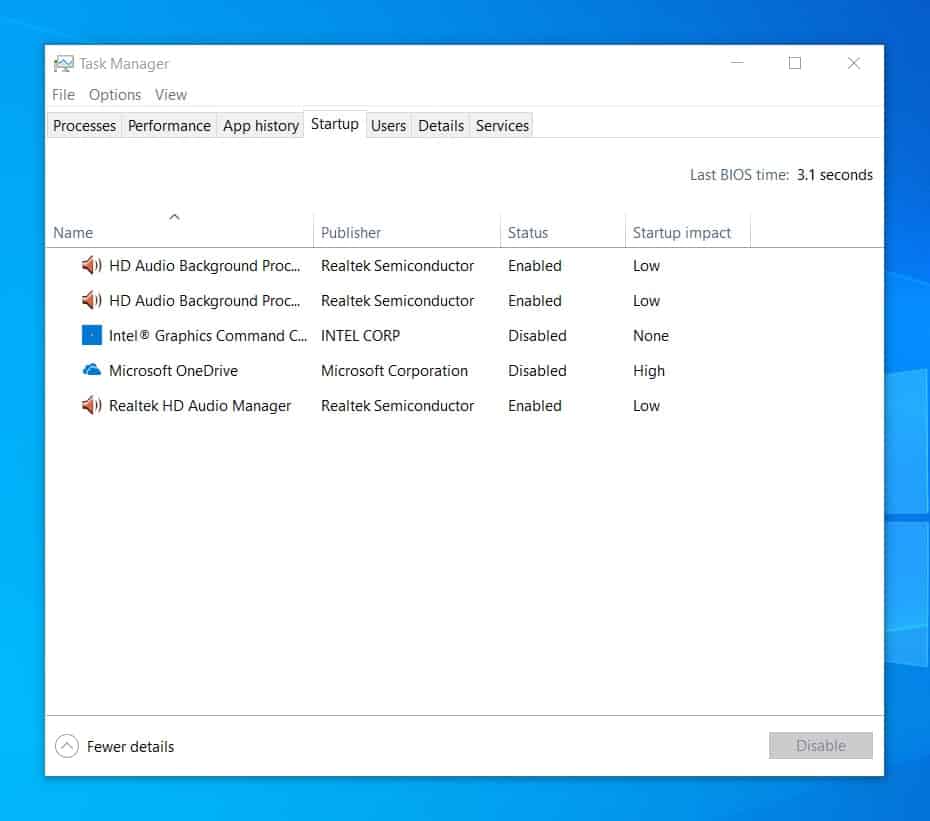
You can solve this problem by disabling the programs you do not want to start during the boot process. Follow the steps to disable the startup of programs on Windows 10.
- Open the Task Manager by right-clicking on the taskbar and choosing Task Manager.
- On the list of tabs at the top, choose the ‘Startup’ tab to see the list of programs that are enabled to run during startup.
- Right-click and choose ‘Disable’ to disable programs you do not want to run during startup
You can disable the programs based on their startup impact. Windows 10 can start up with no problems without any startup programs. However, you might need some programs to be ready automatically when you start up Windows 10. Hence, make your choice accordingly!
2. Use the Task Manager to Disable Power Hungry Apps
As you install more apps, you might begin to notice that your laptop battery starts draining fast. This is because a few power-hungry apps can consume a lot of battery resources and thereby reduce battery life. To solve your battery woes, it is highly recommended to stop apps that use a lot of power.
You will have to open Task Manager on your Windows 10 computer to check the apps that use a lot of power. Open the Task Manager from the Search box or by right-clicking on the taskbar and choosing Task Manager or by using the keyboard shortcut Ctrl+Shift+Esc.
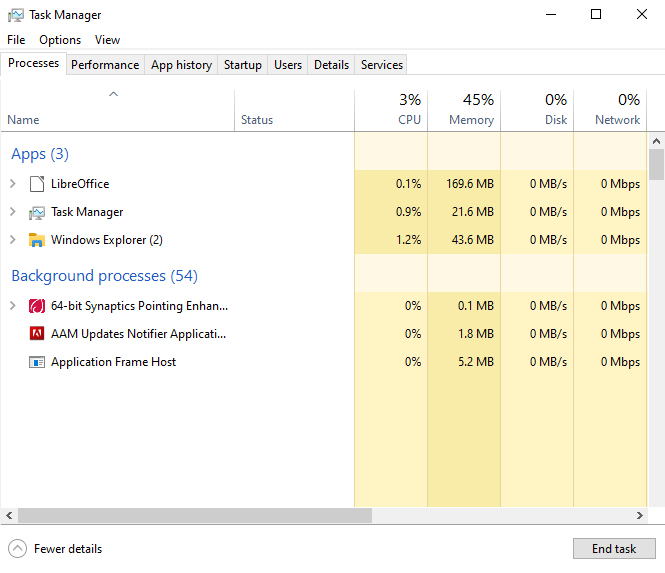
Follow the steps below once you’ve opened the Task Manager to disable power-hungry apps.
- In the Task Manager click on the ‘Processes’ tab at the top.
- You will see usage statistics related to CPU, Memory, Disk, Network, and GPU. Next to these usage statistics, you will see two columns for Power usage and Power usage trend. If you do not see these columns, right-click on the header and enable them.
- Check the apps that consume a lot of power based on the Power usage column. You can confirm if they continue to use a lot of power based on the Power usage trend column that populates a couple of minutes after the apps have begun to run.
- Right-click and click ‘End Task’ to end the process of apps that consume a lot of power
You can also go to Settings > System > Battery to see the apps that have a significant impact on your battery life and decide if you need to keep them running.
3. Windows 10 Wi-Fi Slow – Change DNS
Your Windows 10 Wi-Fi network connection can be slow and you might find it inconvenient when you’re browsing the web. Usually, it can be a problem with the slow DNS server of your Internet Service Provider (ISP) which can be resolved by using a free public DNS server that can provide better speed, privacy, and security.
Some of the best free public DNS servers are,
1. Google DNS
2. Cloudflare
3. OpenDNS
IP addresses for these DNS servers are listed below.
Google DNS
8.8.8.8
8.8.4.4
Cloudflare
1.1.1.1
1.0.0.1
OpenDNS
208.67.222.222
208.67.220.220
Follow the steps below to change the DNS server:
1.Open File Explorer or by pressing the Windows + E combination on the keyboard.
2. Go to: Control Panel\Network and Internet\Network and Sharing Center
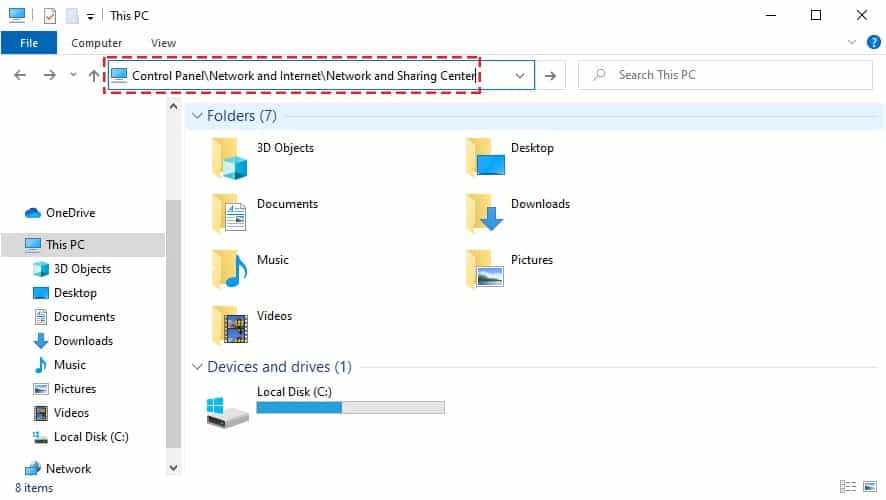
3. Click on "Change adapter settings"
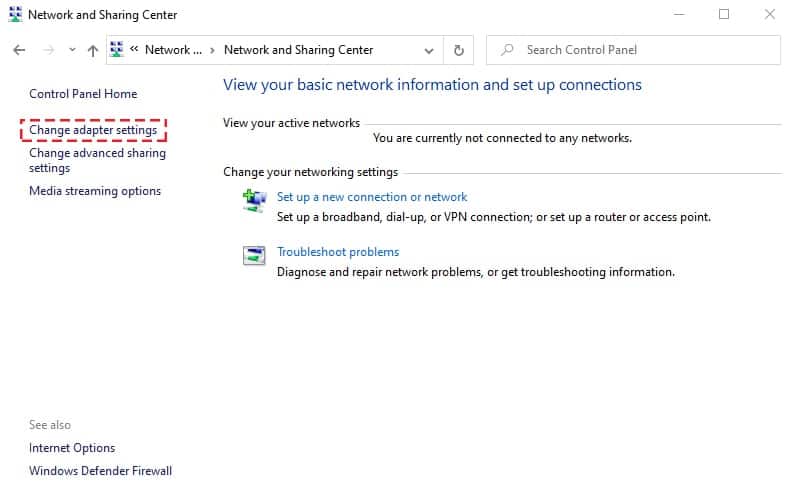
4. Right click on your Network (Wifi, Ethernet), then select "Properties".
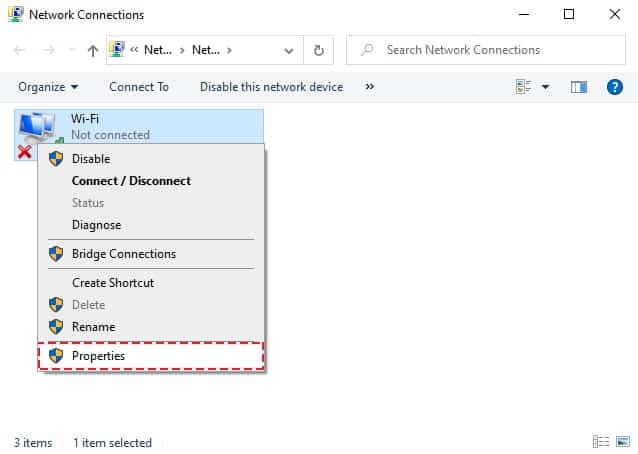
5. Click on your "Internet Protocol Version", then change DNS.
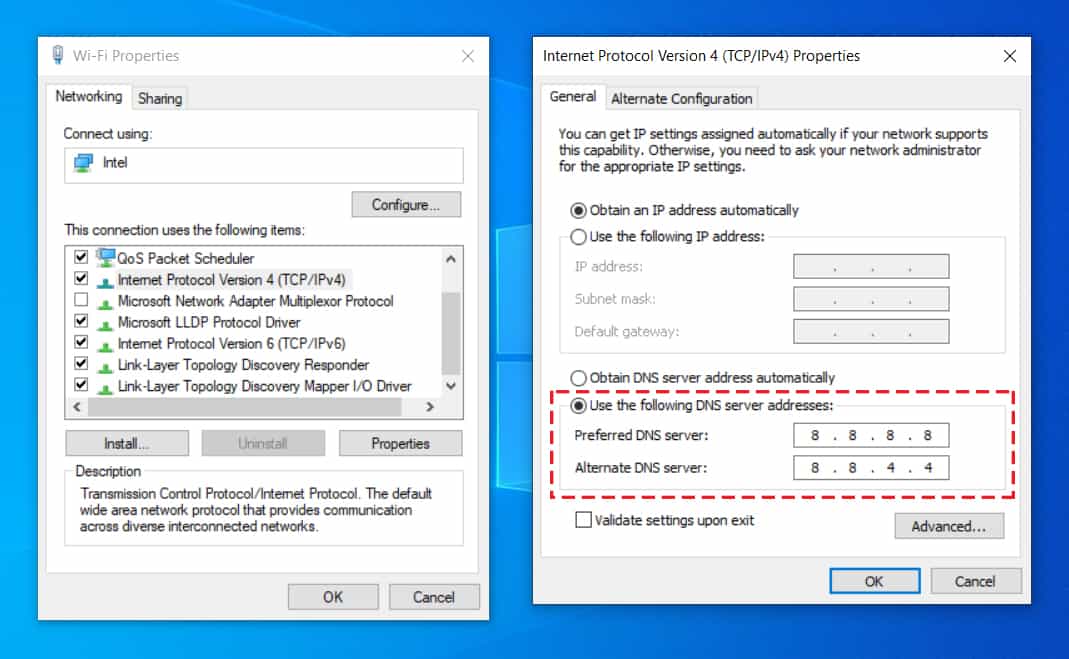
Now, you will see a marked improvement in the speed of your Wi-Fi network connection.
4. Disable Visual effects, Virtual Memory
If you’re using an old computer for running Windows 10, you will need to make use of all possible opportunities for speeding up your experience. In addition to adding more memory and using SSD storage, you can disable visual effects, reduce memory usage, and disable virtual memory to get more speed.
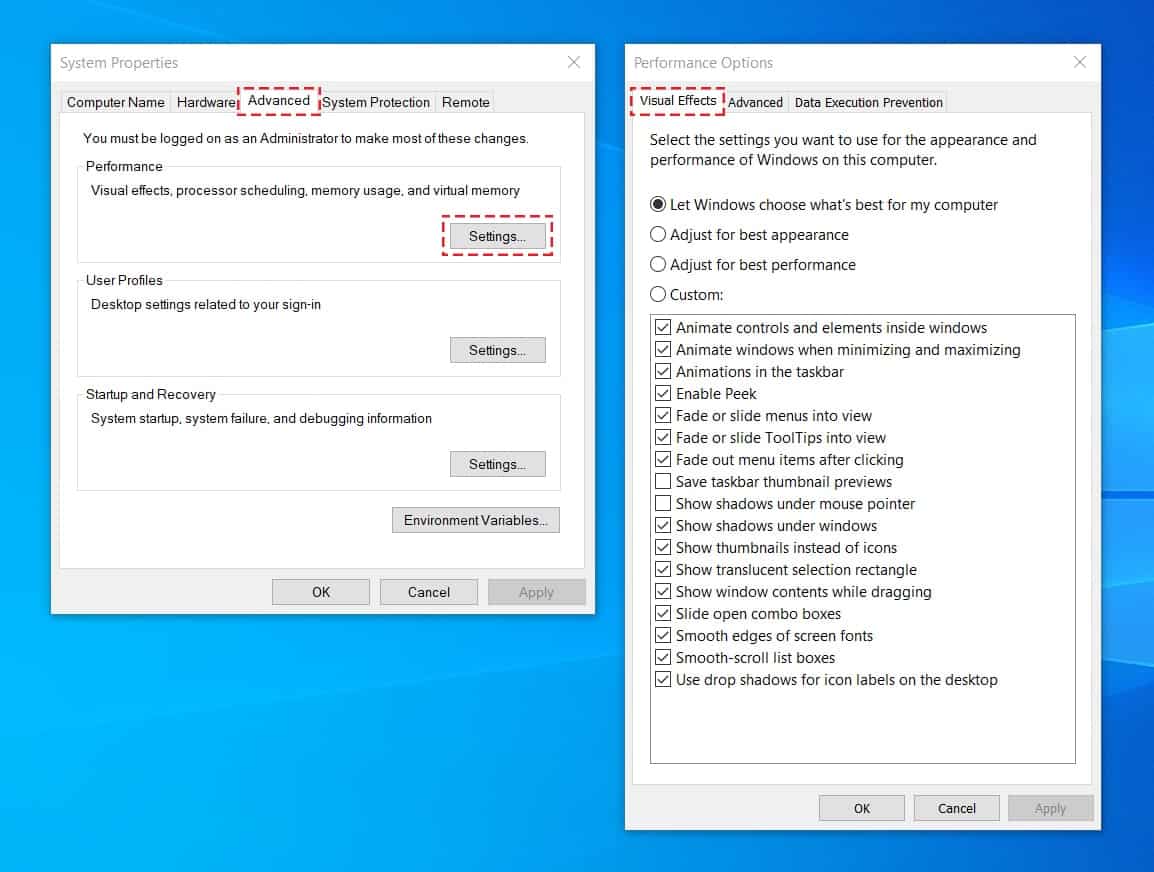
Follow the steps below to disable visual effects on your Windows 10 computer.
- Open the Run command by searching for ‘Run’ in the Start Menu. You can alternatively use Windows + R key to open it.
- Type sysdm.cpl and click on OK to open System properties.
- Go to the ‘Advanced’ tab and under the ‘Performance’ section, click on Settings.
- Under the ‘Visual Effects’ tab choose Adjust for best performance. This will disable all animations and effects on Windows 10.
- Click Apply and then click OK to save your settings.
You can reduce memory usage on your computer by constantly monitoring the processes running on the device and removing the ones that take up a lot of memory. You can use the Task Manager to monitor the memory usage on the computer. You can also monitor if any background processes are utilizing a lot of memory and stop them if they are not needed to reduce memory usage.
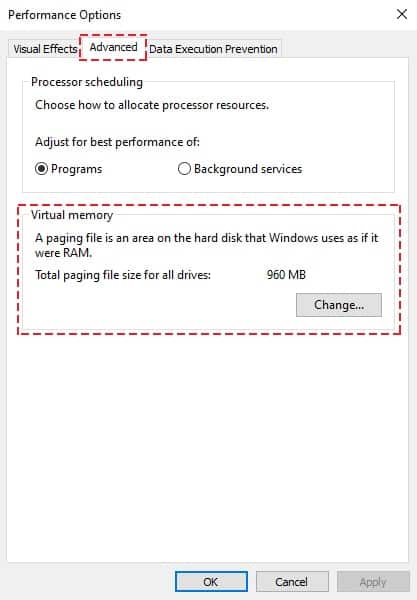
The Virtual Memory (Pagefile) reduces the workload of the RAM and allows the computer to perform better. The Pagefile can be 1.5 times to 4 times the physical memory on the computer. You can reduce this to speed up Windows 10 processes.
Follow the steps below to reduce the Virtual Memory on Windows 10.
6. Under the ‘Performance’ section, select Advanced tab.
7. Click on the Change button under the Virtual memory section.
8. Once you’ve decided the Virtual Memory, click on OK.
5. Upgrade to New SSD
A Solid-State Drive (SSD) can boost the speeds of your Windows 10 operating system, especially if you’re running an old computer. You can set up your Windows 10 operating system to boot from the SSD which will give faster login times and speed up other processes.
If your computer has a slot to add an internal SSD, you can go ahead with it. Or else, you can also add an external SSD to speed up Windows 10.
6. Windows 10 Slow After Updating
The Windows 10 1909 version that was released in November 2019 was the eighth major update to the operating system. However, the new version brought along with it a host of issues related to operating speed. Updated users complained of extremely slow computers that were functioning great before the update. Among the reported problems were slow login times, navigation, and browsing.
If you find yourself in a similar situation with the functioning of Windows 10 slow after updating to new version, it is time you fix your computer and get it back to working at optimal speeds again.
The best way to restore your PC back to normal is to uninstall the 1909 update. Fortunately, uninstalling an update is simple on Windows 10.
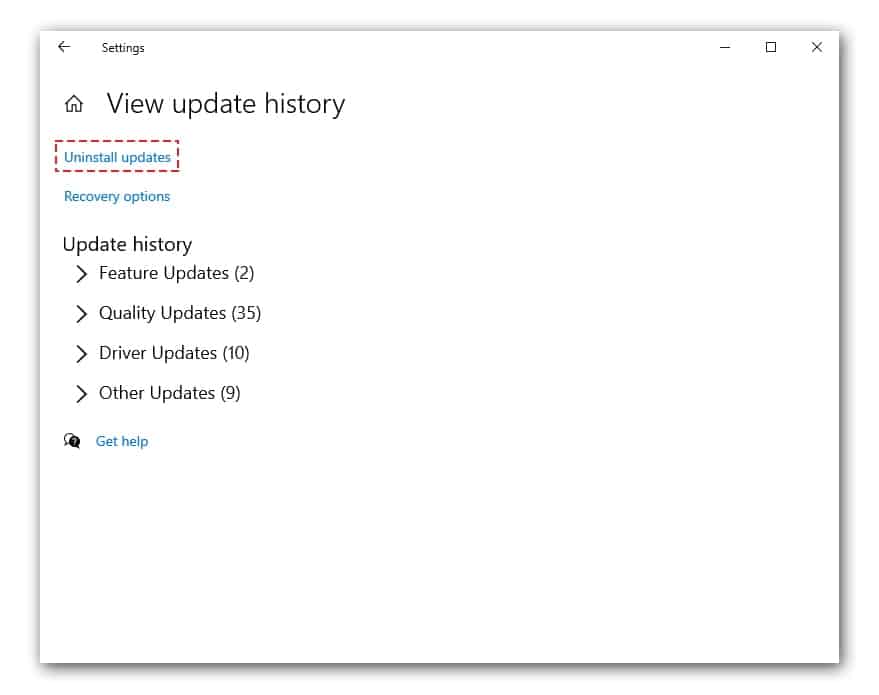
Follow the steps below to uninstall a recent update on Windows 10.
- Open the Settings app by clicking on the cog icon in the Start Menu or by pressing the Windows + I combination on the keyboard).
- Choose ‘Update & Security’ and then select ‘Windows Update’ from the left side panel.
- Click on ‘View update history’ and click ‘Uninstall updates’.
- Select the Update to uninstall it.
This should fix your problems.
7. Install Antivirus Software
Even though Windows 10 comes with the default security software called Windows Defender, it can significantly affect the performance of the computer and slow down processes. You can take control of your computer resources by installing free or premium antivirus software that defends your computer from viruses and malware while ensuring better performance.
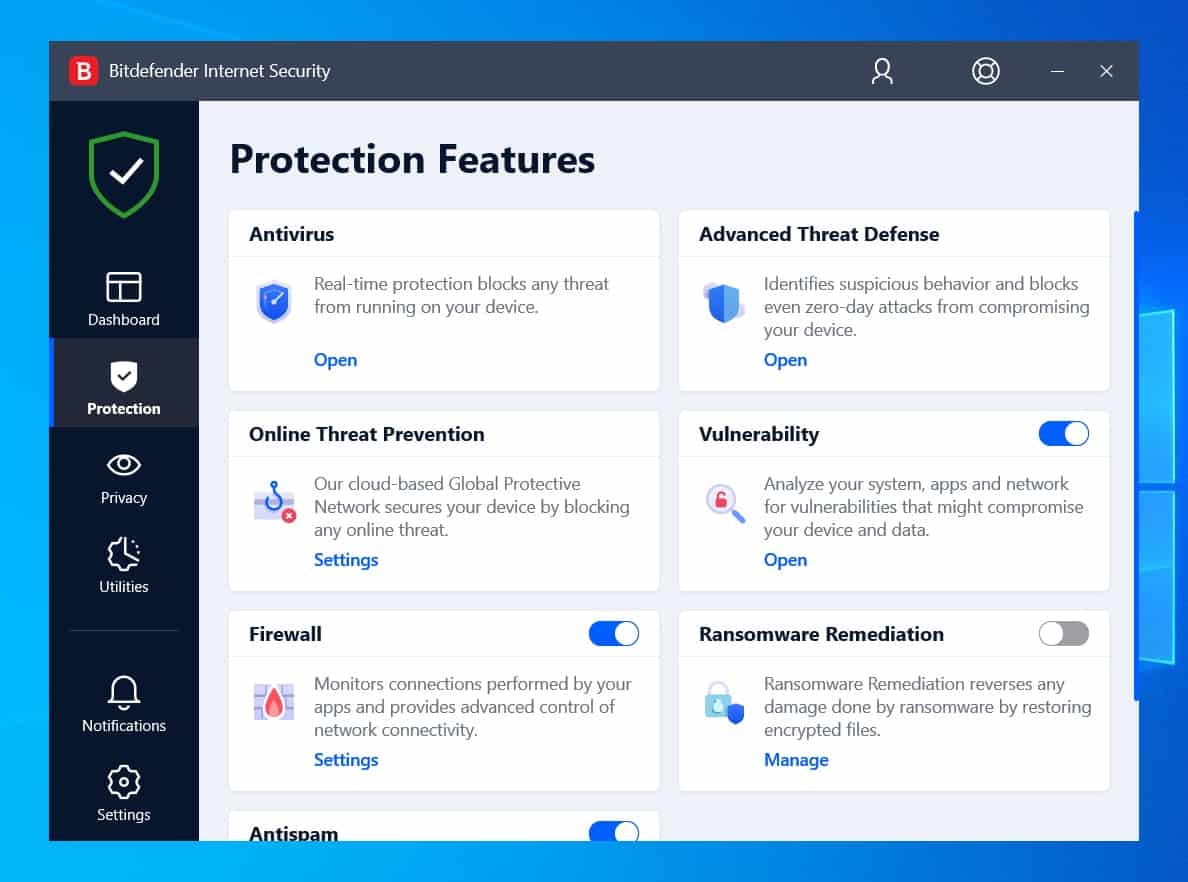
Some of the best antivirus software available for Windows 10 are:
1. Norton 360.
2. Bitdefender Internet Security.
3. McAfee Total Protection.
4. ESET Antivirus.
8. Create a Power Plan
If there is a mix of programs you need running on your computer that can sometimes be draining on the battery, you will need a custom power plan to maximize the battery life. By default, there are three power plans to choose from – Balanced, Power saver, and High Performance.
However, you can modify your preferences and create a custom power plan that suits your needs.
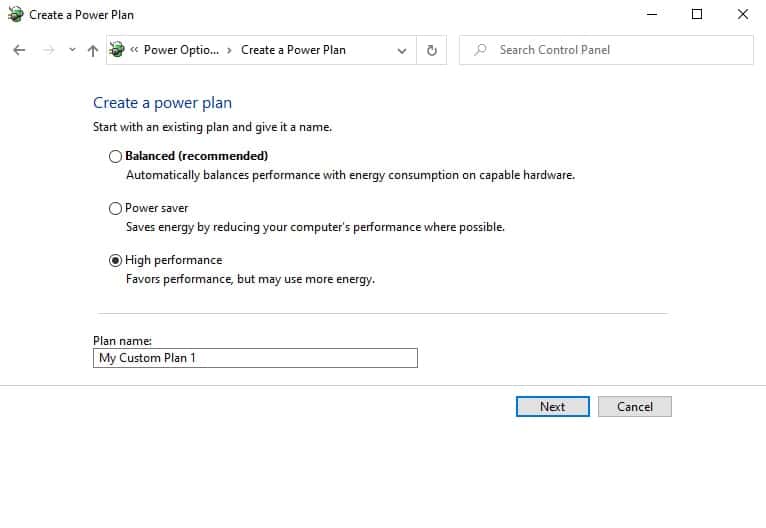
Follow the steps below to create your custom power plan:
- Open the Settings on Windows 10 (Press Windows + I), Choose System and click on Power & sleep from the left panel.
- Click on Additional power settings, On the left panel, choose to Create a power plan.
- Type the name of your plan in the Plan name box. Click the Next button to create your plan
- Now go to Settings > System > Power & sleep > Additional power settings.
- Click the Change plan settings next to your newly created custom power plan. Click on OK once you’re satisfied with your settings.
9. Configure Storage Sense
If you’re short on disk space, you might experience your computer slowing down. You might need to see if you can add an SSD storage or free up disk space to speed up the experience. You can also use the existing disk space cleaner on Windows 10 to free up space.
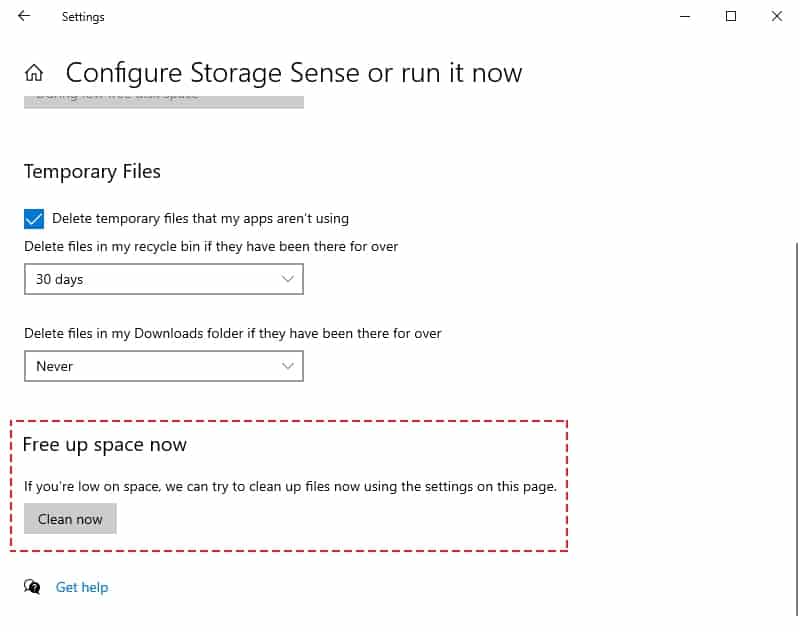
Follow the steps below to free up your disk space and avoid Windows 10 slow speed issues:
- Open the Settings app.
- Choose System and select Storage from the left panel.
- Click on Configure Storage Sense or run it now and then click on Clean now under Free up space now.
10. Clean Install Windows 10
A clean install of Windows 10 will be the last resort option if the optimizations you’ve done have failed to improve the speed significantly. After you’ve backed up your files and checked Windows 10 activation, you can proceed with the clean install of Windows 10. This will make sure that you start with a clean version of the latest Windows operating system and get a faster experience.
Make sure that the system configurations meet the requirements for running Windows 10 before going ahead with the clean install of Windows 10.
Windows 10 slow issues can be tackled in a lot of ways. There are many reasons why your Windows 10 computer can be running slow and if you can find the reasons and use a solution we’ve discussed above, you can speed up your computer performance and battery life.


Leave a Comment