macOS 12 Monterey is currently the latest version of the Mac operating system. macOS Monterey brings many powerful features that Mac users have been eagerly waiting for.
In macOS 12, we have exceptional features like Live Text, which lets you select texts from the images and videos. They introduced a new DND mode called Focuses to focus more on your projects. Besides, macOS Monterey has got many upgrades in FaceTime, Safari Browser, and many more.
The macOS installer is a .app file and doesn't come with a disk image. So, to install the macOS installer on a Virtual Machine, we will need to create a macOS ISO Image. In this tutorial, we will show you how to create a macOS Monterey ISO Image in a few easy steps.
macOS Monterey ISO for Virtual Machine
To install the macOS Monterey on a Virtual Machine like VMware and VirtualBox requires a Monterey ISO image. To create a Monterey ISO image, you need a real Mac or Virtual macOS. Now, if you don't own a Mac, you can rent a macOS that runs on Mac. You can take both physical and virtual macOS on rent and build a Monterey ISO image.
Before creating the Monterey ISO image, you will need to download macOS Monterey.app from the App Store. After downloading the mentioned file, you can use the macOS Terminal to create a Blank Disk cdr Image (ISO) with HFS+ Partition. Then, we will use createinstallmedia tool in macOS Monterey.app to create a macOS Monterey Installer to complete the process. Later, we will move and rename the Blank Disk Image to ISO Image.
How to Create a macOS 12 Monterey ISO Image
We will need to execute a command in our macOS in-built terminal in this step. So, launch the Terminal by typing ‘Terminal’ in your ‘Spotlight Search.’ Once it appears on your screen, launch it. You can also open it directly from the Utility section.
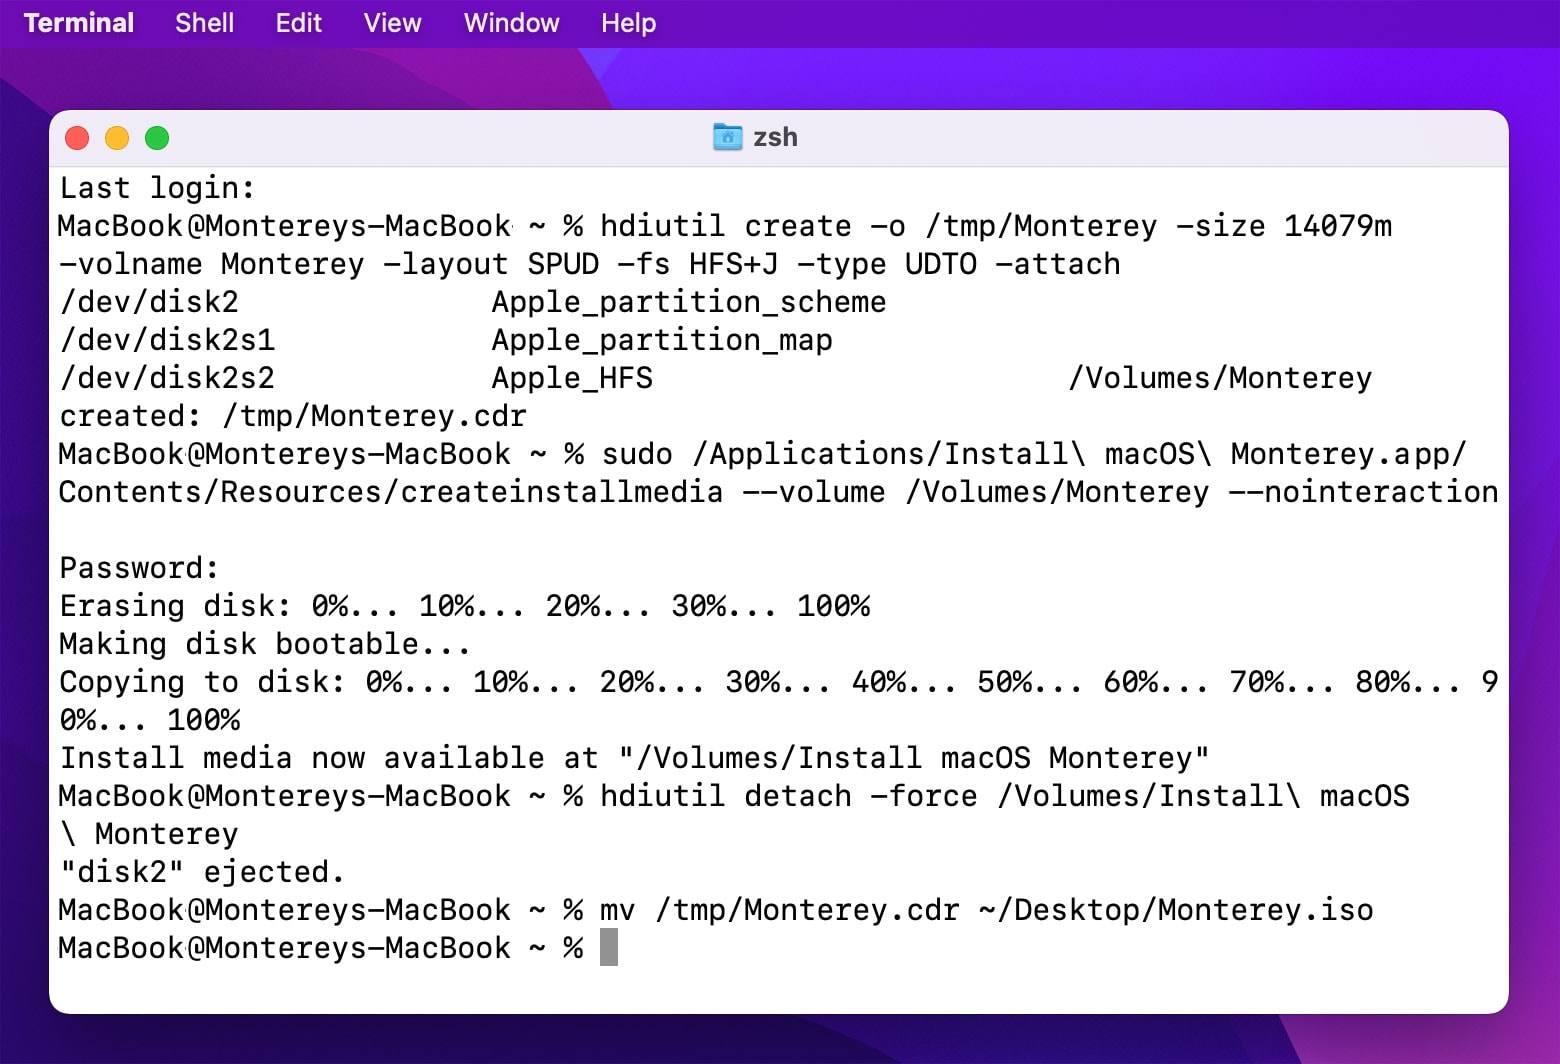
Follow this commands to create macOS Montery ISO Image:

Create Monterey ISO Blank Disk with hdiutil command:
hdiutil create -o /tmp/Monterey -size 14079m -volname Montereyiso -layout SPUD -fs HFS+J -type UDTO -attach
Size: 14GB to 19GB
Volume name: Monterey
Layout: SPUD is Single partition - Apple Partition Map
Filesystem options: -fs HFS+ Mac OS Extended
Type: UDTO is DVD/CD master (ISO image)
Attach image after creation
Use the Createinstallmedia Utility to Copy the Installer Files to the Disk
we will use the createinstallmedia in "Install macOS Monterey.app" to create a macOS Installer.
Unmount the Disk, Move File to Desktop and Rename File to ISO Image.
These were the steps to create a macOS Monterey ISO Image or macOS Big Sur, Catalina, and others. We hope you followed all the steps correctly and achieved the desired results without any issues. Do let us know whether it worked for you or not. In addition, if you face any issues during the process, you can ask in the comment section. We would be happy to assist you.


Short, Sweet, and 100% Working!
Thank YOU!