Are you having trouble with your Mac computer or looking to create a macOS bootable USB as a backup? Perhaps your internet connection is not strong enough, or you simply want to ensure that your Mac does not automatically install an older operating system when using recovery mode. If so, you may need to create a macOS installation on your Windows PC. But don't worry, we've got you covered! In this guide, we'll show you how to create a standard macOS installation that supports all versions, including Sierra, Mojave, and even the newest releases like Big Sur, Monterey, and Ventura.
In this guide, we'll teach you how to run a lightning-fast macOS version on a Virtual Machine. And the best part? You'll be able to download any macOS version with ease. Plus, we'll show you how to create the most reliable and standardized macOS installation using Disk Utility and Terminal. So why wait? Let's dive in and discover this method today!
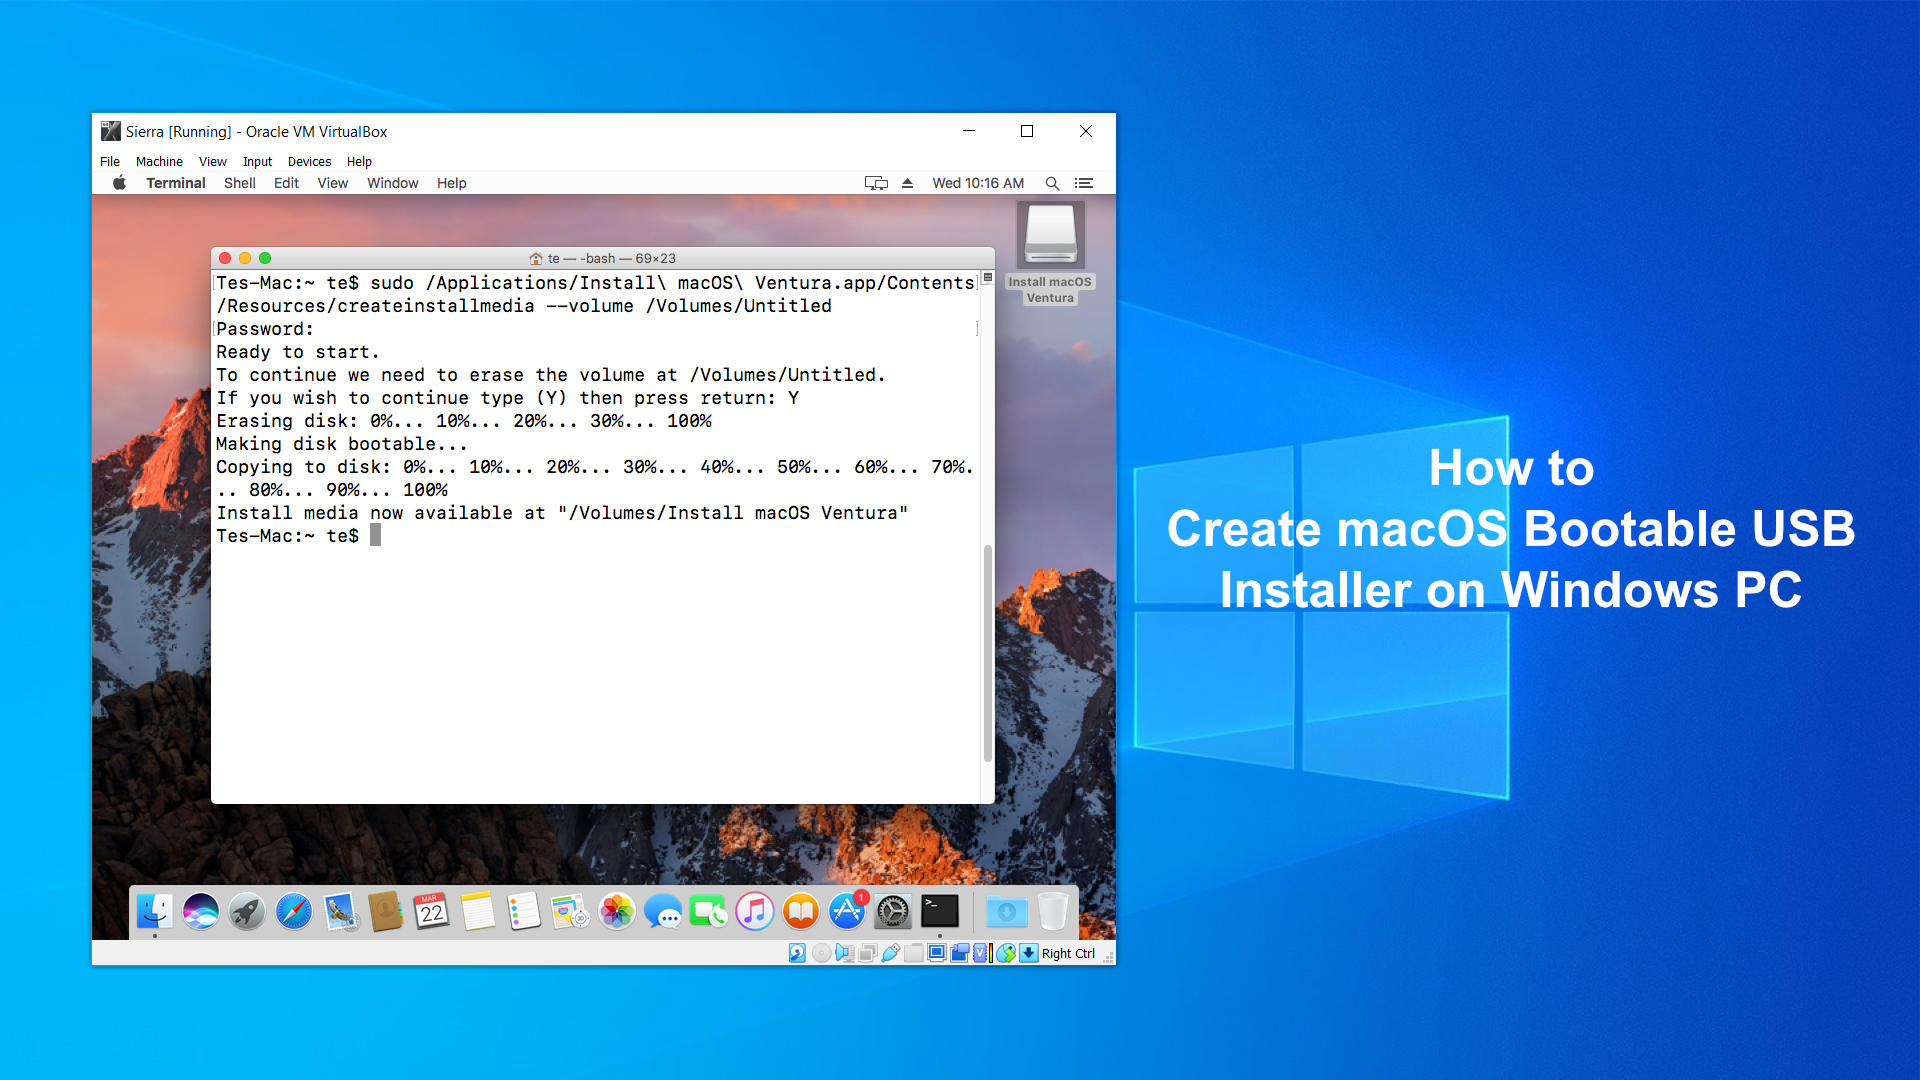
How to Create macOS Bootable USB Installer on Windows PC
1. Run macOS Virtual Machine
Are you ready to experience macOS Virtual Machine on your Windows PC? Look no further than VirtualBox! This amazing software is not only free, but it also supports macOS Sierra on Windows. Plus, we'll show you step-by-step how to download and install macOS Sierra on VirtualBox by following the instructions below.
How to Install macOS 10.12 Sierra on VirtualBox on Windows PC
With a Virtual Machine, you can install any macOS version you desire! we highly recommend using older versions like Sierra or Mojave. These versions are incredibly lightweight (only 6GB!) and boast lightning-fast speeds when running on a Virtual Machine.
2. Download macOS Installer
Discover the simple ways to download any version of macOS effortlessly, with the easiest way being the use of the App Store on macOS. For instance, Sierra versions from Sierra to Ventura can be downloaded with just a simple search and click. After downloading, your installation package can be found in the Applications folder.

For other versions like Ventura, Monterey, or Big Sur, you can simply download the InstallAssistant file using any browser on both Windows PC and macOS. Then open the InstallAssistant file in the macOS Virtual Machine, and voila! Your macOS installer can be located in the Applications folder.

3. Create macOS Bootable USB Installer
The first step is to connect your USB drive to your macOS virtual machine. But before we can start, we need to make sure that the USB drive is formatted correctly.
Using the Disk Utility app on your macOS virtual machine, you'll need to change the format of the USB drive to Mac OS Extended. Just keep in mind that all of the data on the USB drive will be erased. So, make sure you've backed up any important files before continuing.
To open Disk Utility, you can go to the Applications > Utilities folder or simply search for it using Spotlight. Once you're in Disk Utility, select your USB drive and click the Erase button to create a new partition. If Disk Utility gives you an error message, try unmounting the disk by right-clicking on the USB drive and selecting "Unmount Disk" before attempting to erase it again.

Next, we're going to use Terminal to create a macOS Bootable USB Installer. You can open Terminal in the Spotlight search or in the Applications>Utilities folder. Then, we'll use the following commands to create a complete macOS installation. As we use the Sudo command to create the macOS installer, admin privileges with the macOS password will be required.

You have to replace "Untitled" with the name of your USB drive.
macOS Ventura:
sudo /Applications/Install\ macOS\ Ventura.app/Contents/Resources/createinstallmedia --volume /Volumes/Untitled --nointeraction
macOS Monterey:
sudo /Applications/Install\ macOS\ Monterey.app/Contents/Resources/createinstallmedia --volume /Volumes/Untitled
macOS Big Sur:
sudo /Applications/Install\ macOS\ Big\ Sur.app/Contents/Resources/createinstallmedia --volume /Volumes/Untitled
macOS Catalina:
sudo /Applications/Install\ macOS\ Catalina.app/Contents/Resources/createinstallmedia --volume /Volumes/Untitled --nointeraction
The process of creating a macOS installer takes about 15 to 30 minutes, depending on the settings of the macOS Virtual Machine. You can set USB 3.0 on VirtualBox and adjust the number of CPUs and RAM to speed up the process. However, please note that some errors may occur when using multiple CPU cores on macOS on VirtualBox, so be careful with this setup.
Once you have a macOS installer on a USB Drive, it's time to try reinstalling your Mac. This is a concise and easy-to-follow guide when you have a macOS Virtual Machine at hand.


Leave a Comment