Imagine you’re working from home and are beginning your day. You open your Mac and it doesn’t boot. You’ve got a lot of work lined up to be completed and can’t afford to skip a day. What do you do?
You have to download the macOS Installer from another Mac or PC or else you need to have a backup macOS Installer handy. The macOS Installer is about 12GB and you will need a high-speed internet connection to download the installer. You can also use Recovery Mode to reinstall the macOS you’re running on your Mac. However, if you wish you clean install a new macOS, you need a bootable USB.
When you have a USB Mac bootable drive, your problems are solved and you can clean install macOS on your Mac. To create macOS USB Installer, you need a flash drive with at least 16GB of storage.
By following this tutorial, you can install new versions of macOS such as macOS Ventura, Monterey and Big Sur. With a Mac USB bootable drive, you can clean install any version of macOS.
macOS USB Installer
A USB Mac bootable drive allows you to install the current macOS you’re running or new version of macOS. It is important to create macOS USB Installer and have one handy so that you can use it whenever you need it.
You need to download the macOS you want to add to the bootable drive. You can choose from various operating system versions including macOS Monterey, Big Sur, Catalina, Mojave, and High Sierra.
Download macOS Version
You can visit the Mac App Store and search for the operating system you wish to download to your Mac. Make sure your internet connection speeds are sufficient for faster downloads. When you’ve downloaded the macOS of your choice, the download will be present in the Applications folder then Copy your "Install macOS.app" to external flash drive.
How to Create Mac Bootable USB in Recovery Mode
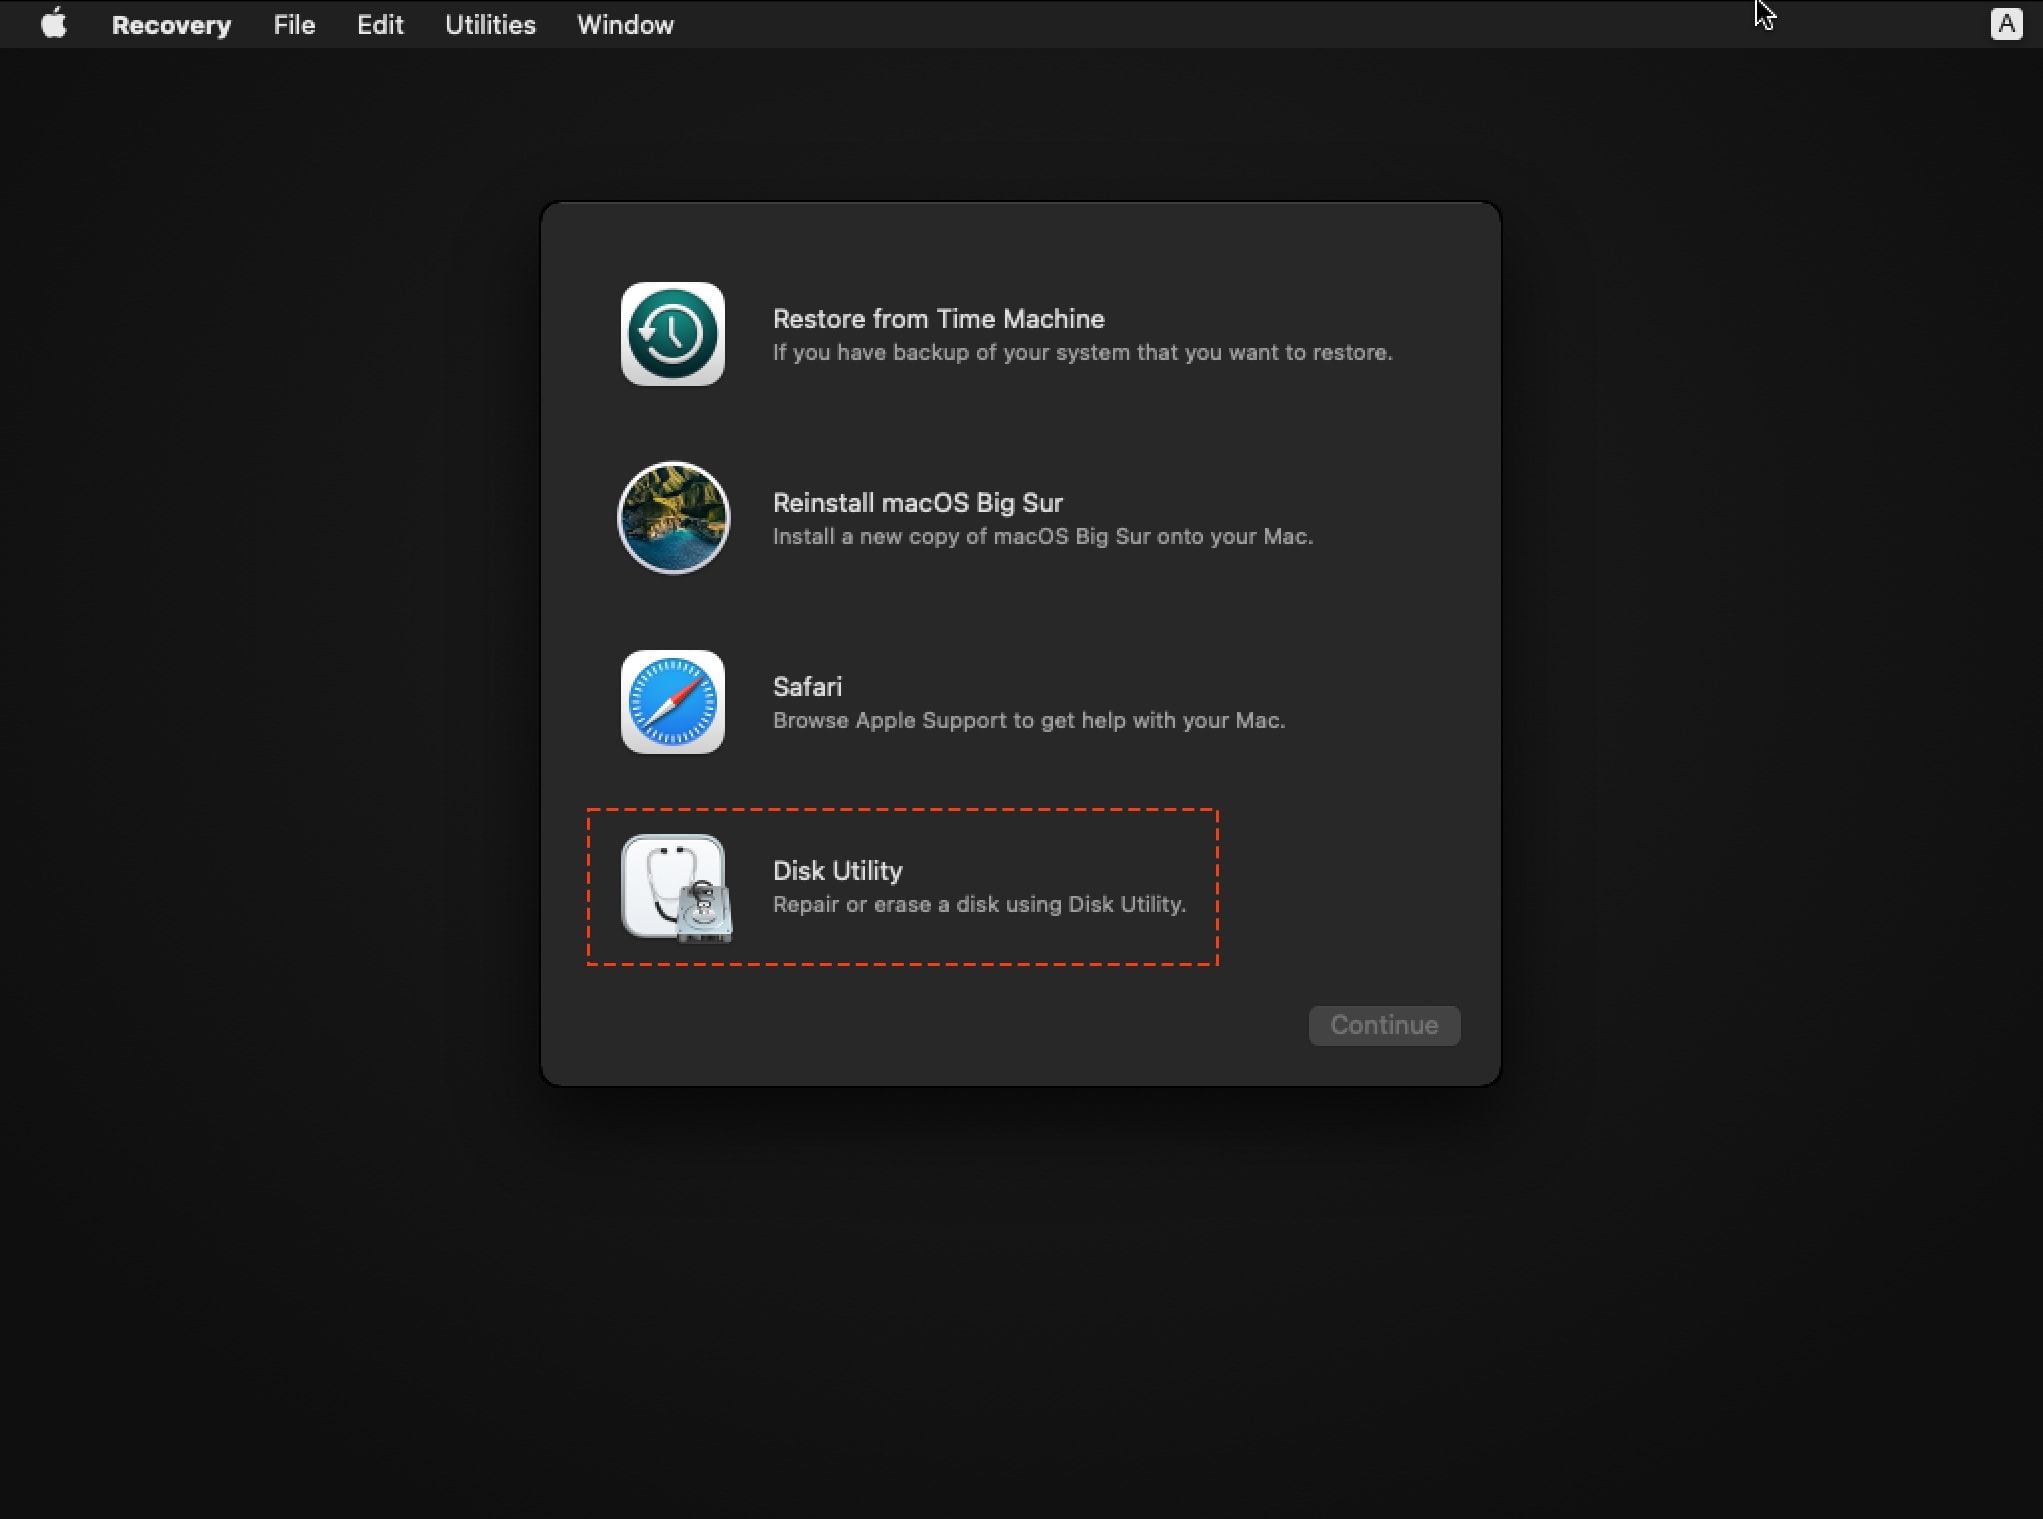
Step 1: Turn on your Mac and hold Command + R to enter Recovery mode and click on "Disk Utility".
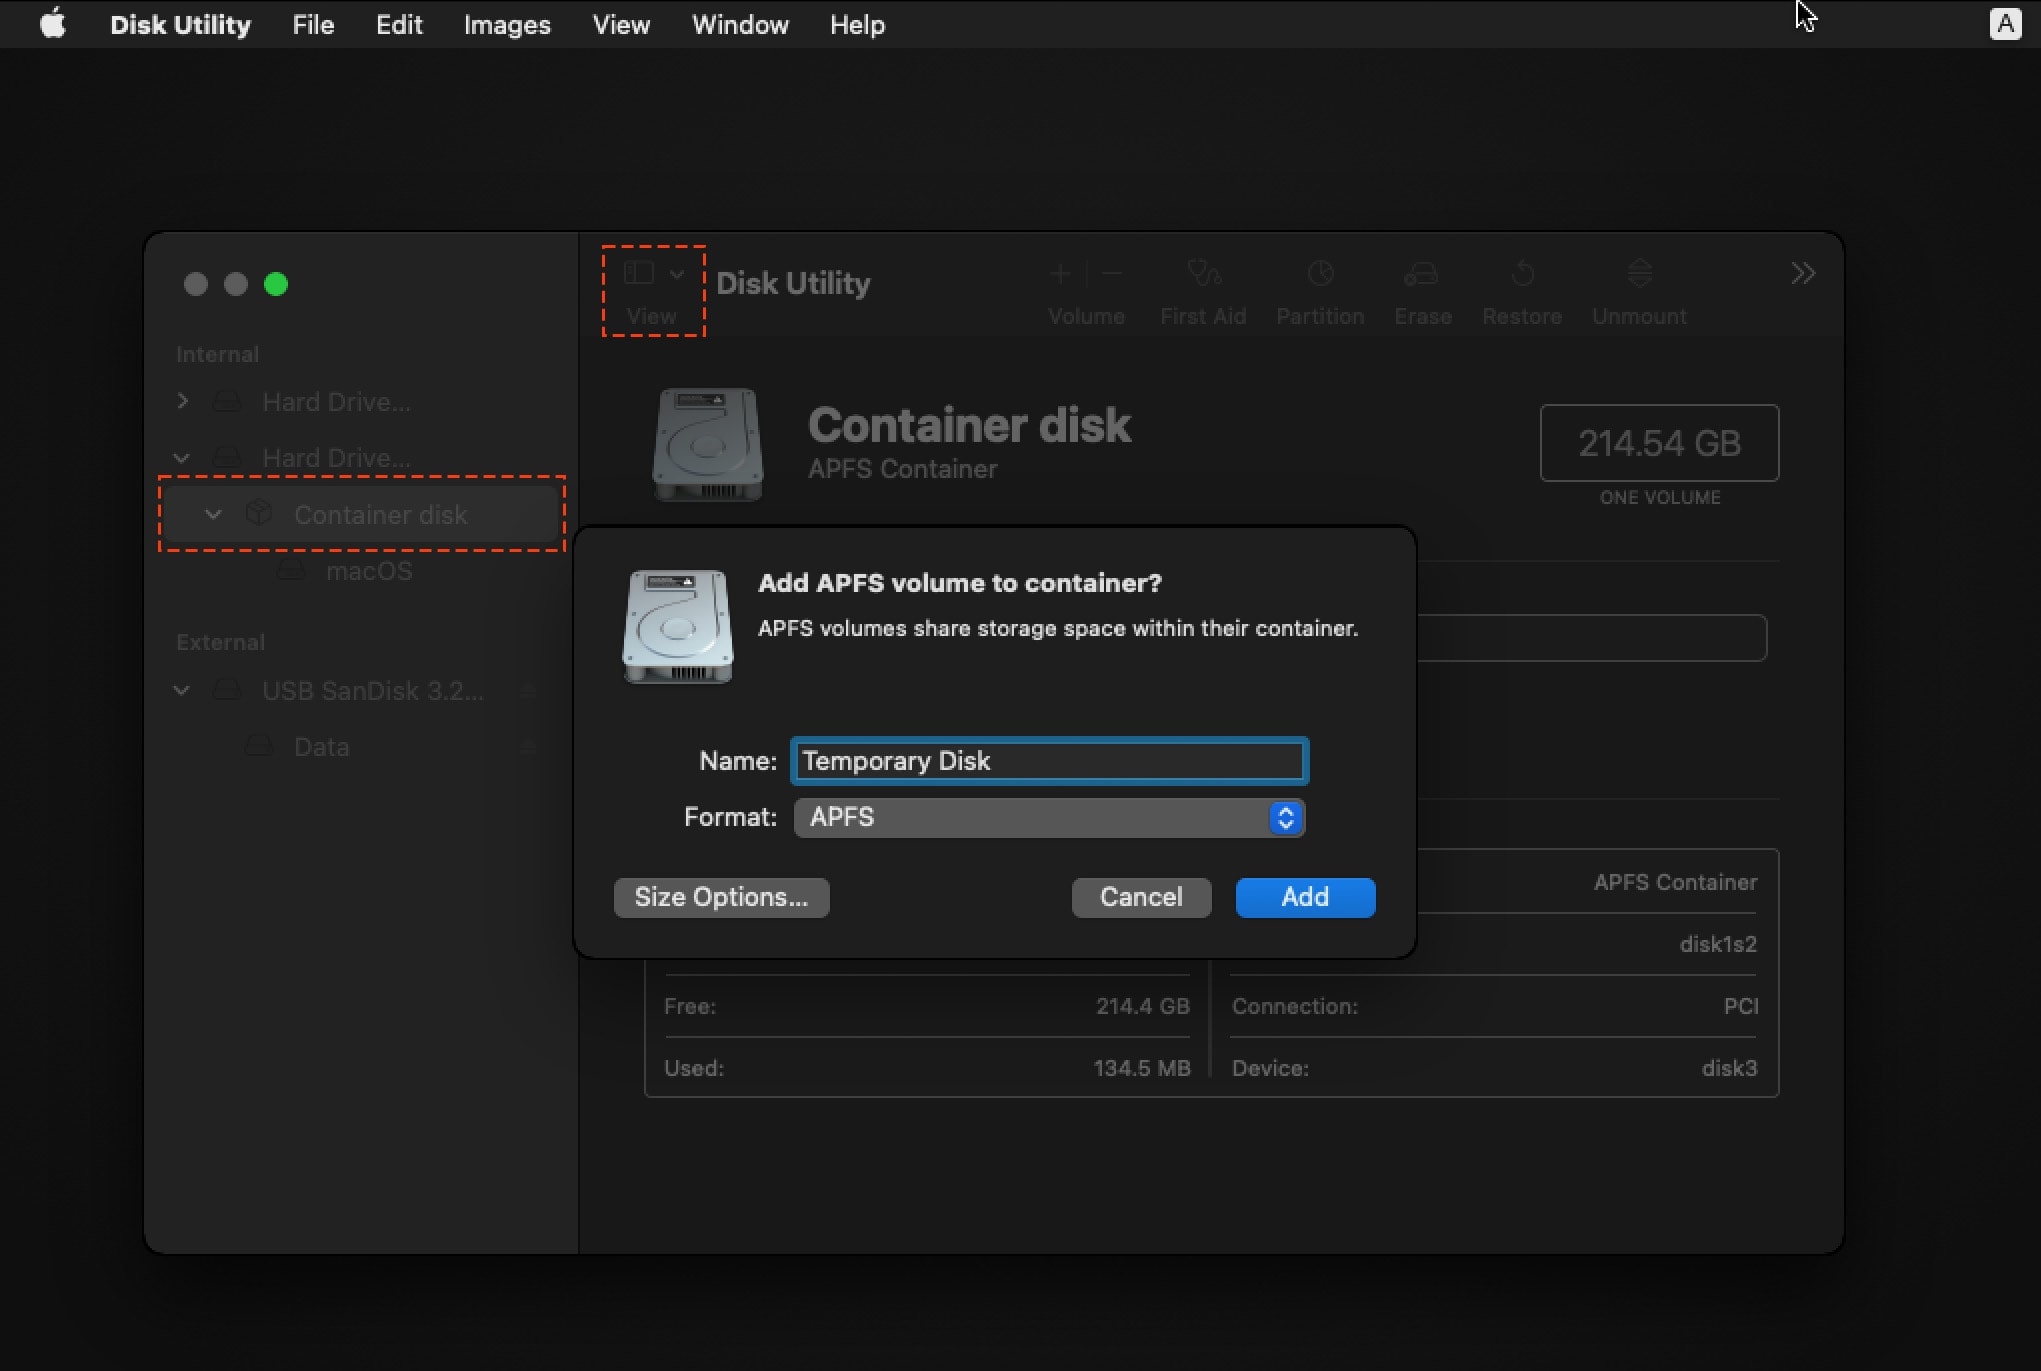
Step 2: Create a Temporary Disk in Disk Utility. Click on View > Show all devices. Select Container disk and click "+" button to add new volume. Select format as APFS. Click Add to create a Temporary Disk.
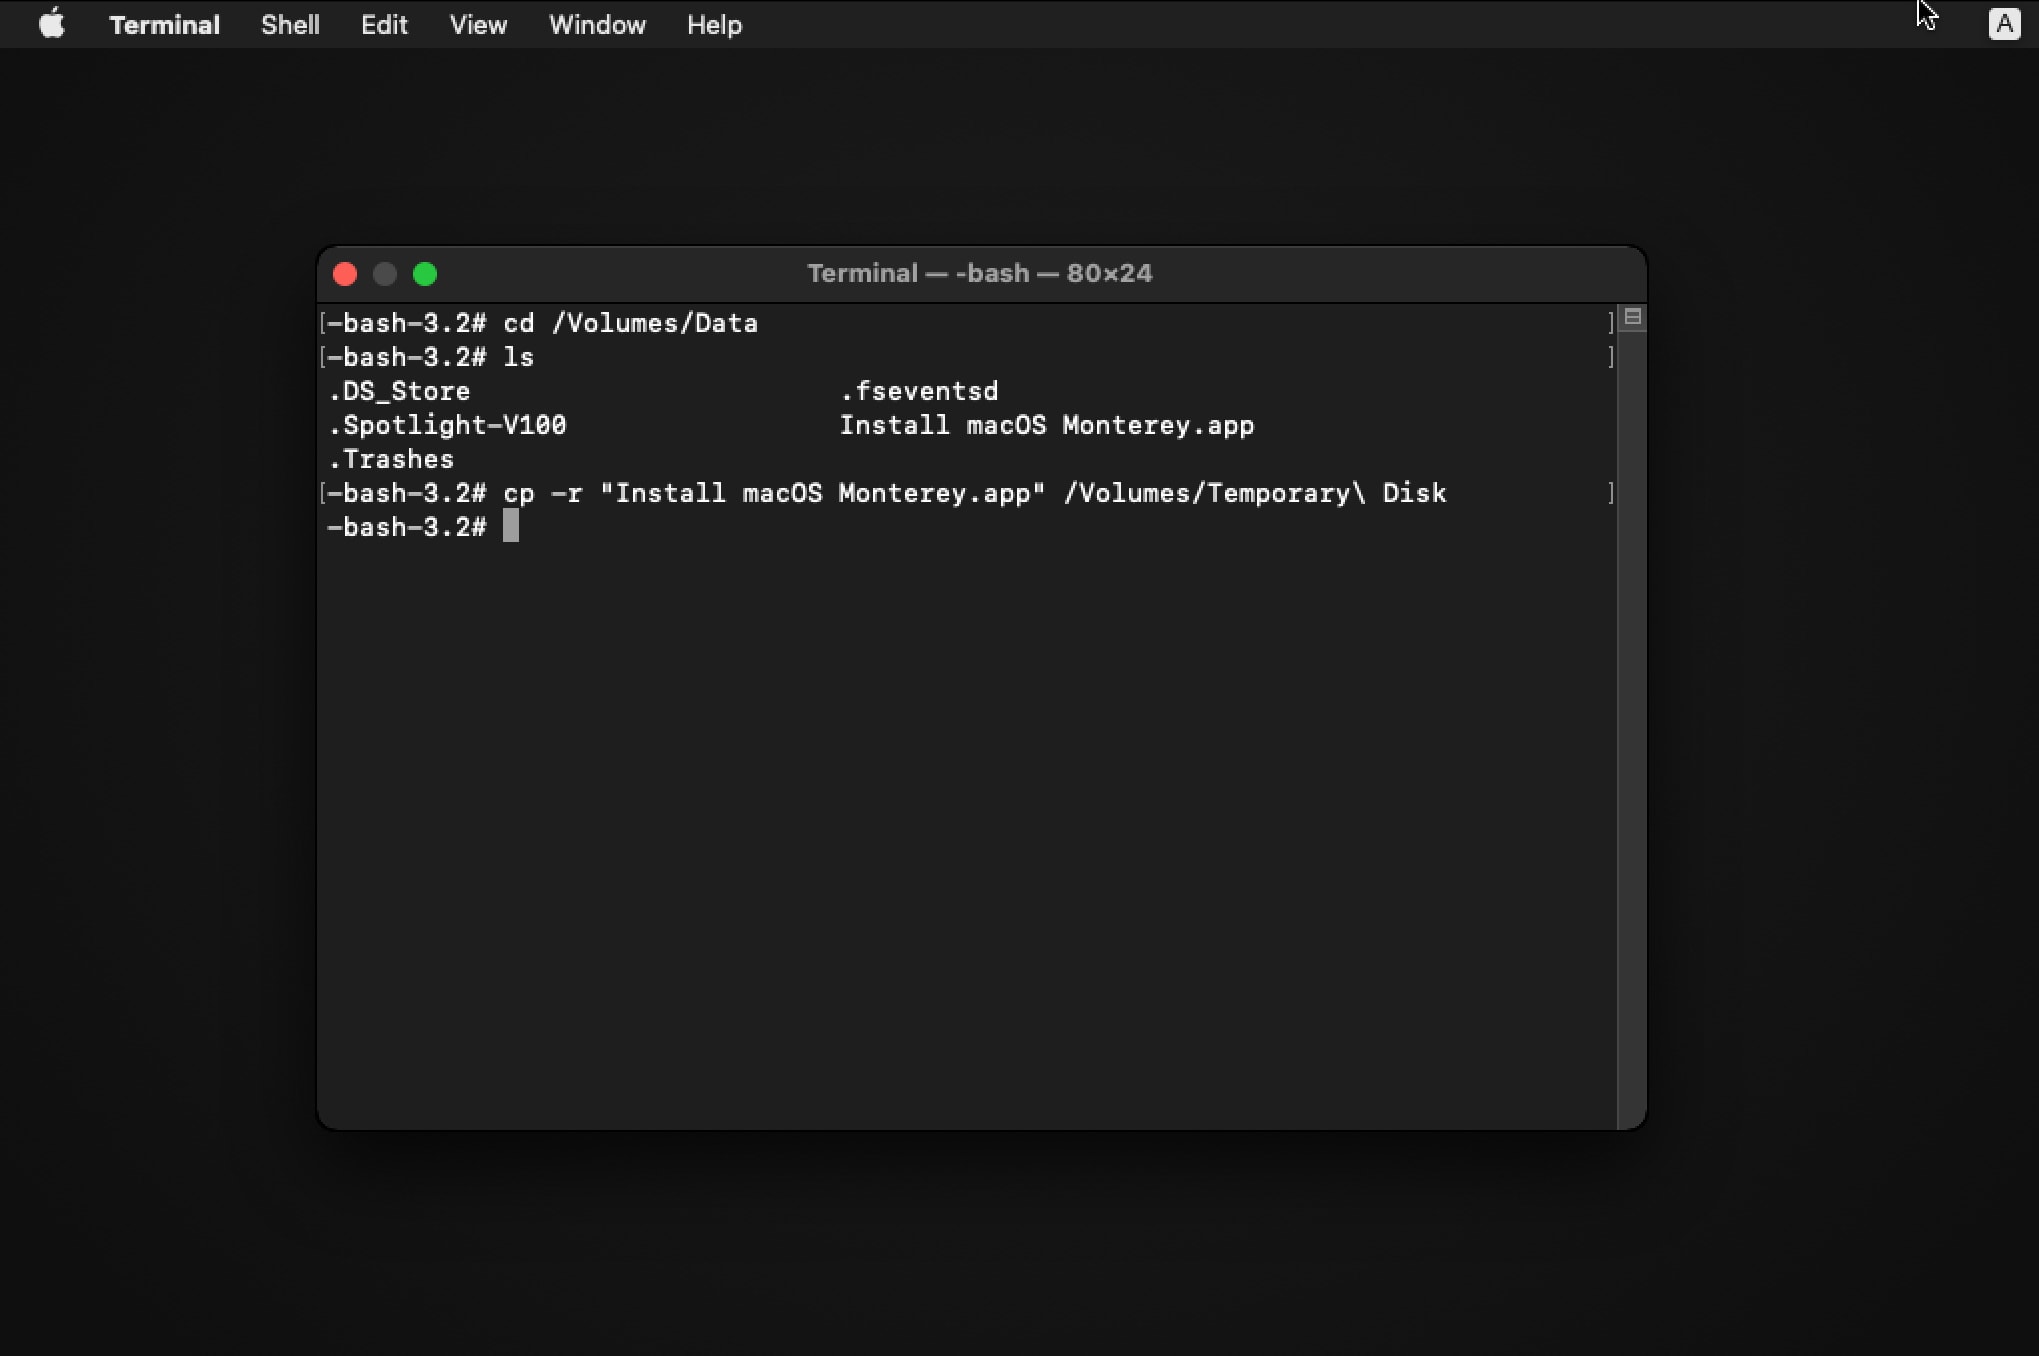
Step 3: Close Disk Utility. In Recovery Mode, click on Utilities > Terminal.
Use this commands to copy Installer on USB Drive or Backup folder to Temporary Disk:
# Go to USB Flash Drive, replace "Data" with the name of your USB drive or Backup folder
cd /Volumes/Data
# Copy Install macOS Monterey.app to Temporary Disk.
cp -r "Install macOS Monterey.app" /Volumes/Temporary\ Disk
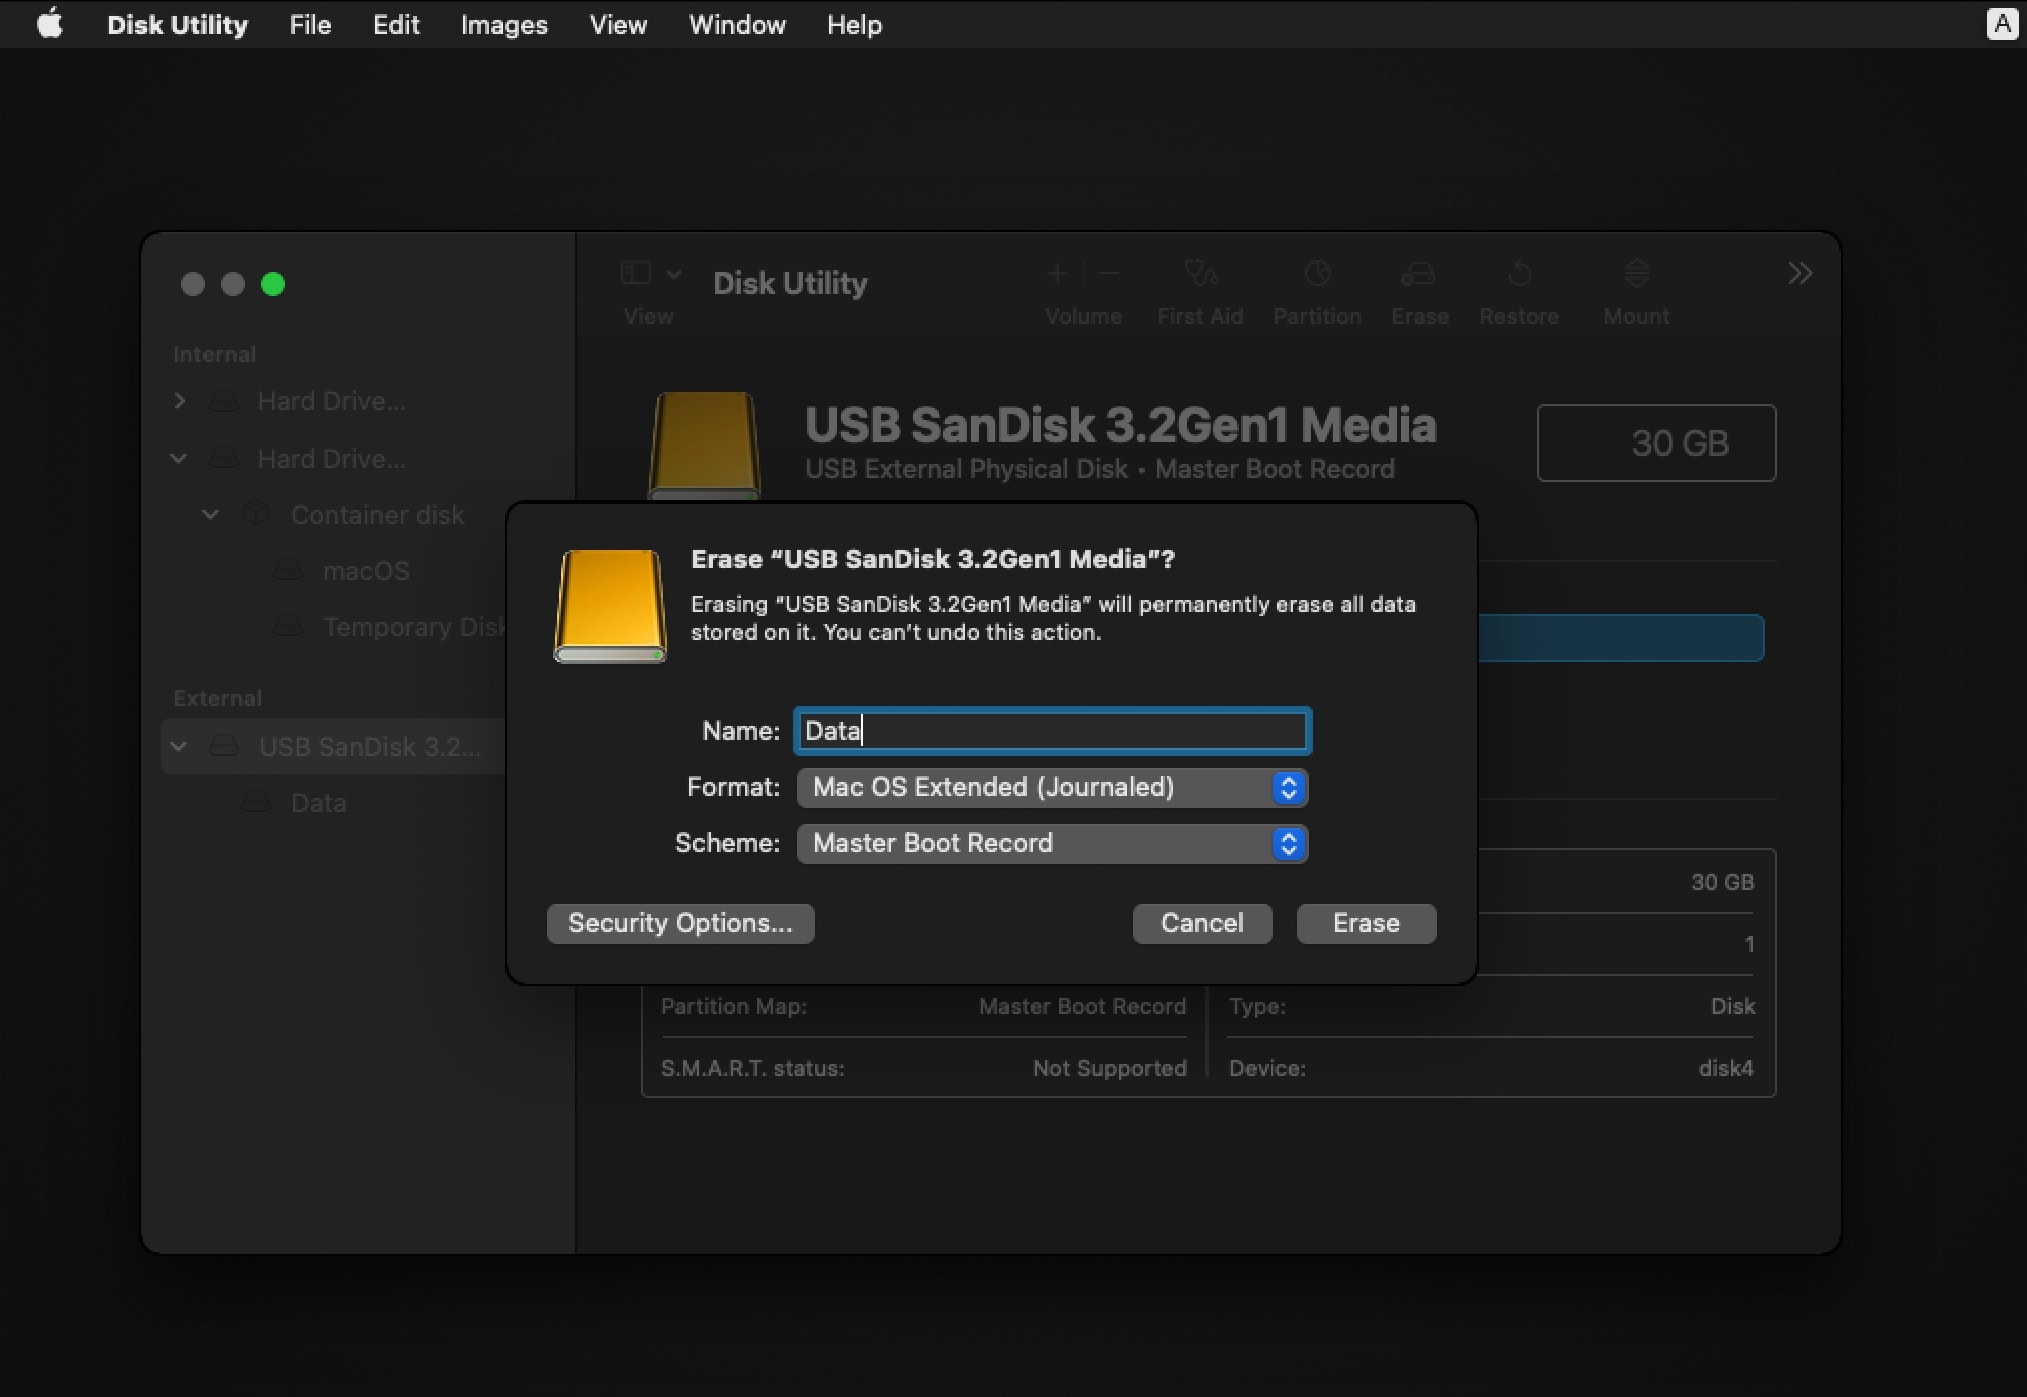
Step 4: Quit Terminal and open Disk Utility. In Disk Utility, choose your USB Drive and click on "Erase" button. Select format as "Mac OS Extended" and Scheme as "Master Boot Record".
Step 5: Close Disk Utility and reopen Terminal. Use this commands this create Mac USB Bootable Installer.
Here’s how the command line for creating a macOS USB bootable drive will look like:
This command for new macOS Ventura Beta, with Data is named of USB Drive
/Volumes/Temporary\ Disk/Install\ macOS\ Ventura\ beta.app/Contents/Resources/createinstallmedia --volume /Volumes/Data
This command for macOS Monterey and replace your USB name (Data)
/Volumes/Temporary\ Disk/Install\ macOS\ Monterey.app/Contents/Resources/createinstallmedia --volume /Volumes/Data
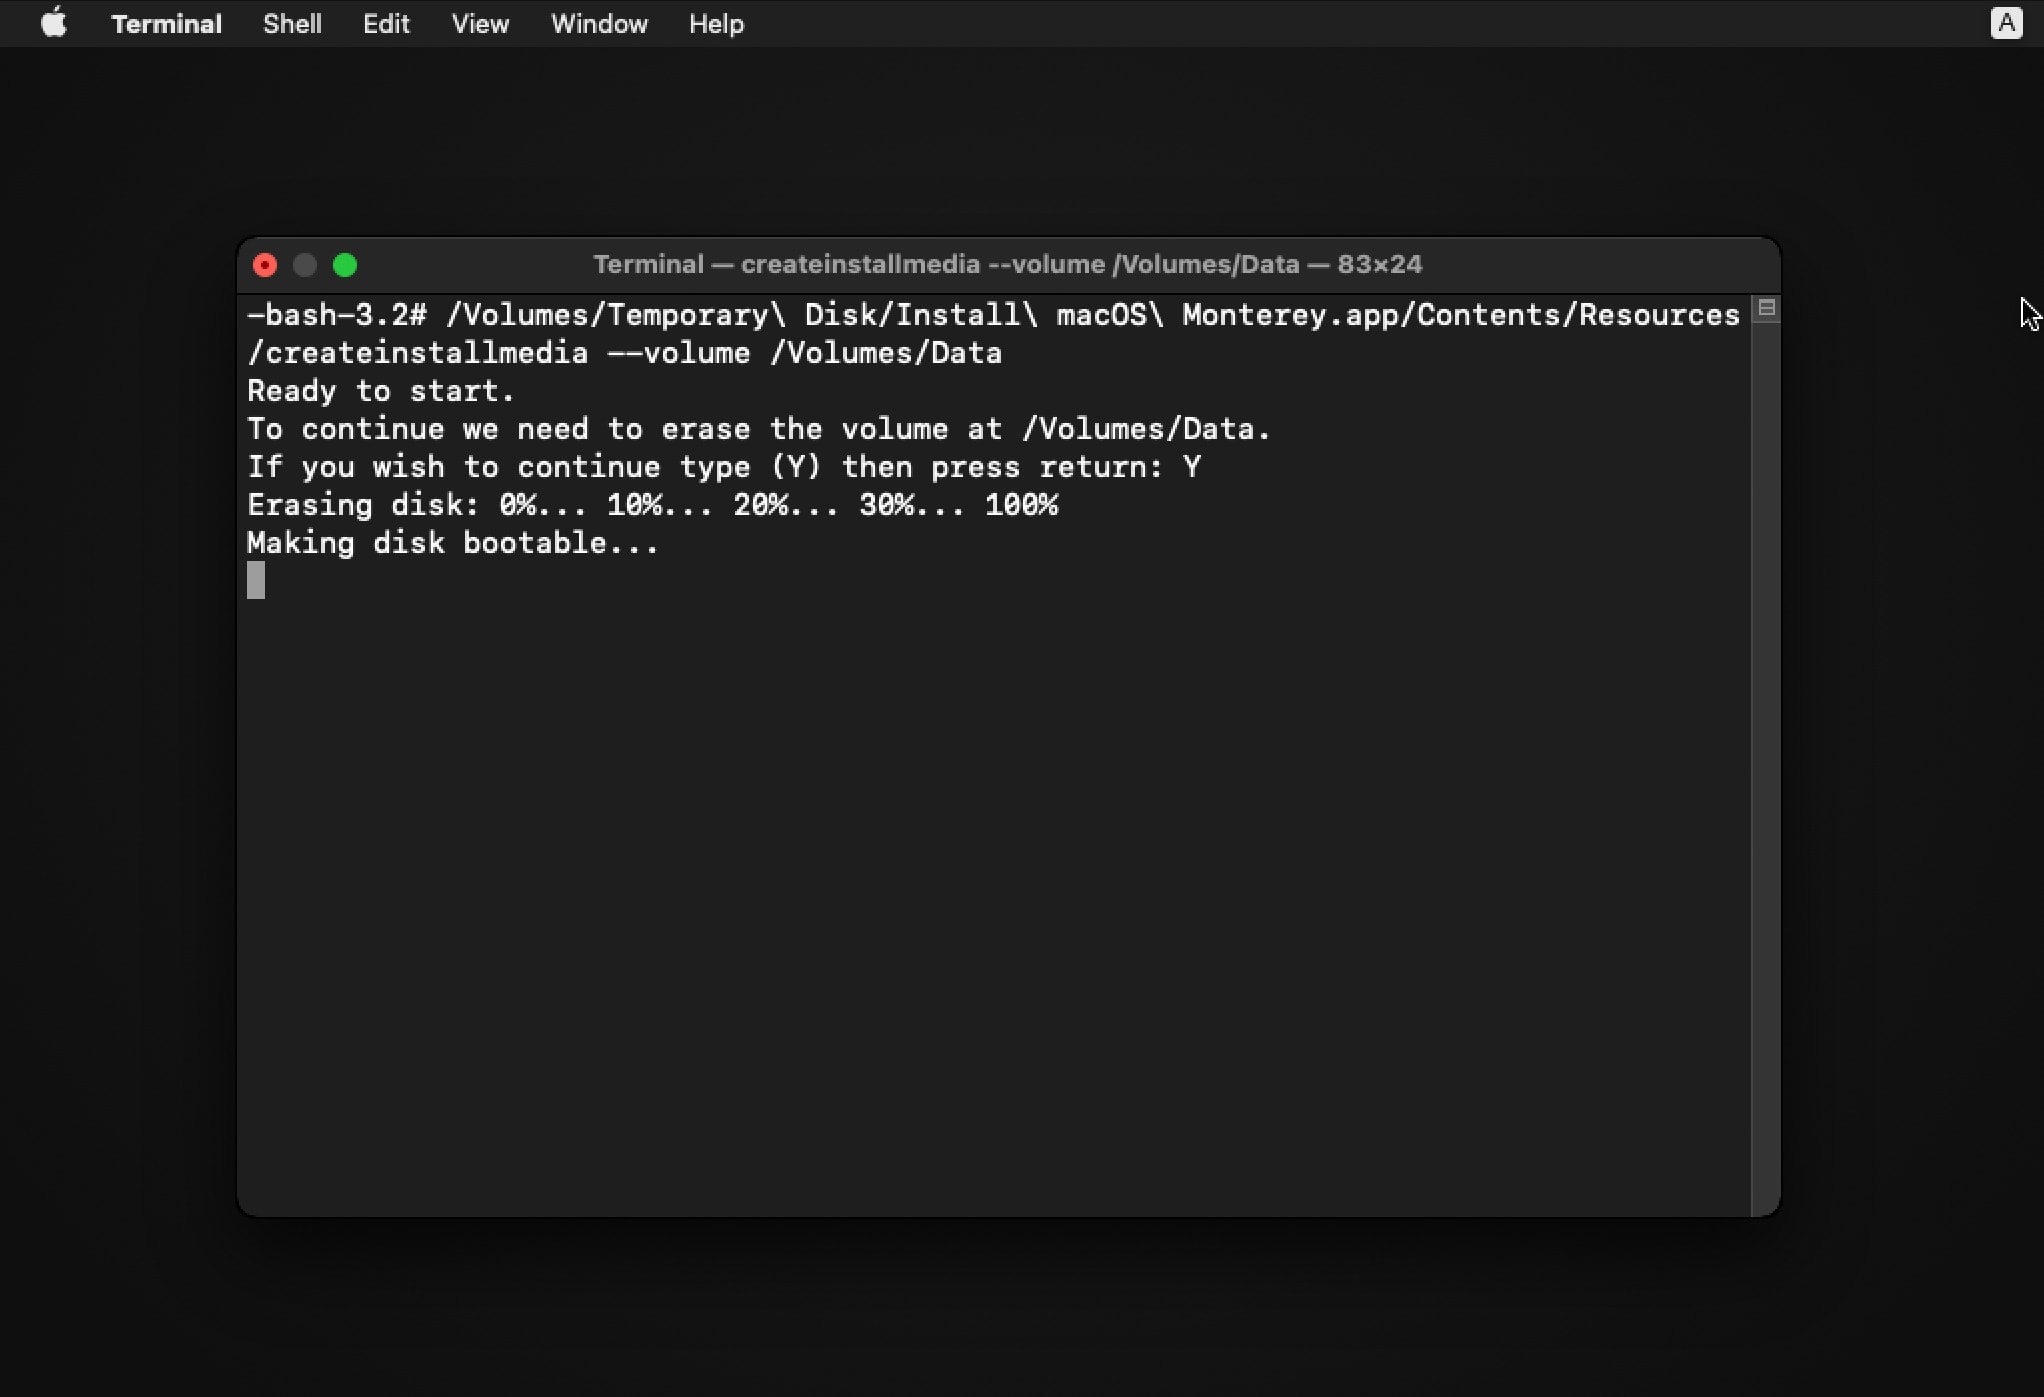
You can, alternatively, copy and paste the command for creating a bootable drive for different operating systems.
macOS Big Sur:
"Volume Path"/Install\ macOS\ Big\ Sur.app/Contents/Resources/createinstallmedia --volume /Volumes/Volumename
macOS Catalina:
"Volume Path"/Install\ macOS\ Catalina.app/Contents/Resources/createinstallmedia --volume /Volumes/Volumename
macOS Mojave:
"Volume Path"/Install\ macOS\ Mojave.app/Contents/Resources/createinstallmedia --volume /Volumes/Volumename
macOS High Sierra:
"Volume Path"/Install\ macOS\ High\ Sierra.app/Contents/Resources/createinstallmedia --volume /Volumes/Volumename
If your Mac runs macOS Sierra or earlier versions, you need to include --applicationpath argument and installer path.
macOS Sierra:
"Volume Path"/Install\ macOS\ Sierra.app/Contents/Resources/createinstallmedia --volume /Volumes/Volumename --applicationpath /Applications/Install\ macOS\ Sierra.app
Once you’ve entered the command. Press return after you’ve entered the command. Enter the administrator password when prompted and press return. When prompted, type "Y" to erase the volume and press return. Terminal will show the progress as the volume is erased.
Once the process is completed, your external drive will have the name of the macOS installer you downloaded such as Install macOS Monterey.
Step 6: After Terminal create a Mac bootable drive by copying all the information to the external drive. You can delete Temporary Disk. Open Disk Utility then select Temporary Disk, click on "-" button to delete this volume.
Plug the USB Mac bootable drive. Press and hold the Option key for Intel Mac or press Power button for M1 Mac Select the volume with the bootable installer and proceed. Ensure you have internet connectivity and that your Mac is compatible with the version you’re about to install. Follow on-screen instructions and you’ll be able to select the destination of the installation.
We highly recommend you to create Mac bootable USB drive and have it with you. In case your Mac has startup problems, you don’t have to worry and can simply plug in the bootable drive to clean install your preferred macOS.



Thank you very much for this wonderful guide.