
The BIOS of a computer is the Basic input and output system that works during the booting of a computer to initialize the hardware. This software is built in all PCs and is the first operating system they run when powered on. It is this BIOS that loads the operating system or the bootloader and then the computer can come to life.
There are two versions of BIOS that are now supported by many PCs. The first that is common is the legacy version of BIOS. This was developed in the 1970s and is compatible with older equipment and network configurations. For it to work, it requires a drive that uses the MBR format. However, the MBR drive format is limited to drives with less than 4TB storage space and one is unable to create more than 4 partitions of the hard drive. It is this limitation that has driven many users to look for other alternatives. Many people require lots of space and the ability to make as many partitions as one would wish on a hard drive is appreciated by many.
Another version of BIOS that is loved by many is UEFI (Unified Extensible Firmware Interface). This is a recent one that aids a computer boot and shut down faster. This is the firmware that many computers made in recent times come with in place of BIOS though some call it a type of BIOS. To use this mode for booting the computer, you need to use a drive that has the GPT drive format. With this, you will be able to set up drives over 4TB and can then partition them as you wish. It addresses all the shortcomings of the Legacy BIOS.
The next question you must be asking is how you can convert MBR to GPT. You must also concerned about losing all your data. You should not worry. We will show you how to convert MBR to GTP without data loss. First things first though:
Confirm that the motherboard supports UEFI/EFI Boot Mode
This is very important and one should never proceed without confirming this. If the UEFI/EFI boot mode is supported you need not back up the data as you will not lose it in the process. But, if only the legacy BIOS mode is supported, you can’t convert MBR to GPT. So, how can you check whether the motherboard supports UEFI/EFI boot mode?
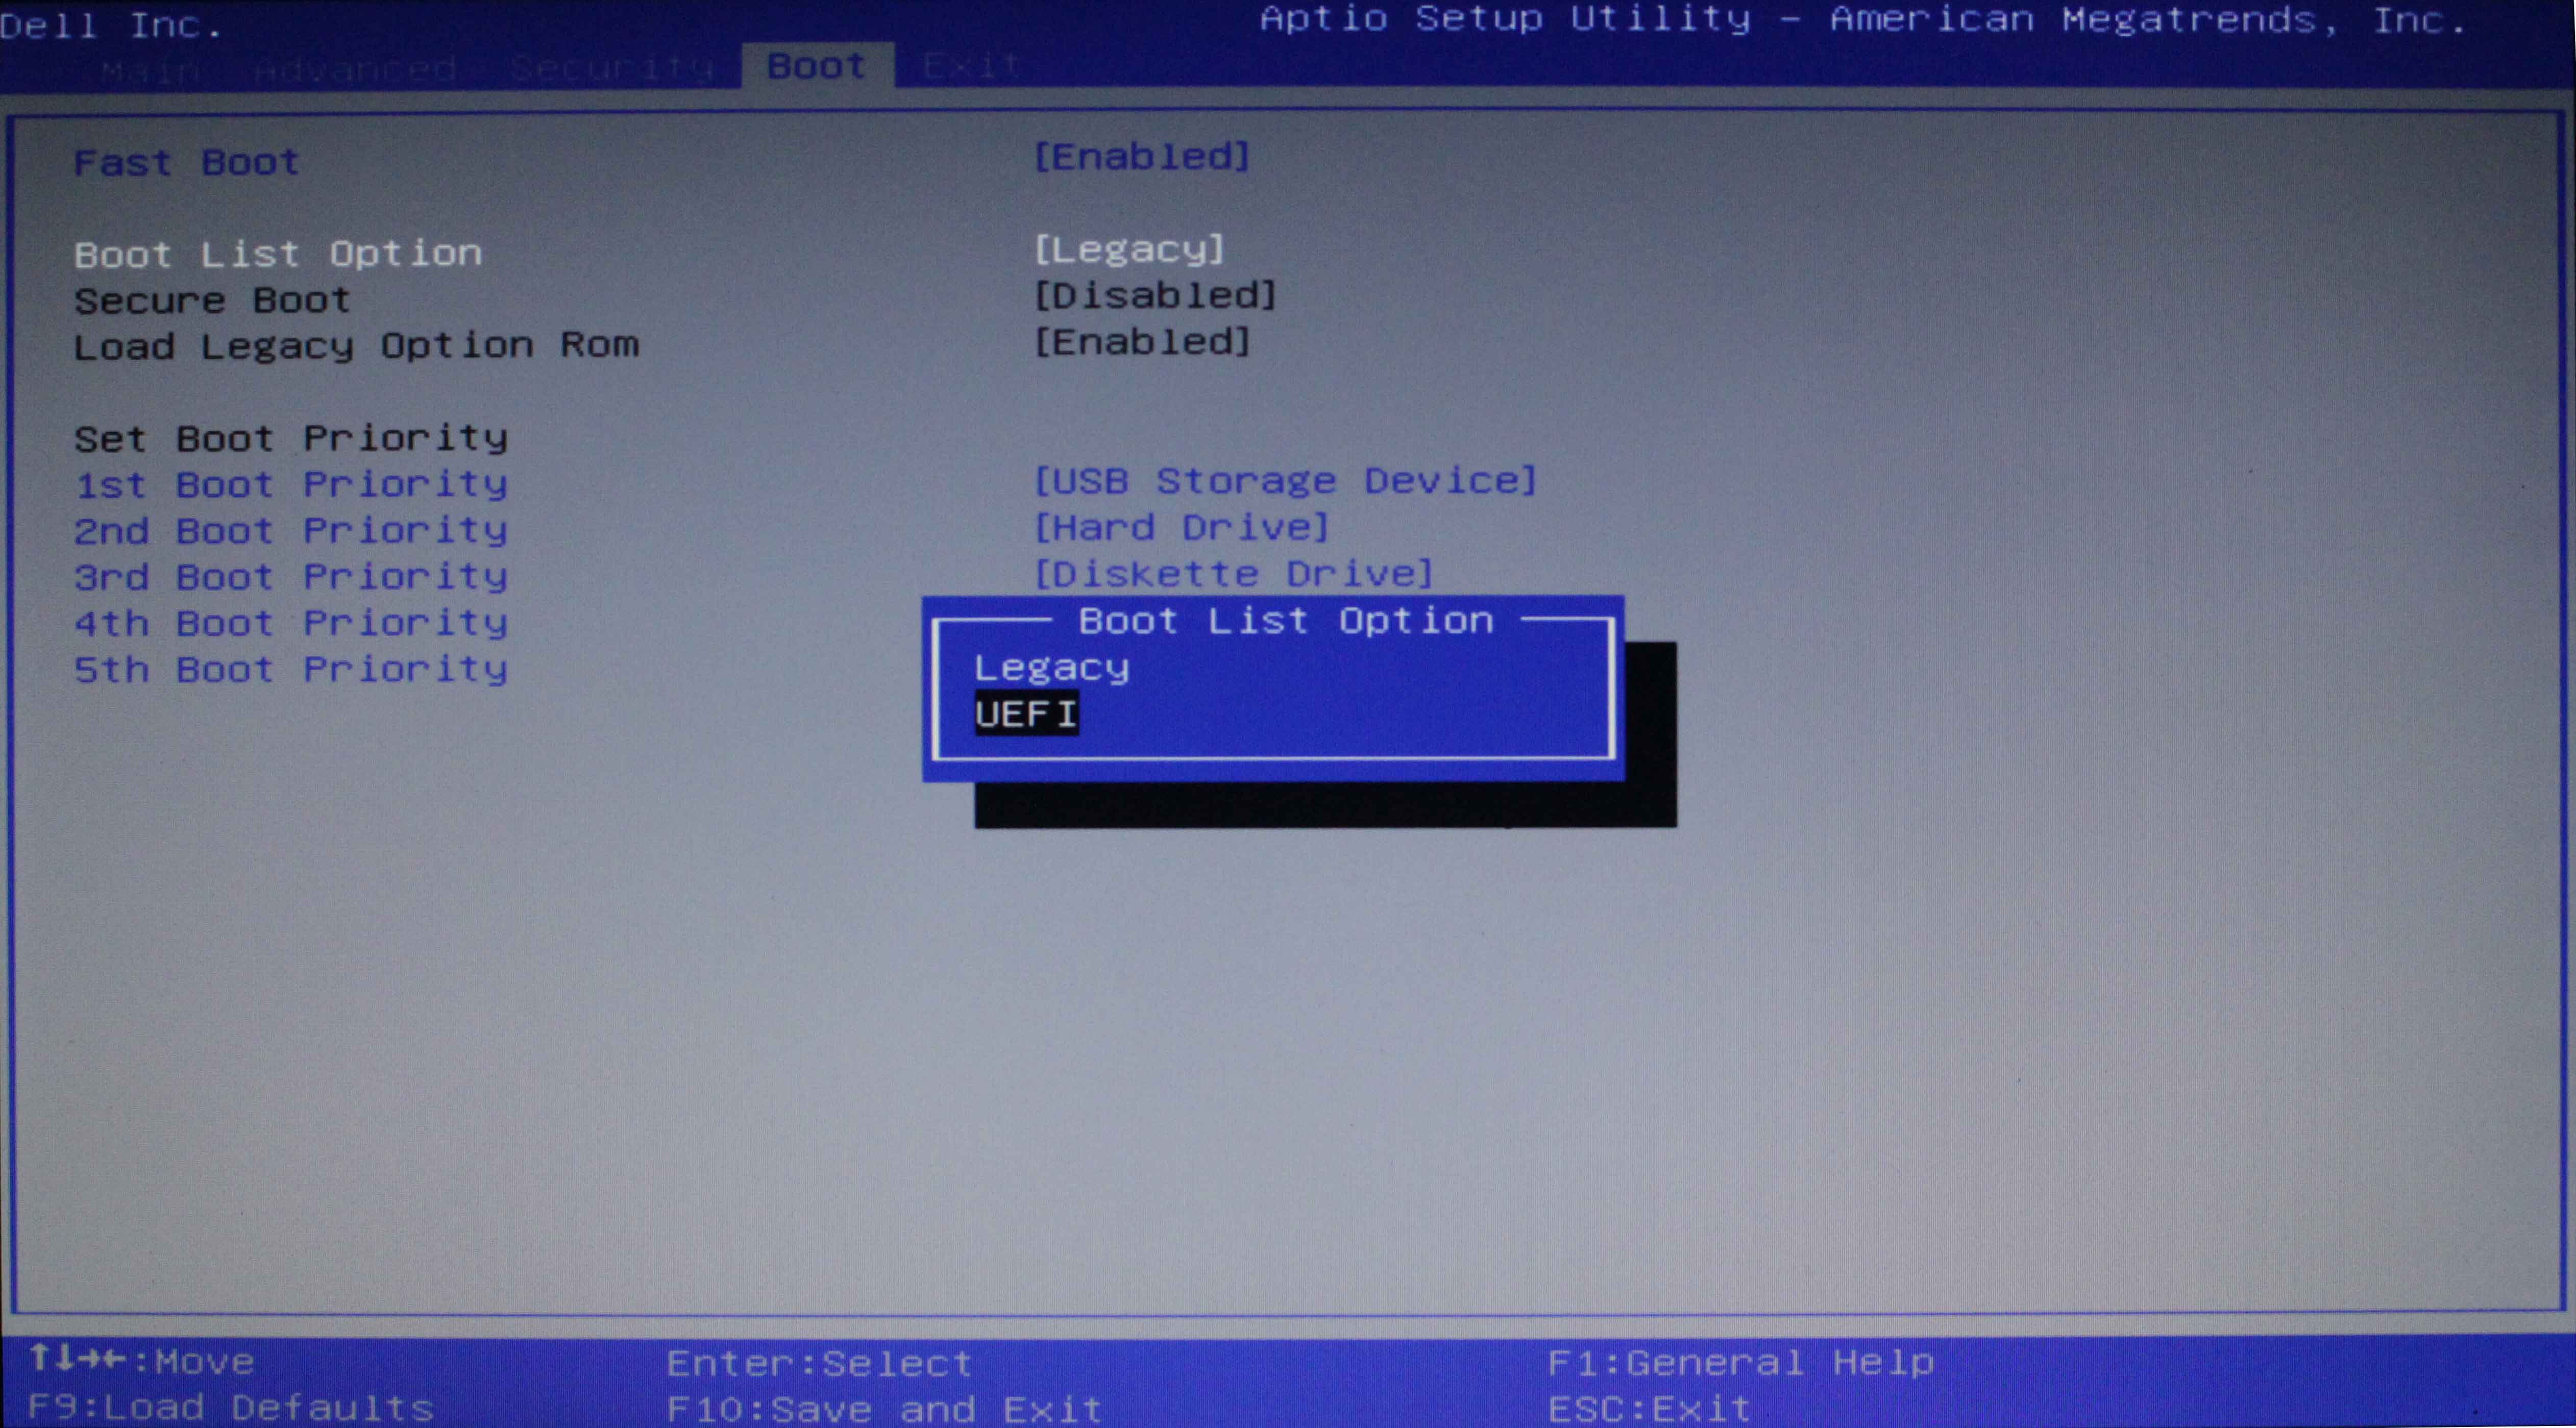
1. Boot the computer and as the firmware starts running, press F2 to open the BIOS. This can be ESC, F2, DEL or any other key depending on the computer in use.
2. Go to the Boot menu and choose “Boot List option”. You will be able to see whether the motherboard supports EFI boot mode or not.
Depending on what you will find out, we have two options on how to continue.
How to Convert MBR to GPT Disk
If this is the case you have two options; the easy way and the hard way. We will start with the easy way:
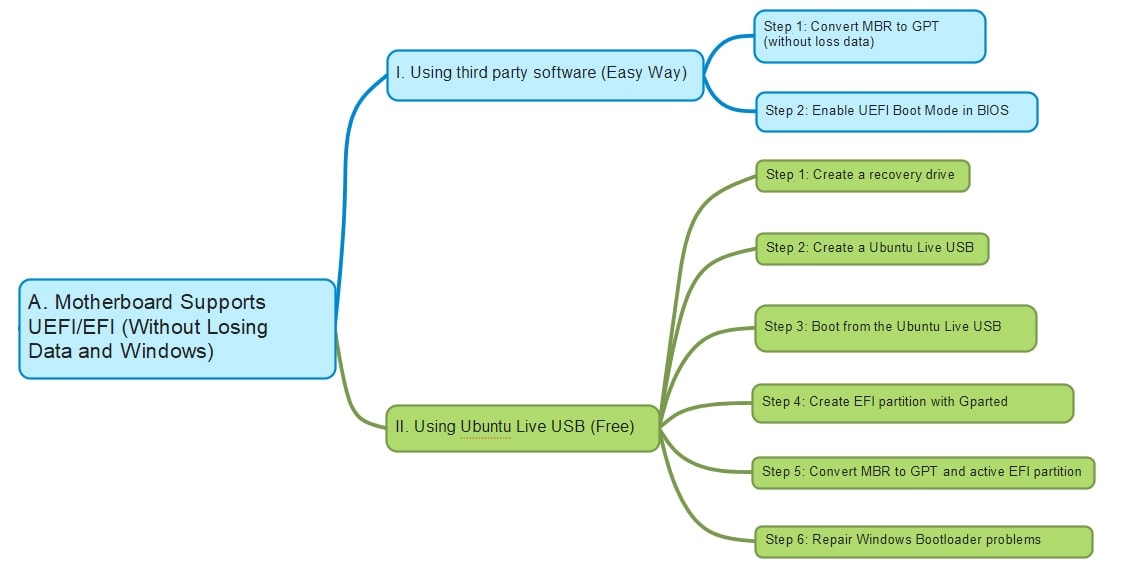
I. Using Third Party Software (Easy Way, Without data loss)
The best option you have is to use the Minitool Partition Wizard Professional 10.The disk will be converted from MBR to GPT without losing any data. With this tool, you will be able to create an EFI partition and then you can install a new bootloader. You will be able to convert NTFS to HFS, merge partitions, change the cluster size and convert dynamic disk to basic. There are many other features that you will get with a GPT formatted hard drive. To start enjoying all these, you need to download the Minitool. Once you have it on your computer, follow these steps:
Download: Minitool Pro
Step 1: Convert MBR to GPT
1. Run the wizard and choose MBR disk’ as the disk that requires conversion.
2. Choose “Convert MBR Disk to GPT Disk”.

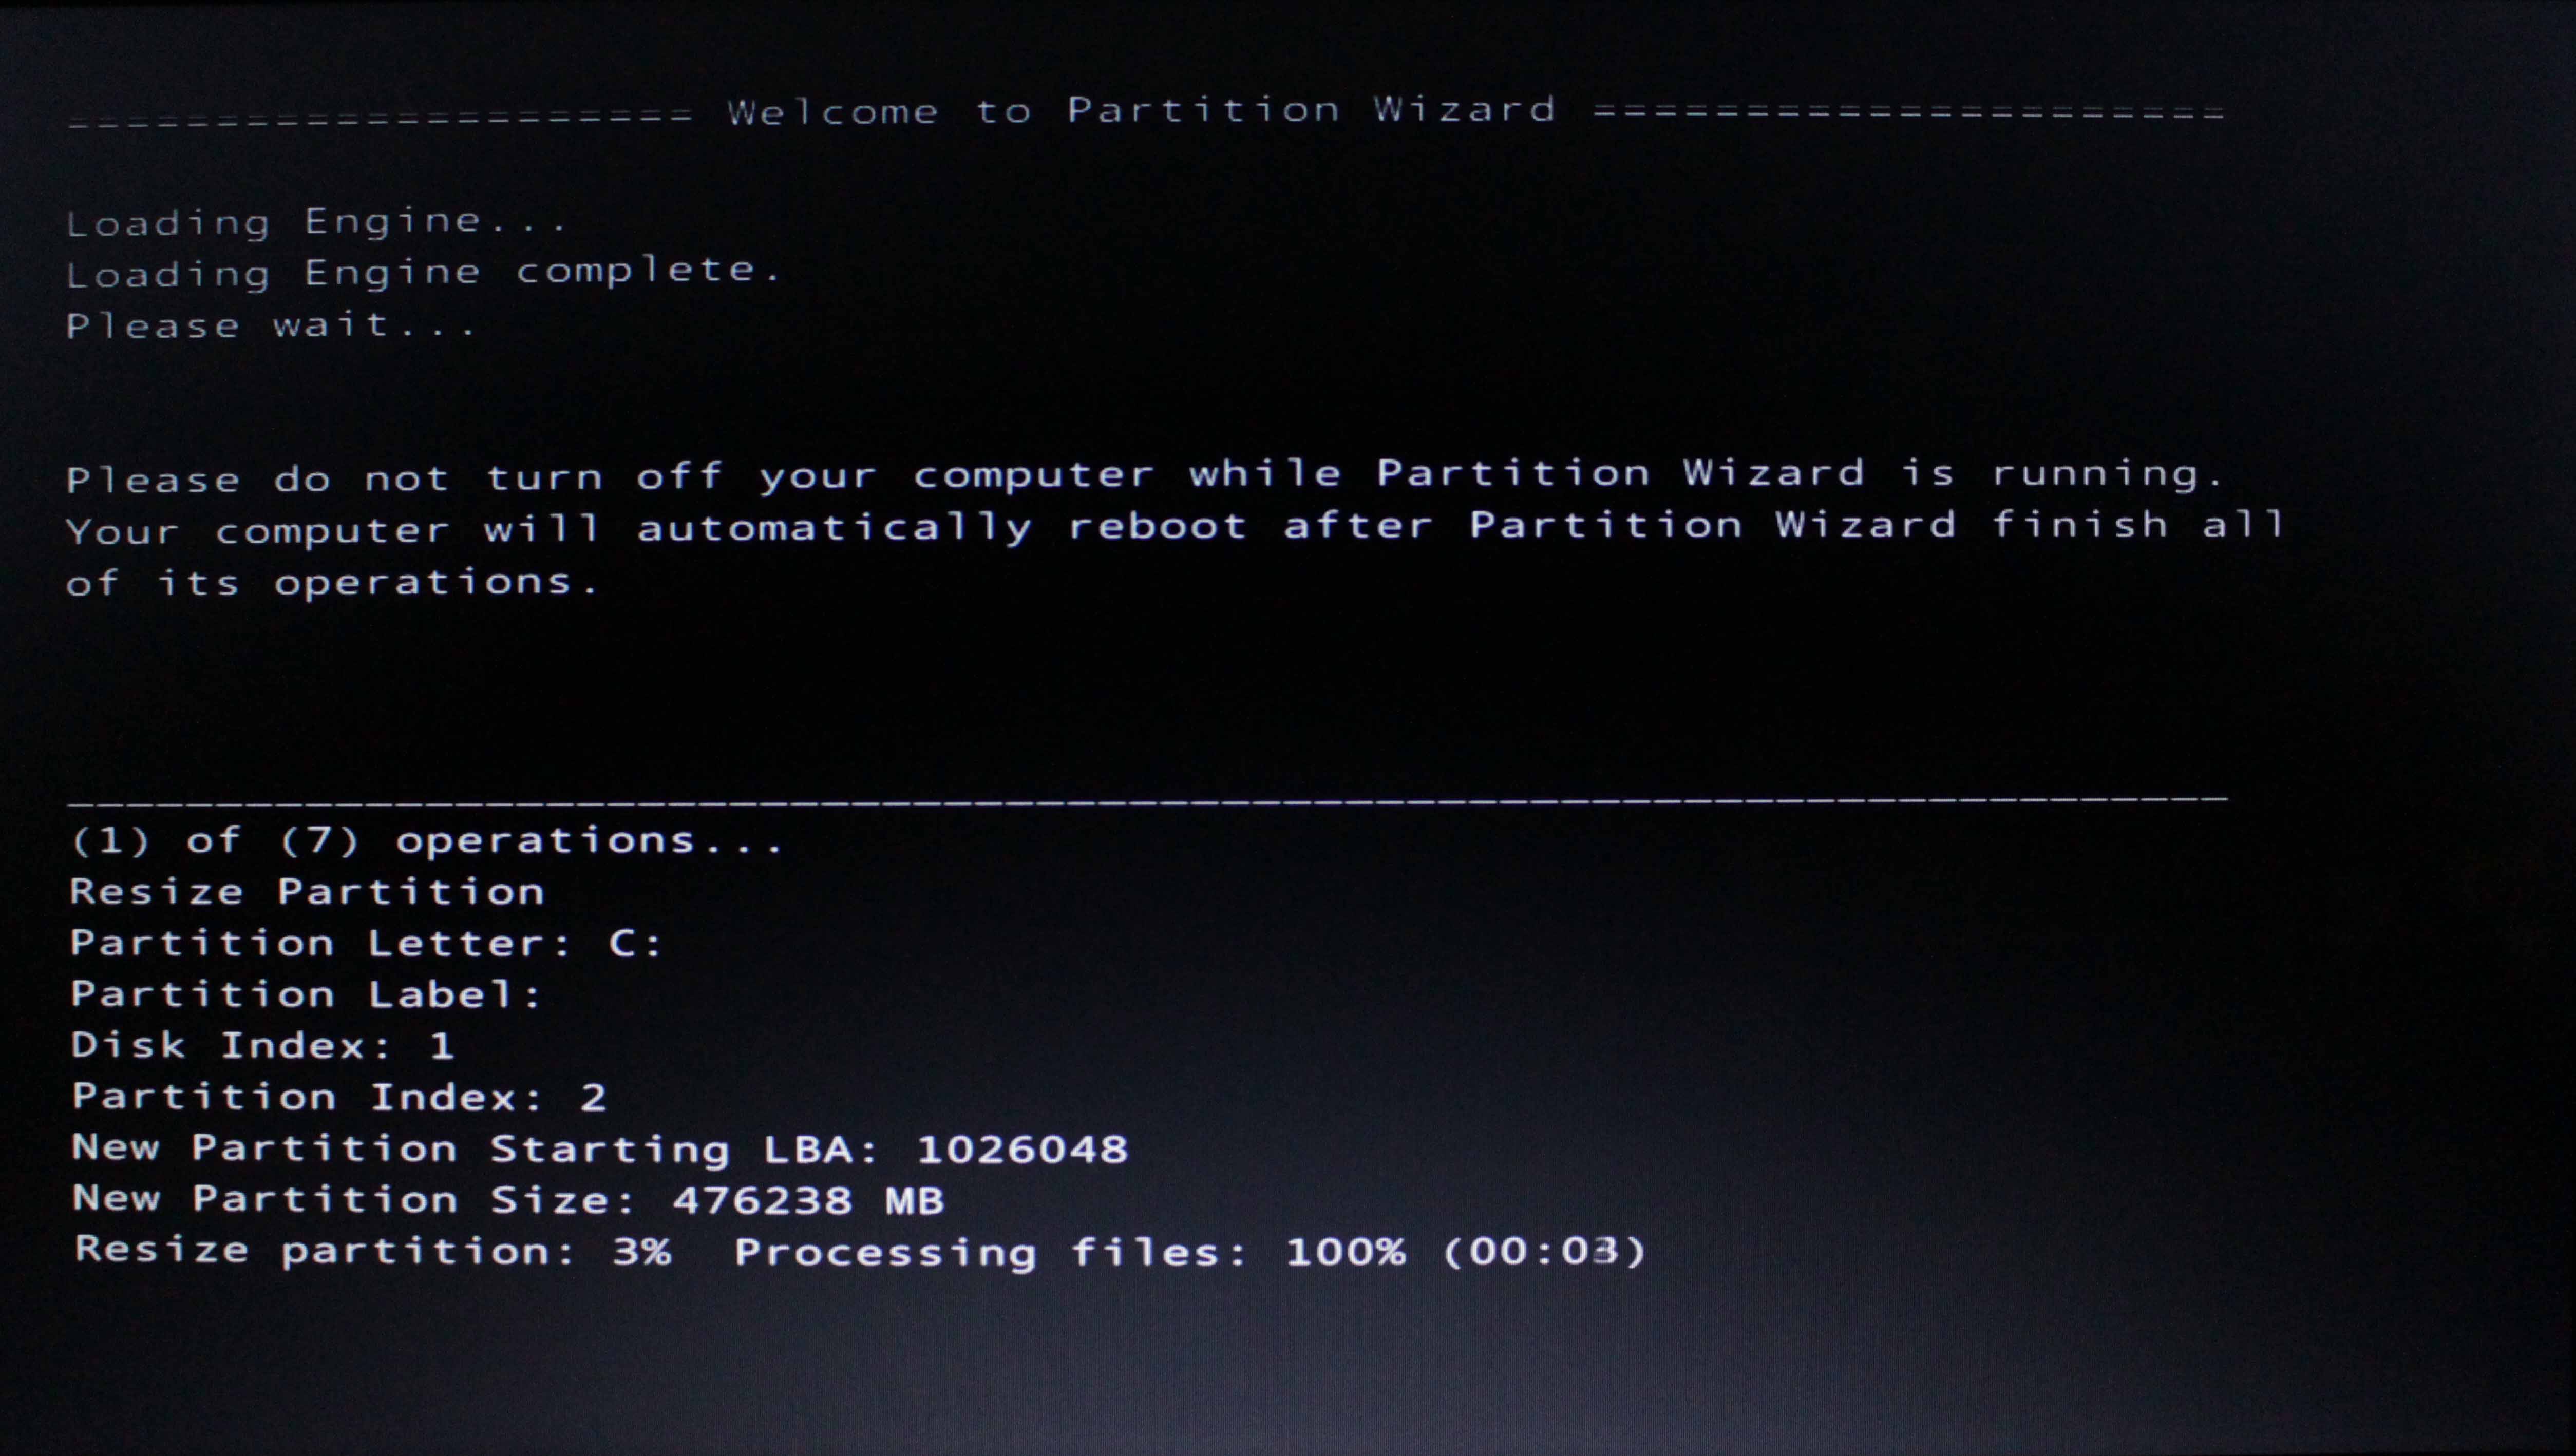
3. Click on the “Apply” button. Pending operations will be carried out which can be seen at the bottom left of the action panel. This creates a new EFI partition and installs a new bootloader.
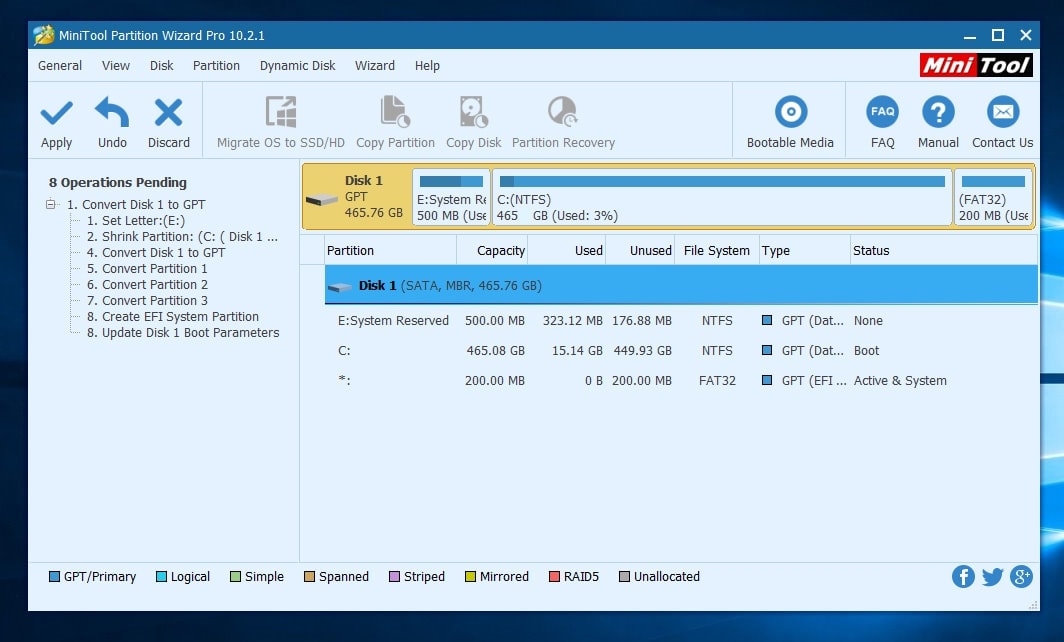
4. Click “Restart Now” button. Allow the disk conversion to finish.
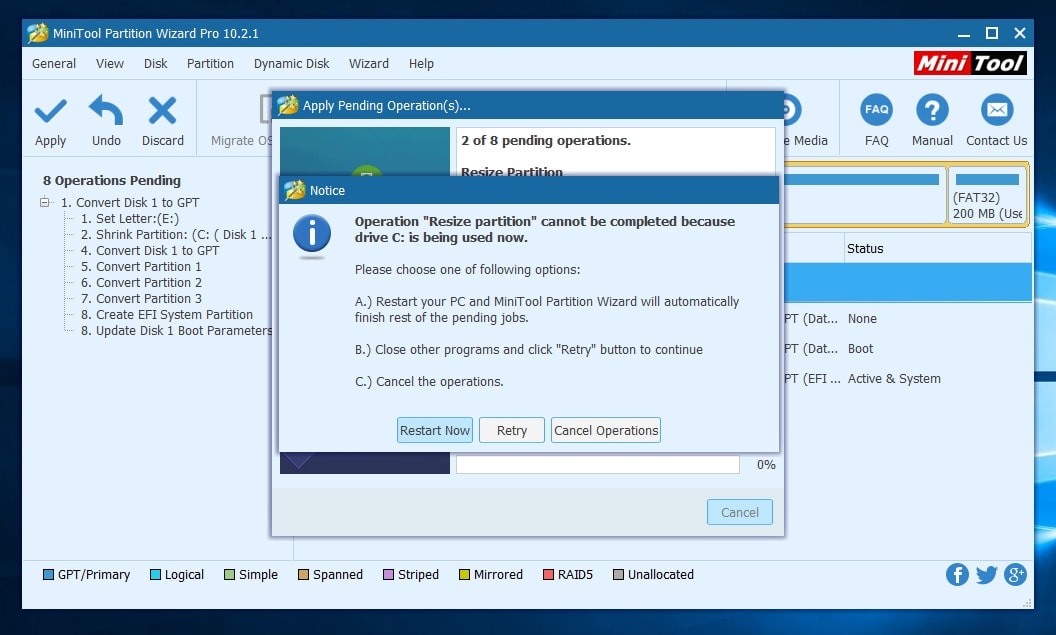
5. Restart your PC and MiniTool Partition Wizard will automatically finish rest of the pending jobs.
Step 2: Enable UEFI Boot Mode in BIOS.
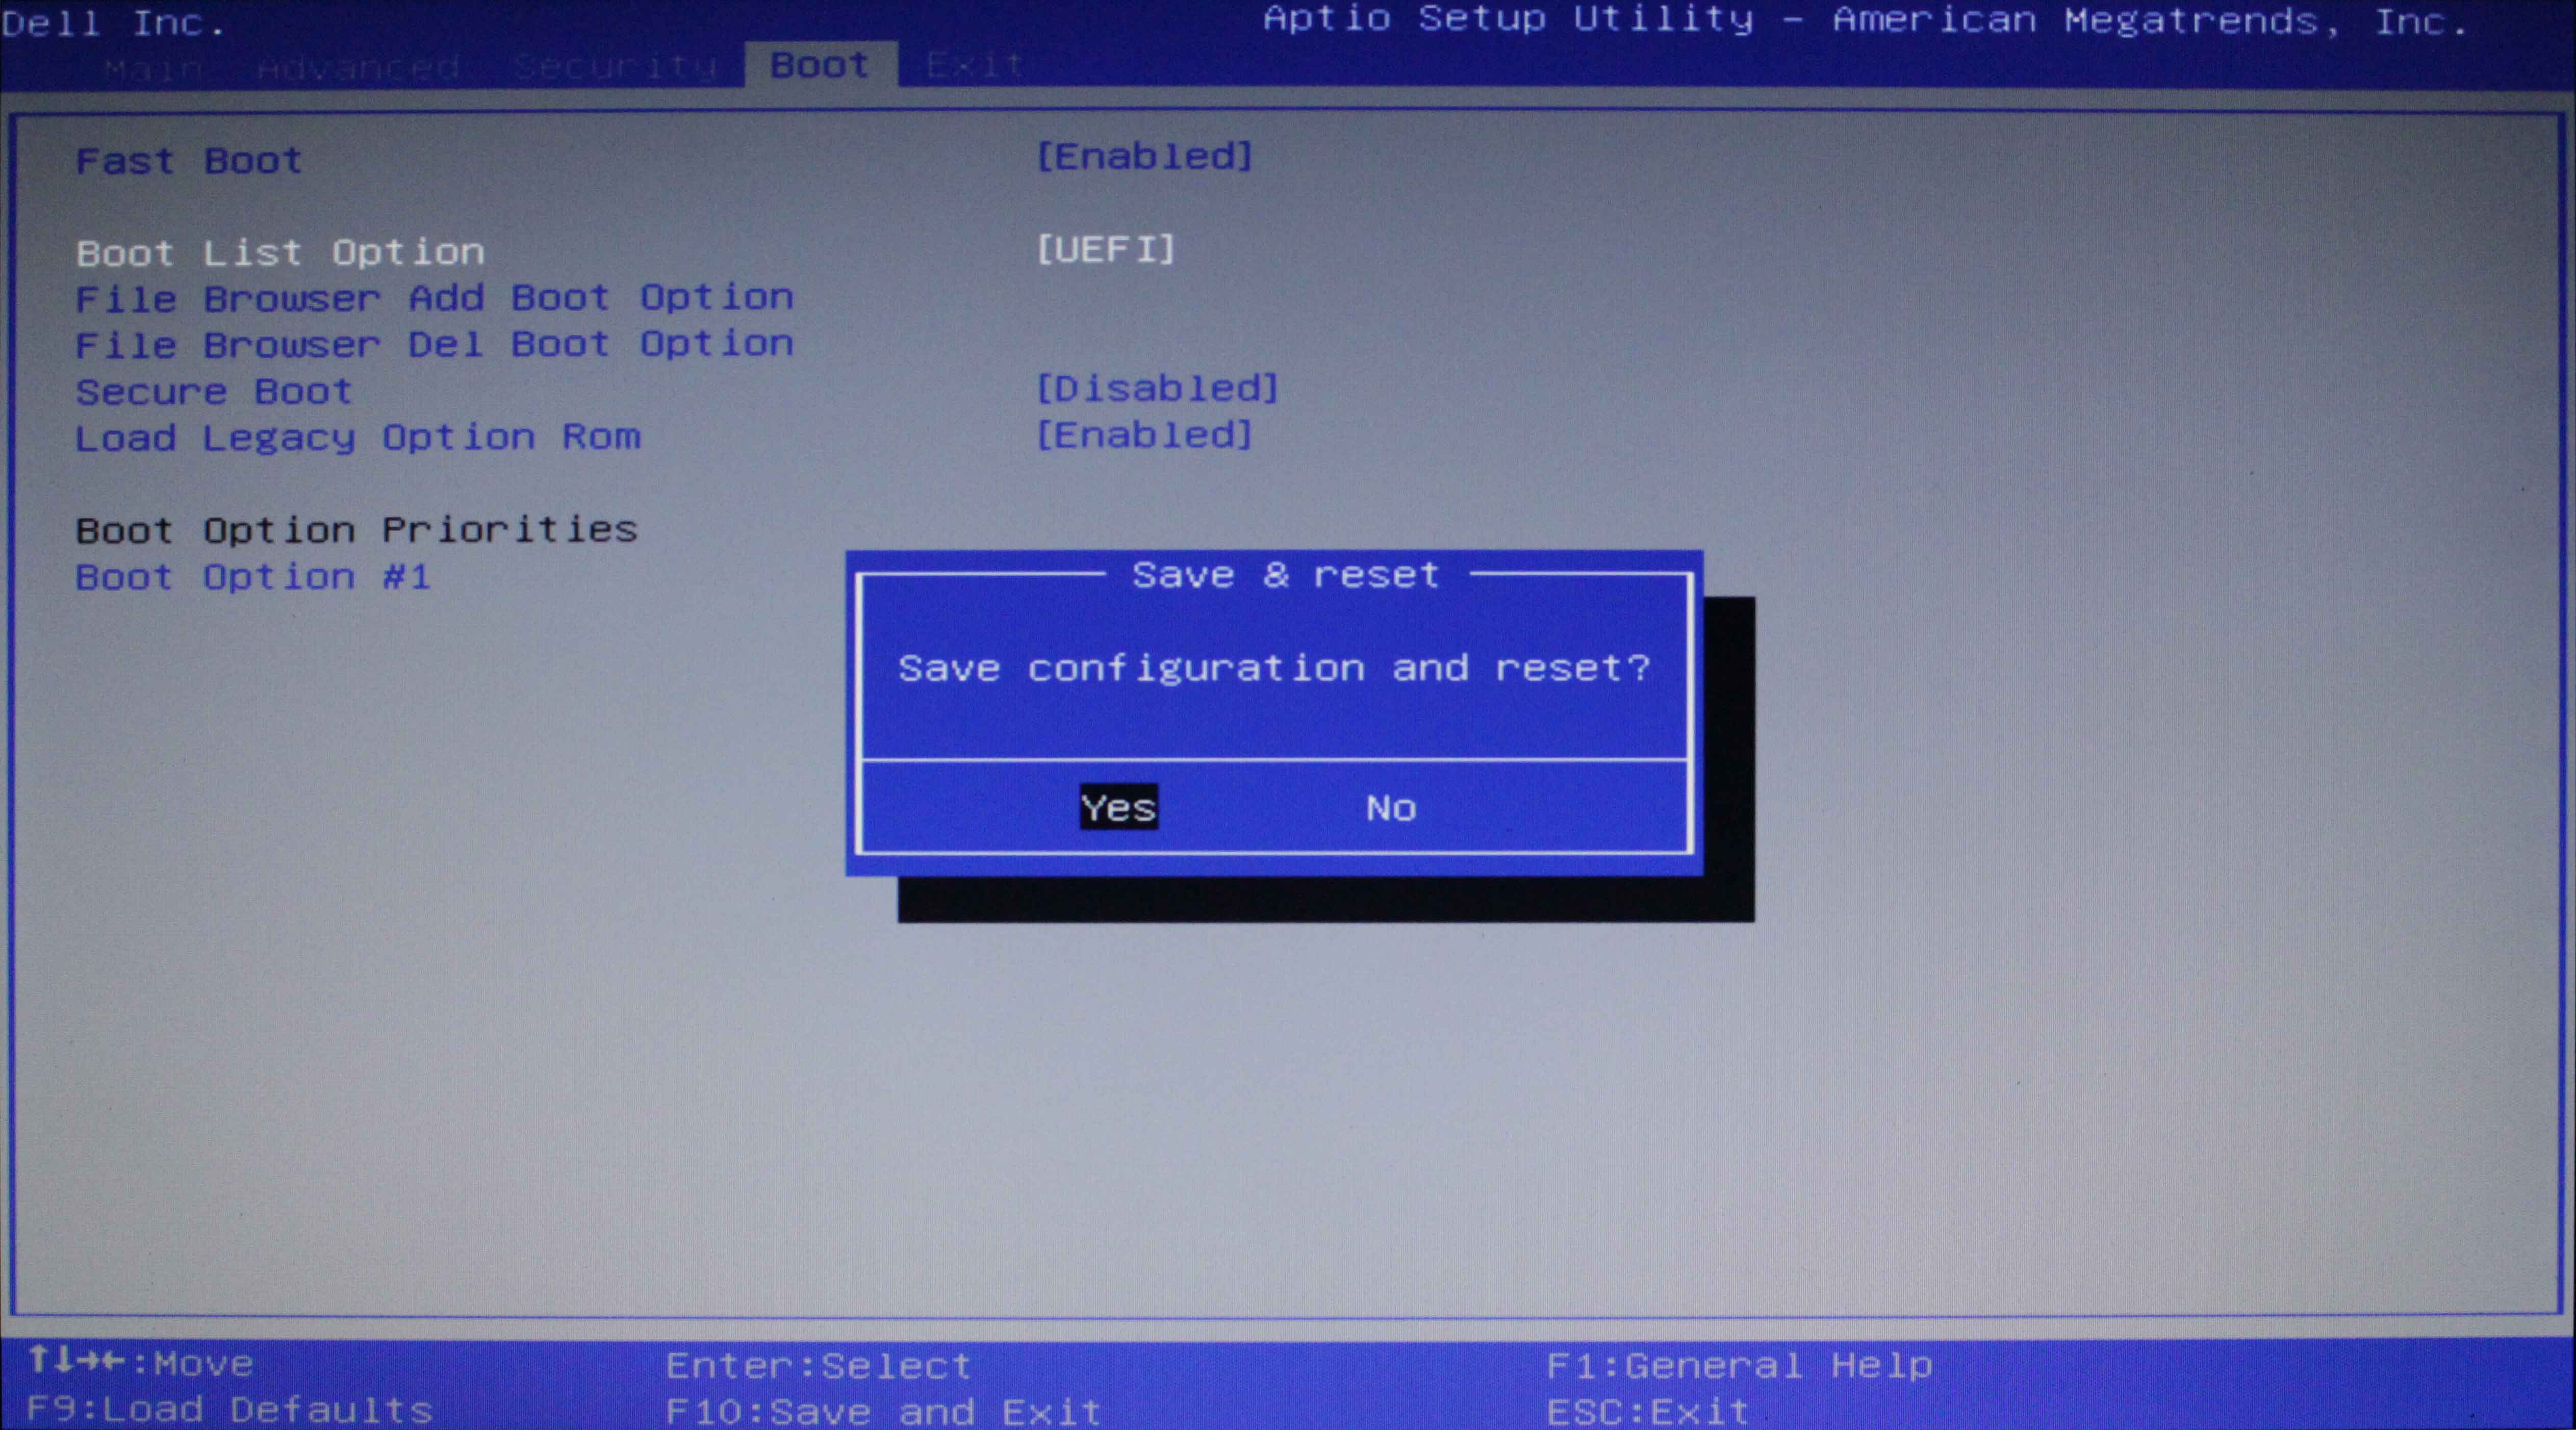
1. Boot the PC and press the key that opens the BIOS.
2. Using the right arrow key on the keyboard select “Boot”. Press Enter and use the down key to select UEFI/EFI. Press Enter.
3. Press F10. Select “Yes to save the change and exit BIOS”.
The PC will now boot with the Windows 10 and other files unchanged with the disk formatting being the better GPT type.
II. Using Ubuntu Live USB (Free, without Losing Data)
For this, you will need to follow various phases. You will need to create a recovery drive, create an Ubuntu Live USB and boot from it. You will then need to create an EFI partition with Gparted and finally convert MBR to GTP. If you are not familiar with a Live USB, it is a USB drive that contains an operating system. In this case, it will contain the Ubuntu operating system. You can enjoy Ubuntu on any device that you put the live USB into. Now on how to convert MBR to GTP:
Step 1: Creating a Recovery Drive
This will help you restore the computer in case it refuses to start. To create one:
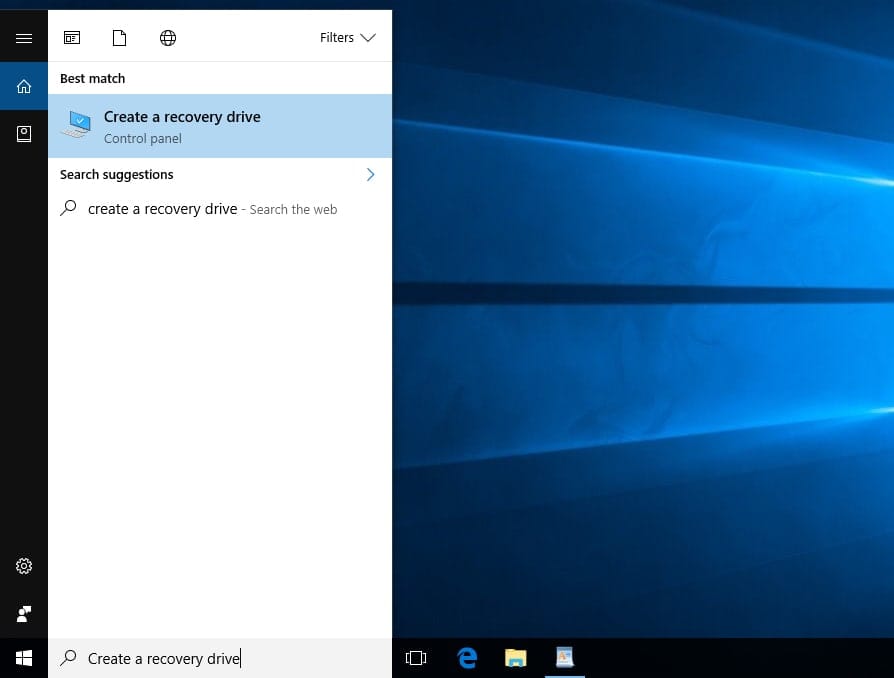
1. Search for “Create a recovery drive” in the taskbar. Click on it and enter the admin password if prompted to do so.
2. Select “Backup system files to the recovery drive” and click on “Next”.
3. Connect a USB drive to the computer and select it. Click on “Next” and then “create.” The backup process will start. This may take a while so be patient.
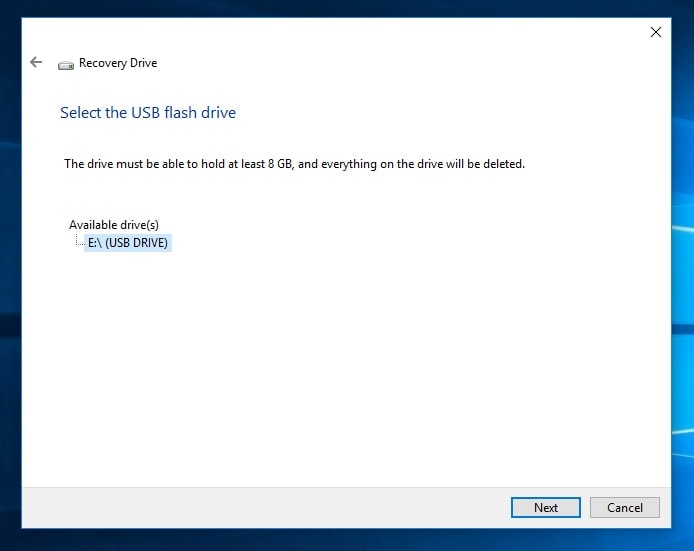
4. There will be a “Delete the recovery partition from your PC” option. You can select it or not depending on what you prefer. Click on “Finish”.
Step 2: Creating an Ubuntu Live USB
By creating an Ubuntu Live USB you will be able to use Gparted and Gdisk to convert MBR to GPT. To create an Ubuntu live USB follow this tutorial: How to create an Ubuntu live USB drive.
Step 3: Boot from the Ubuntu Live USB
1. Restart the computer and press the alternate boot key. This can be one of the function keys or the F12 key. It will be indicated on the screen.
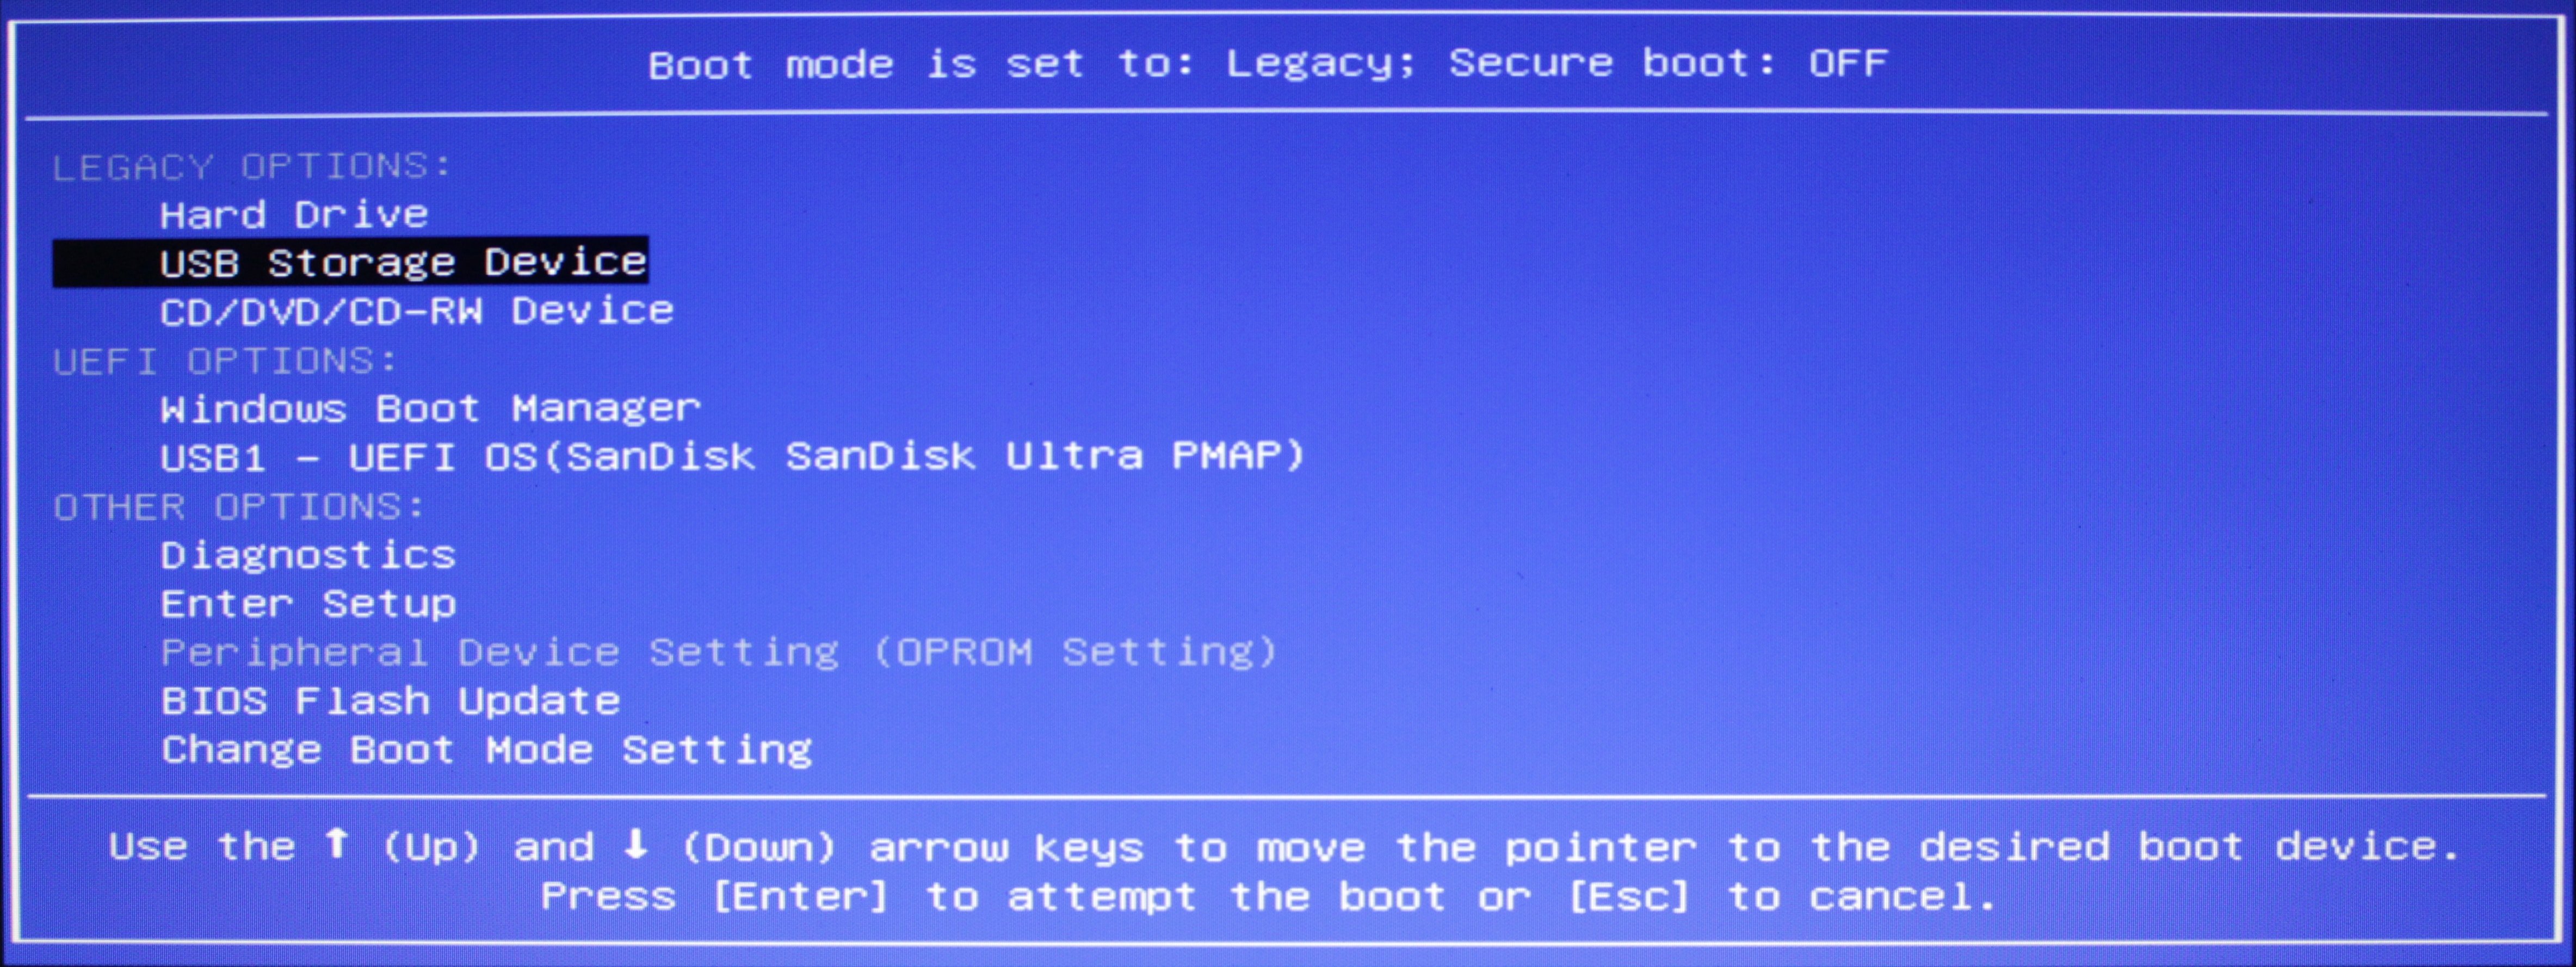
2. Highlight the USB Drive and click on Enter.
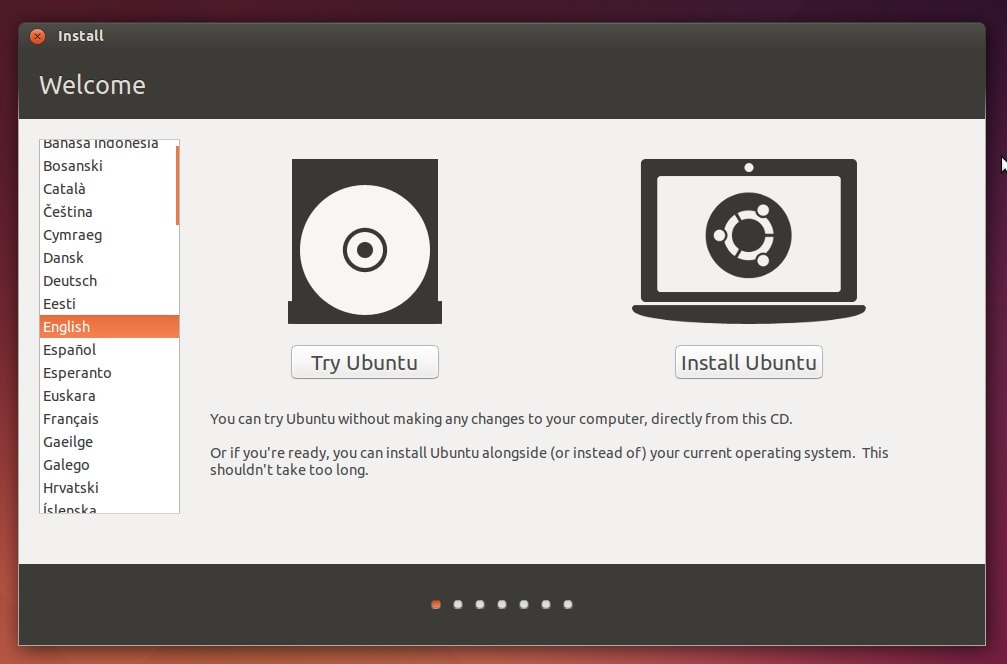
3. Select “Try Ubuntu” to run Ubuntu Live on USB Flash Drive.
If the computer does not boot, change the boot sequence and try again. You will see this in the list to the right when you press the alternate boot key.
Step 4: Create a EFI partition with Gparted
GParted is available on most Ubuntu images and is the best tool to partition hard drives. Search GParted and Open it.

To resize and create new EFI Partition, right click on your “Windows Partition” and click on resize or move.
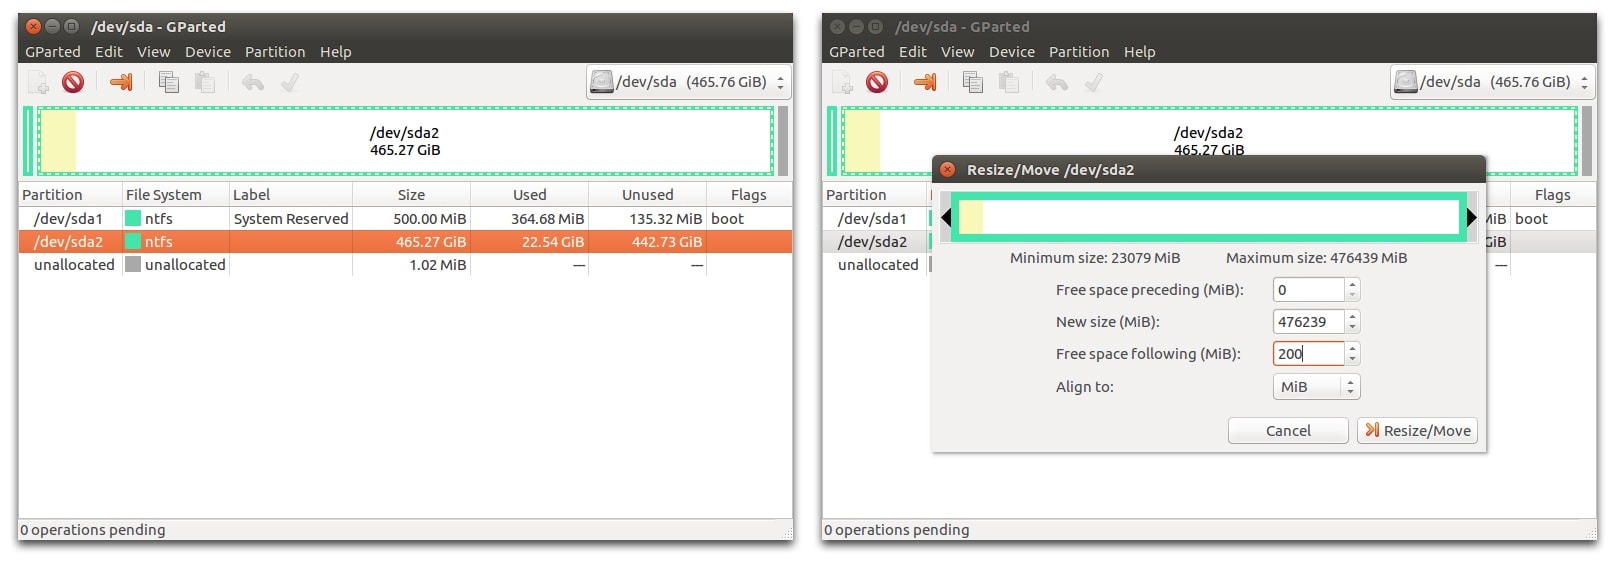
Enter the new size in megabytes at least 200 MB. Click on “Resize/move”.
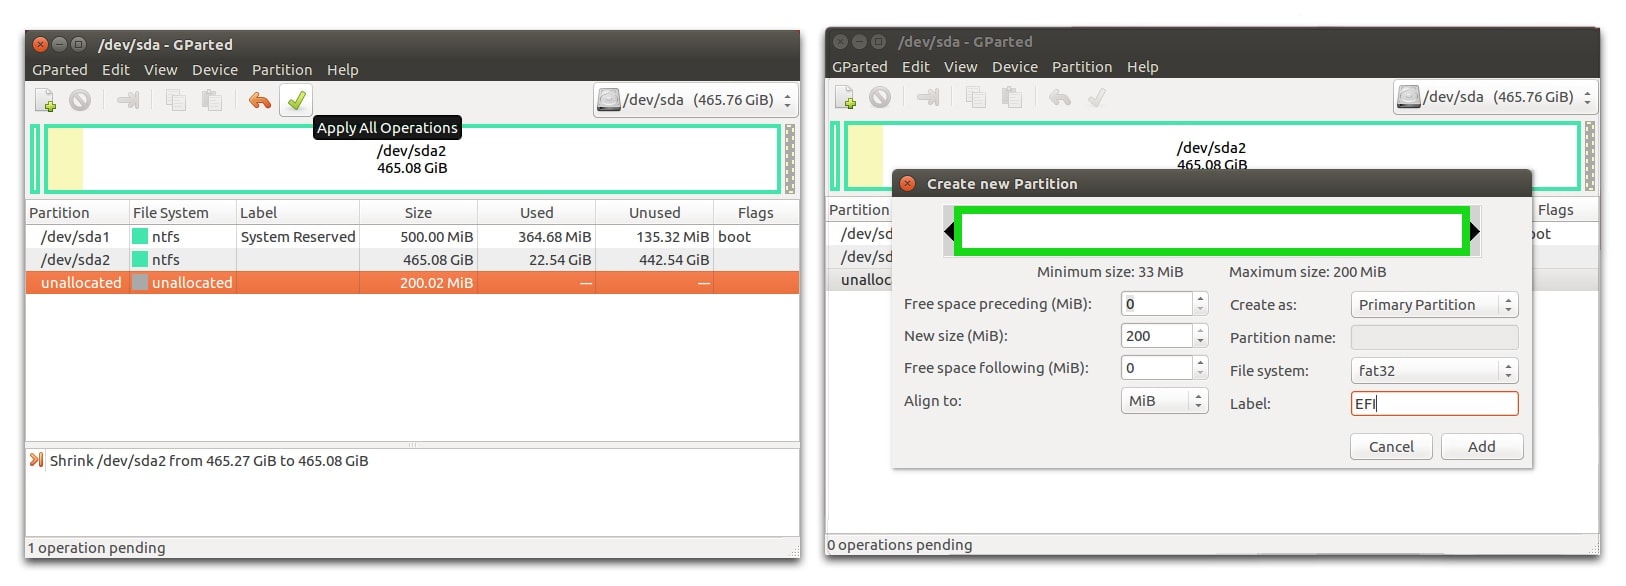
To create a new partition in the unallocated space, click on the toolbar’s plus symbol and click on “new”. Ensure it is over 200MB in size and label it EFI. File system is “FAT32”. Click “Add” to create a new partition.
Step 5: Convert MBR to GPT and active EFI partition
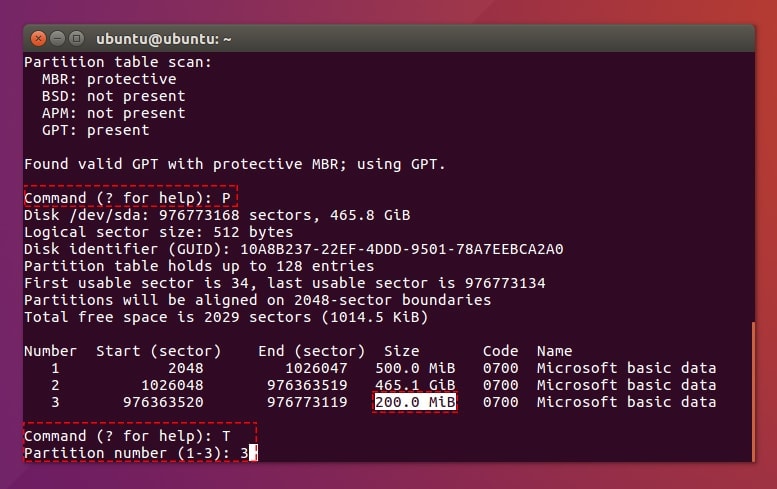
1. Search “Terminal”then click Open. Input the following command
sudo gdisk /dev/sda
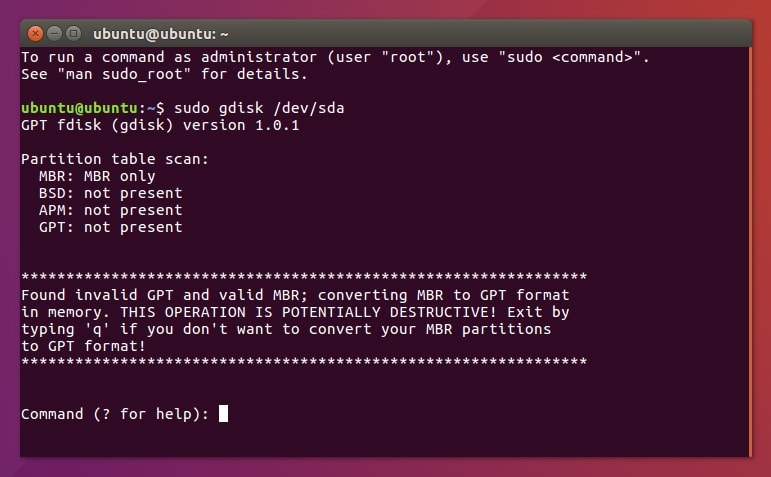
2. To preview the MBR partition table, type P.
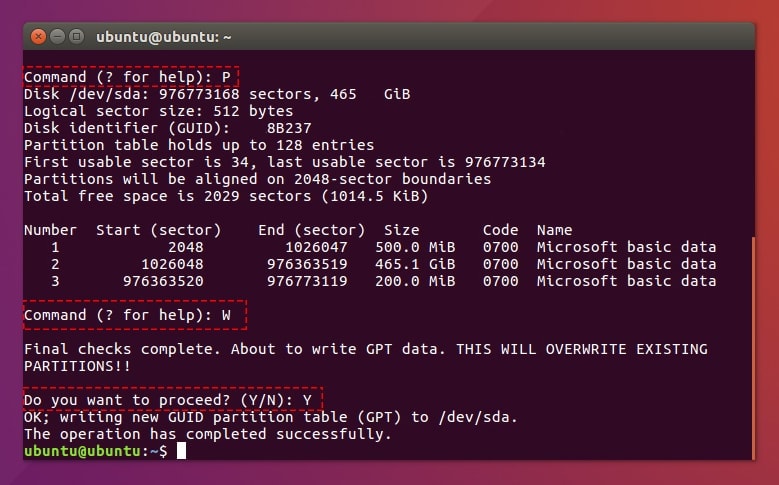
3. Type the W command. This converts MBR to GPT.
4. To confirm that everything is okay with the conversion type Y.
To activate the EFI partition, you will need the terminal open.
1. Type in the command below: sudo gdisk /dev/sda
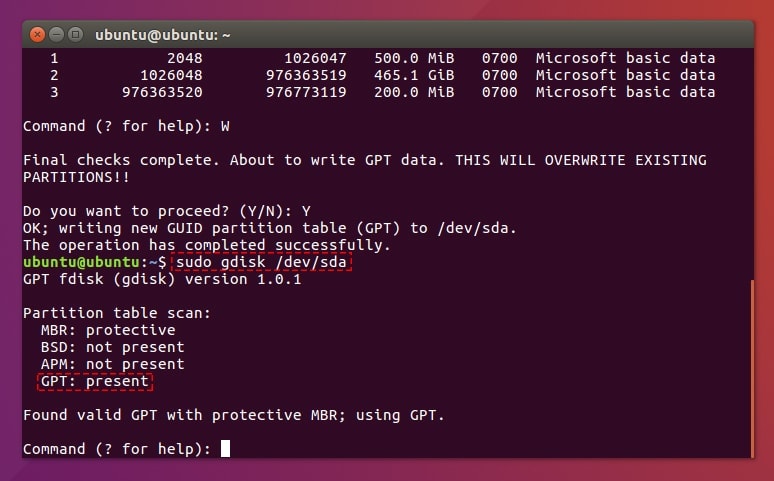
2. To preview the converted GTP partition table type P.
3. To change a partition’s type code type T. enter the type code using 2-byte hexadecimal number.
4. Determine the number of the EFI partition and select it.
5. Type ef00.
6. Type W to write table to disk and exit.
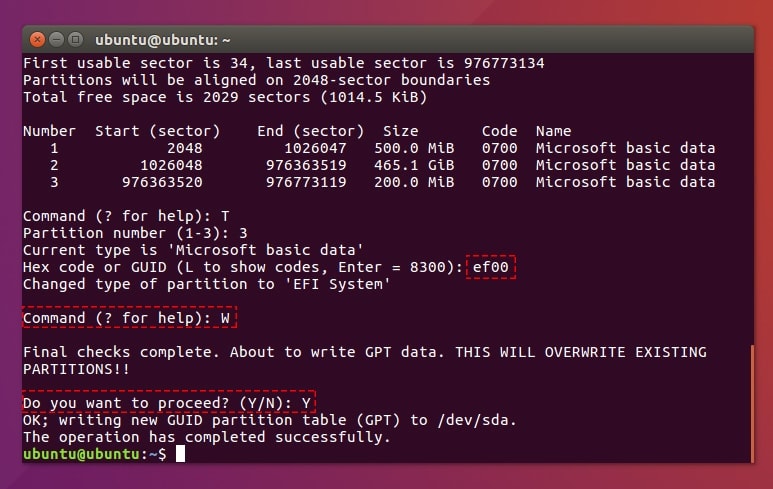
7. Type Y and shut the computer down. Now EFI partition is activated.
Step 6: Repair Windows Bootloader problems
Some EFI boot errors may occur. Here is how you can repair them.
1. Restart the computer and press the F12 button and select your “USB Recovery Drive” to boot from.
2. Choose “Repair Your Computer”.
3. Choose “Troubleshoot”.
4. Choose “Advanced Options”.
5. Select “Command Prompt” or press Shift and F10 to open the Command prompt.
6. Type in this command pressing Enter after every line:
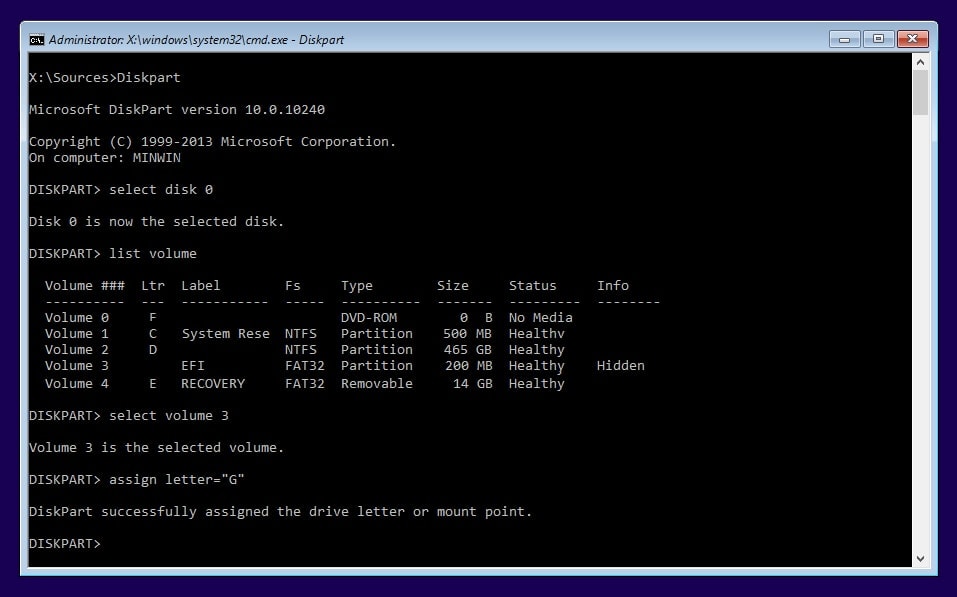
Diskpart
Select disk 0
List volume
7. Confirm that the EFI partition (200MB) is a FAT32 file system and assign a drive number by typing the following commands in the command prompt:
Sel Vol <number of the volume>
Assign letter=<drive letter>
Exit
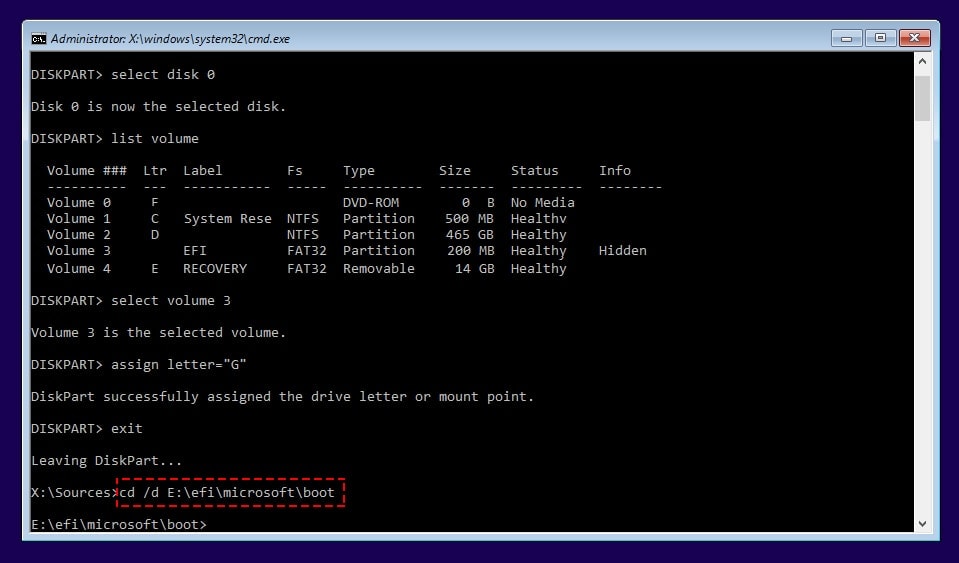
8. To repair the boot record, type and run the following commands:
cd /d <recovery drive>:\EFI\Microsoft\Boot\
Bootrec/FixBoot
<recovery drive>: my recovery drive is “E:”
9. To rebuild the BCD store you need to back up the old one first. Type in the command below to do this followed by pressing Enter.
ren BCD BCD.old
To create a new BCD store type in this command and then press Enter.
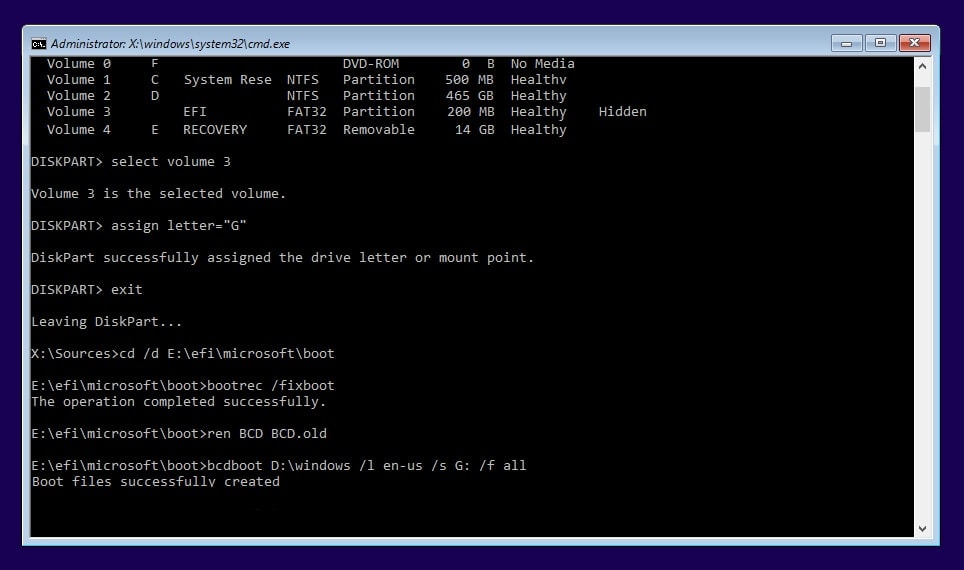
bcdboot <windows drive>:\Windows/l en-us / s <EFI Drive>: All
<windows drive>: my windows drive is “D:” 465 GB.
<EFI Drive>: my EFI drive is “G:” 200 MB.
Exit CMD then restart your computer. Done!
III. Using Windows 10 USB Installer (All Data Loss)
In this case, you will be required to first backup all the data as you cannot convert Windows OS to GPT without losing data. You can do this backup in a different hard drive, USB drive as you wish. After backup proceed as follows:
How to Create Windows 10 USB Installer
Backup and Restore Windows 10 Driver and Activation
Step 1: Boot with Windows 10 USB installer
Restart the computer and when the first screen pops up, press the key indicated on the screen (F12). It could be any of the Function keys depending on the PC you are using. From the menu that pops up, select the Windows 10 USB installer as the device to boot from.
Step 2: Convert MBR to GPT during the installation process (All Data Loss)
1. When the Windows setup appears press Shift and F10 keys simultaneously. This opens the command prompt.
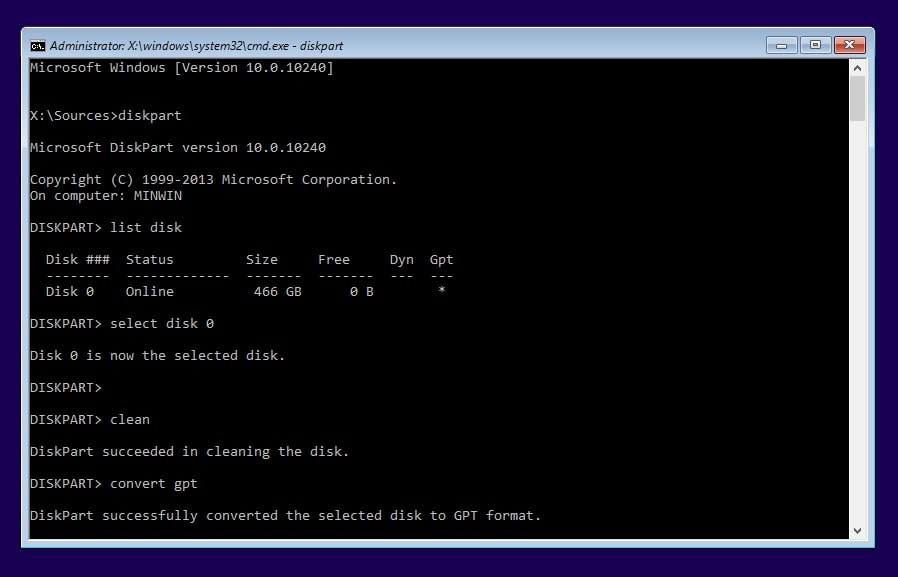
2. Type the command below, enter after every line:
Diskpart
List Disk
Select Disk 0
Clean
Convert gpt

exit
Press Enter and type Exit followed by Enter to close the command prompt.
Step 3: Install the Windows 10
1. Click on “Next” to install the new OS.
2. Select custom install then select the new GPT partition as the location where the Windows will be installed.
3. Allow the installation to continue and the PC will soon reboot. When it does, create a new user account and restore Windows driver and activation as was explained above.
There you have it, all the processes that you need to carry out so as to have the better GPT disk format. With it you will be able to create as many partitions as you want, the Windows will run faster and many other benefits. Be sure to check if the UEFI boot option is supported by your motherboard. If it is then you will be able to change the disk format without having to lose any data. There are several options to convert Windows OS to GPT. The best means by which you will be able to convert MBR to GPT disk without losing data is using a cool tool known as Minitool. This will allow you to quickly convert the disk format and then you can use the UEFI or EFI boot mode that is faster. With this mode activated the Windows operating system will be speedier thanks to the fast-starting and shutting down process.
Using an Ubuntu live USB to convert disk format from MBR to GPT is quite tedious but it does get the job done without losing data. You will however be required to create a recovery disk and use it later to recover any Windows files and solve bootloader problems that may be corrupted in the process.
On the other hand, using Windows 10 USB installer, you must save data first before any process as the data in the disk that will be converted will be totally erased. You will then change the format of the disk when installing Windows afresh.


Such a good tutorial. Thank you!
Hello i have a serious issue after doing all the steps with the live USB. I can’t boot into windows. I did use the recovery CD (windows 7 pro) but it says that it’s not compatible with my windows. how can it be since i created it with recovery system. now I’m stuck without being able to boot into windows and repairing it. what did i do wrong.
You should create a new Windows USB installer then repair your startup disk, or install Windows on another hard disk.
Be careful with DISKPART utility , it is completely cleaning/formating the disk with “clean” command.
Yes. If you use “Part 3: Using Windows 10 USB Installer”, All your data is lose. You should use Part 1 or Part 2.