
Do you feel like your OS X El Capitan is running slow and keeps getting slower as it ages? Is your creativity being slowed down by an underperforming Mac? Older Macs tend to underperform a little as compared to their newer counterparts. Not to worry as we have some speed tips which will help your Mac to run a little bit faster. By spending some time to clean up your Mac, you will gain more by running software smoothly and quickly. With these tips, you have the confidence to clear out all the clutter so as not to lose any of your data. With these steps, your Mac OS X will bolt ahead at full speed.
How to speed up OS X El Capitan?
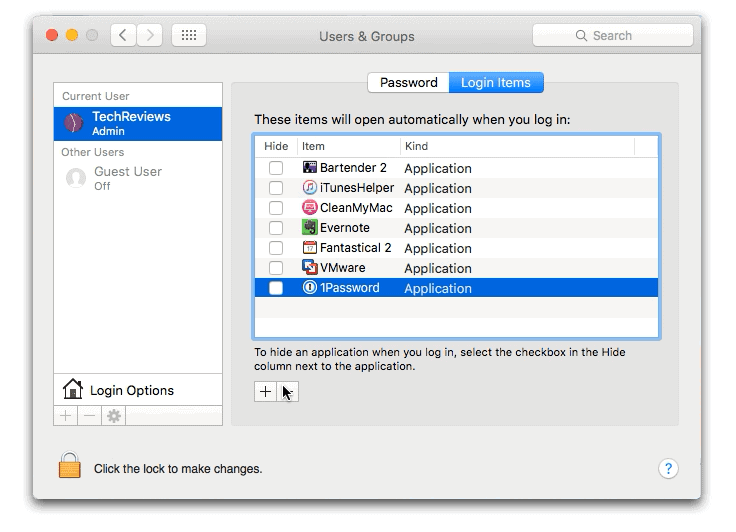
1. El Capitan Slow Login
A clean startup helps to speed up a MacBook which is running slow. With a fast Mac, there is no wasting time trying to get login. You get instant access to all the programs that you need to use and as a result, your Mac gains in speed. This optimization means a huge leap in terms of your computer’s performance which is definitely a boon for you. As your computer fires up faster, so will the apps start and perform stably over a huge period of time.

Go to your System Preferences > Users & Groups and then click on your username. Now click on “Login Items,” select a program you don’t immediately need when your Mac starts up, and click the “-” button below. Taking care of these startup programs is an easy way to help you fix El Capitan Slow Login.
2. Clean Up Your Hard Drive
If you want the most bang for your buck, cleaning your hard drive is by far the best and easiest way to speed up your Macbook. Go through your hard drive and clean out everything that’s slowing it down! What exactly is slowing it down? Caches, logs, apps, widgets, language packs, plugins, hidden trashes, and large files. Get rid of these things to fix OS X El Capitan Slow! The best part is that you can do this all manually! However, finding all of these things and removing them takes time, plus you have to know where to look. But you’ll get the biggest increase in speed by cleaning your hard drive!
“Actually, that sounds kind of difficult…”
Luckily, there are tools to help you clean out all that junk. One of the best tools is CleanMyMac 3! CleanMyMac 3 knows what files to remove, where they are, and how to completely remove them. You just click Scan… and then Clean to completely remove gigabytes of unnecessary files. It’s incredibly easy to use!

Clean My Mac 3 is available for a FREE download here
3. Get Rid of Unwanted Programs
When you simply trash apps, only the .app file gets removed. However, most applications usually generate service data that gets stored in other different places. If you wish to remove an app, always remember to select it using the checkbox beside it. Not only can you select apps for total removal, but they can also be reset to their initial state by getting rid of all unrelated files thus keeping the file in the system. CleanMyMac is able to find and remove these files related to the app, freeing up more space on your hard drive.

4. Get rid of preference panes
If you have custom items in your preference pane and you do not use them then CPU usage is being taken up. To take care of this, right-click an item then select remove from the Preferences pane.

5. Update Software
Newer versions of software are always good to have as they are updated to take care of bugs and security vulnerabilities. This also comes with performance enhancement thus making sure that your Mac runs smoothly and efficiently.

6. RAM Upgrade
Upgrading your RAM is definitely the best solution for improving the performance of your Mac. Before going ahead and spending your money, find out how much difference will be made. You can do this easily by firing up the Activity Monitor, clicking on the memory tab keeping an eye on the memory pressure gauge at the bottom of the window. This upgrade should be able to take care of fast, reliable performance while running several apps and you do not have to rely on the hard drive for additional space.

7. Is your Macbook compatible?
If you had downloaded the previous version of OS X Yosemite, then your MacBook is compatible with the new OS X El Capitan. This means that your Macbook meets the system requirements. This also includes at least 4GB of memory and storage space of about 8.8GB. The OS X El Capitan aims at improving effectiveness and general performance of Macbook through a number of features. These include the ability to work with a Gmail account from the mailbox. Javascript is now functional in web pages in Safari. Multiple apps can be opened while opening and sharing raw and live photos through airdrop and messages is easier than before. Compatible list:
- iMac (Mid 2007 or newer)
- MacBook Air (Late 2008 or newer)
- MacBook (Late 2008 Aluminum, or Early 2009 or newer)
- Mac mini (Early 2009 or newer)
- MacBook Pro (Mid/Late 2007 or newer)
- Mac Pro (Early 2008 or newer)
- Xserve (Early 2009)
However, the El Capitan can make your computer slow after the update. This may cause a freezing problem and a general reduction in performance of Macbook. Other related problems such as Wi-Fi, battery, spotlight and many others may also arise. These can be fixed through a number of ways which include
8. Reset SMC and PRAM After El Capitan Update
Although resetting these controllers may not be precise due to the sluggishness of El Capitan, they improve performance. This is by resetting some slight system controllers that could have been interfered with during update. This does not erase any of the user’s data. When your Macbook slow after El Capitan update, you should reset SMC and PRAM.
To reset SMC on Mac mini, Mac Pro, iMac or Xserve: you need to turn off your computer then turn it on normally. You just turn it off with the shutdown key, remove the power cable and wait for about 15 seconds. You then return the power cable, wait for about 5 seconds then you turn your MacBook on.
To reset SMC on MacBook Pro or MacBook Air: you have to shut down your computer then ensure that the power cable is plugged in. You then press and cling to the left shift plus option, control, and power buttons for not less than 10 seconds. You then release all the keys at once and power on your computer normally.
To reset PRAM: you need to shut your Mac down. You then put it on and immediately press and hold option plus command, P and R buttons at once. This should be done before the gray boot up is displayed on the screen. You hold on to the keys and release them immediately the computer restarts. You may also need to adjust your speaker volume, display setting, and startup disk options.
With these useful tools and tips, you will definitely be able to help your Mac run a little faster and you will be happy with the additional performance. This improvement by a huge factor means that you will not be constantly bothered by your Mac running slow or some apps refusing to work the way they are supposed to. With this, you will become much more productive regardless of the restrictions that come with slow computer performance.
New Tutorial: macOS High Sierra Slow? Fixes Here


SLOW INTERNET: FINALLY, THE THING THAT WORKED WAS GOING INTO LAUNCHPAD (applications) > UTILITIES > AIRPORT UTILITY > CLICK ON THE WIFI UNIT ICON (in my case Airport Extreme) > ENTER USERNAME AND PASSWORD TO MAKE CHANGES > IN THE UTILITY WINDOW IN THE BASE STATION TAB, I CHANGED THE NAME OF THE BASE STATION (update button is available then) > CLICKED UPDATE IN THE LOWER RIGHT CORNER… WHICH RESET THE UNIT AND I THINK DID A FIRMWARE UPDATE AUTOMATICALLY (if not, update the firmware somewhere) > THEN ON THE INTERNET TAB IN THE WINDOW, CLICK RENEW DHCP LEASE After trying everything else, this was the only thing that worked!!! Internet is back to being fast!
Thanks Jason!